WARNING: The blades are sharp; handle them with care.
- Cut the foods into small pieces (1.5 x 1.5 cm) and place them inside the bowl (P) or for mixing,
insert the ingredients.
WARNING: Never add foods over the maximum level marked on the bowl (P).
- Fit the lid (O) over the bowl (P) moving the mark inside the bowl (P) so that it is in line with the
symbol ( ). Block the lid (O) so it clicks into place by moving it clockwise ( ) (Fig. 6).
WARNING: Make sure that the lid is firmly locked into place before starting the appliance.
- Plug the appliance into the mains power.
- Start the appliance, selecting the rotation speed of the blade using the operating dial (A).
The appliance has two operating speeds: minimum «1» and maximum «2».
WARNING: When the appliance is used to mix or whisk, we recommend starting at speed “1” and
then passing on to speed “2”. When used to chop, it is advisable to use the pulse function, turning
the dial (A) anticlockwise to the “P” setting. For optimum use, press the button in short bursts (2/3
sec.).
WARNING: Never operate the appliance for more than 30 seconds at a time. Wait at least 2 minutes
before operating it again.
- For smoother, finer chopped foods, remove the food, if necessary, from the sides of the bowl with
a spatula, pushing it towards the centre.
WARNING: Never remove foods from the sides of the bowl while the appliance is operating. Switch
off the appliance first and unplug it from the mains power.
WARNING: To prevent accidents or damage to the appliance, always keep hands and cooking
utensils well away from moving blades or discs.
WARNING: Never use your fingers to remove food from the sides of the bowl while the appliance is
operating. Always use the special spatula.
- If it is necessary to add foods during appliance operation, use the opening in the lid (O). Push the
foods down with the pusher (G) on its own (Fig. 7).
WARNING: Never insert foods by hand. Always use the pusher.
- To stop the appliance, turn the dial (A) to “0”.
Slicing
WARNING: The blades are sharp; handle with care.
- Fit the the slicing blade (M) into the blade disc (I) so that the hole in the blade is in the centre of
the disc (Fig. 8).
- Fit the assembled blade support disc (I) on the motor shaft (C), gripping it by the relevant slots
and keeping the blade so it is facing upwards (Fig. 9).
- Fit the lid (O) over the bowl (P) and proceed as described in the section “Chopping, mixing”.
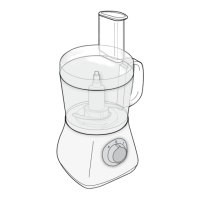
INSTRUCTIONS FOR BLENDER USE
- Fit the blender (L) onto the power base (B) and turn it clockwise until it clicks into place and so that
the tabs on the blender fit perfectly into the slots in the power base (Fig. 10).
- Fit the lid (L) onto the blender (N) and press it gently down until fully inserted (Fig. 11).
- Insert food previously prepared through the hole of the cover (L), without exceeding the max. level
indicated on the blender (N), and then place the cap (H) onto the cover (L), so that the notches of