NOTE FOR ELECTRICIAN:
The security Sensor should be wired to its own
switch. Before installation/maintenance, the
electrical supply should be isolated. Switching
off the wall switch is NOT sufcient isolation to
prevent electrical shock.
LUX – LIGHT LEVEL ADJUSTMENT CONTROL
Adjusts the light level at which the Security
Sensor operates. Adjust to , the unit will
operate day and night. Adjust to , the unit
will operate only at night when movement is
detected.
Time – time “ON” adjustment
Varies the length of time the light will stay ON
from about 10 seconds to 7 minutes. Turn clock-
wise to increase ON-time – ideal setting is about
10 o’clock position (approximately 2 minutes).
Whilst there is movement within range of the
unit, the light will remain ON. When no further
movement is detected, the light will switch OFF
after the pre-set time has elapsed.
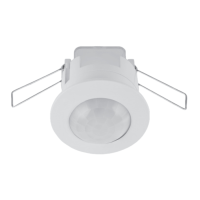
To achieve best results the Arlec Security
Sensor should be mounted in a ceiling, or under
eaves of a building, generally used to control an
existing light tting. The Security Sensor should
be mounted 2.2 - 4 metres above the area to be
scanned (Refer Figure.1).
To avoid nuisance triggering, the sensor
should not be installed near heat sources such
as barbecues, air conditioners, other outside
lighting, moving cars and ue vents.
Do not install near reective surfaces such
as smooth white walls, swimming pools, etc.
The Arlec Security Sensor scanning
specications (approximately 6 metres at 360°)
may vary slightly depending on the mounting
height and location.
The detection range of the unit may also alter
with temperature change. Before selecting a
place to install the Arlec Security Sensor, you
should note that movement across the scan
area is more effective than movement.
directly toward or away from the sensor
(Refer Figure.2A). If movement is made walking
directly toward or away from the sensor and not
across it, the apparent detection range will be
substantially reduced (Refer Figure.2B).
WARNING: Must be installed by a licenced
electrician or other person authorised by
legislation to work on xed wiring of an electrical
installation.
1. Cut a circular hole into the ceiling, to
accommodate the sensor body (care should
be taken to avoid cutting into concealed
electrical wiring).
2. Remove the clear plastic terminal cover by
displacing locating clips with a screwdriver
blade and unscrew the front screw Figure 4.
3. Run the mains wiring to the product
terminating in accordance with Figure 3A & 3B.
4. Replace the clear plastic terminal cover
and secure wires with anchorage clamp.
5. Fold metal xing springs to vertical position
and insert complete wired assembly upward
through hole. Fixing springs with then snap
downward, retaining sensor in position
Figure 5.
Where to fit your
security sensor
installing your
security sensor
Ceiling
IMPORTANT: Be careful of electrical shock.
Always remember that the light may not switch
ON during daylight or the light maybe in the
automatic OFF mode. Never touch live areas
unless fuse is removed or circuit breaker is in
OFF position at the switchboard main.
For best results and operation the following
steps should be taken:
1. Mount the sensor above the desired area
to be scanned.
2. Turn the light level control fully clockwise
and time control fully anti-clockwise.
3. Turn the wall switch ON, light will come ON
for 10 seconds and then go OFF, provided that
there is no movement in the detection area.
setting the controls
understanding
the controls
Figure 4 Figure 3B
Figure 5