EasyManua.ls Logo

ARMORDILLO CR X User Manual

ARMORDILLO CR X
10 pages
To Next Page IconTo Next Page
Page #1 background imageLoading...
Page #1 background image
IMAGE IS FOR REFERENCE,
SHOWN WITH ADDITIONAL ACCESSORIES
CR X Chase Rack
STOP
Verify part and application is correct before proceeding.
If missing part or damage item please customer service directly.
Monday - Friday 9am-6pm PST (909)895-4522
Email - SUPPORT@ARMORDILLOUSA.COM
We strongly recommend reading through the installation
guide before installation.
1/2020 4100 REV2
ARMORDILLO RECOMMENDS PROFESSIONAL INSTALLATION ON ALL THEIR PRODUCTS
WARNING: When working on ,under or around vehicle exercise caution. If working without a lift check vehicle owners manual for correct jacking points.
Always wear safety glasses and ensure a safe working area. Serious injury or death could occur if safety measures are not followed.
PERIODICALLY CHECK TO ENSURE ALL FASTENERS ARE TIGHT AND ALL STRUCTURAL COMPONENTS ARE SOUND
CARE
To protect your investment, wax this product after installing. Regular waxing is recommended to add a protective layer over the
finish. Do not use any type of polish or wax that may contain abrasives, that could damage the finish.
For stainless steel: Aluminum polish may be used to polish small scratches and scuffs on the finish.
Mild soap may be used to clean bull guard.
For color finishes: Regular waxing is recommended to add a protective layer over the finish.
Mild soap may be used to clean the bull guard.
ARMORDILLO products are designed as decorative accessories and should not be relied upon as protection for the vehicle or passengers. Buyers assume all
risk and liability whatsoever resulting from installation and use of ARMORDILLO products. ARMORDILLO assumes no liability for injury, loss, incidental or
consequential damages in the event of an accident.
ARMORDILLO guarantees the original purchaser a LIMITED 5 YEAR WARRANTY from data of purchase against manufactured defects in materials,
workmanship and finish under normal use. This excludes damage resulting from road hazards, debris, product misuse, improper installation, impairments from
accidents, neglect, shipping or product modification. This warranty applies only to new products and is limited to the repair or replacement of ARMORDILLO
products. Warranty does not included cost of removal, installation, labor, freight, inconvenience, or consequential damage. Original purchaser must return
defective merchandise to the original place of purchase and must provide the proof of purchase.
21912 Garcia Ln, Walnut, CA 91789 (909) 895-4522
WWW.ARMORDILLOUSA.COM SUPPORT@ARMORDILLOUSA.COM
Question and Answer IconNeed help?

Do you have a question about the ARMORDILLO CR X and is the answer not in the manual?

ARMORDILLO CR X Specifications

General IconGeneral
BrandARMORDILLO
ModelCR X
CategoryAutomobile Accessories
LanguageEnglish

Summary

Professional Installation Recommendation

Product Care Guidelines

Instructions for maintaining the product's finish, including waxing and cleaning methods.

Chase Rack Parts and Tools

Parts List

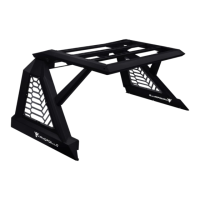
Lists all components included in the Chase Rack package.

Tool Requirements

Details the necessary tools for installing the Chase Rack.

Installation Tips

Provides essential advice for a successful Chase Rack installation.

Hardware Reference Chart

Outlines torque specifications and socket sizes for Chase Rack hardware.

Chase Rack Installation Walkthrough

Assemble Side and Middle Sections

Connects side panels to the middle section using M8 hardware and tightens to 30 ft. lbs.

Prepare Truck Bed Mounting Points

Positions rack, marks holes, drills pilot holes, and prepares for nutsert installation.

Install Nutserts/Rivet Nuts

Installs nutserts into drilled holes using a tool or alternative method for secure bolt attachment.

Attach Chase Rack to Truck Bed

Mounts the chase rack to the bed using M10 hardware, washers, and lock washers, torquing to 50 ft. lbs.

Periodic Inspections

Emphasizes regular checks to ensure all hardware remains secure and tight.

Roof Rack Professional Installation

Roof Rack Product Care

Instructions for maintaining the roof rack's finish, including waxing and cleaning.

Roof Rack Parts and Tools

Parts List

Lists all components included in the Roof Rack package.

Tool Requirements

Details the necessary tools for installing the Roof Rack.

Installation Tips

Provides essential advice for a successful Roof Rack installation.

Hardware Reference Chart

Outlines torque specifications and socket sizes for Roof Rack hardware.

Roof Rack Installation Walkthrough

Assemble Rack Components

Lays out and assembles side panels, front panel, and cross bars using M8 hardware.

Over the Cab Configuration

Details installing vibration dampers and connecting the roof rack portion over the cab.

Over the Bed Configuration

Details attaching the roof rack portion to the base rack and connecting support bars.

Periodic Inspections

Emphasizes regular checks to ensure all hardware remains secure and tight.

Wiring Information

Electrical Safety Warnings

Critical safety precautions for electrical work, including seeking qualified specialists.

Disclaimer of Liability

States user acceptance of risk for property damage or personal injury from electrical work.