9
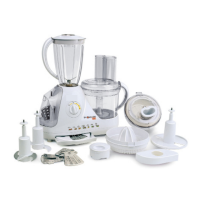
BowlCapacity :300g-1200g./1500ml.
JuiceExtractor :600ml.
CitrusPressCapacity :1500ml.
BlenderCapacity :1000ml.
UsedLife :7Year
Max.NoiseLevel :Lessthan70dB(A)ENISO7779
Tosetthecorrectspeed,turntheOn/Offswitchtospeed“1”,“2”or“3”.Tostoptheappliance
returntheswitchthe“0”position.Pulsefunctionremainsonaslongastheswitchisheld
in the “P” pulse position (Figure 2). At the application and procedures tables you can see
“1-->2”signforspeedsetting.Thatmeans,firstplacetheswitch“1”positionandthan
change the position to “2”.
IV. OPERATING THE APPLIANCE
MIXING AND KNEADING (Figure 4)
• Youcanmixorkneadupto1000gofsoup,doughorpastrybyusingChoppingBlade
or Kneading Blade.
• Placethe bowloverthe driveshaft,locate onmotorbaseandrotatethebowl
anticlockwiseuntilitlocksintoposition.(Figure3)
• Placethechoppingorkneadingbladeontodriveshaftinthecenterofthebowl.Putthe
ingredientsinthebowl.(Figure4)
• Placethebowllidontopofthebowl.Rotatethelidanticlockwiseuntilthelockingtabs
slide in to the inner locking slot on the base and the handle. (Figure 5)
• Forkneadingthedoughorpastryoperations,don’tputwaterintothebowlatthebeginning.
Pourthewaterthroughthefillingtubewhiletheprocessorisrunning.Addthewateror
otherliquidinaslow,steadystream,onlyasfastasdryingredientsabsorbit.Ifliquid
sloshes or splatters, stop adding it but do not turn off processor. Wait until ingredient in
bowlhavemixed,thenaddremainingliquidslowly.
• ApplicationsandproceduresismentionedintheTable1.
CHOPPING BLADE (F1) Table 1
Ingredient Quantity Speed Setting Work Time
Soup 1000 ml. 1 --> 3 20 sc.
KNEADING BLADE (F2)
Ingredient Quantity Speed Setting Work Time
SweetDough 1000gr. 3 20sc.
Cake/BreadDough 1000gr. 3 20sc.
Pie/PastryDough 1000gr. 3 20sc.
CHOPPING (Figure 4)
• ChoppingBladeisusedforchoppingprocess
• Placethebowloverthedriveshaft,locateonmotorbaseandrotatethe
bowlanticlockwiseuntilitlocksintoposition.(Figure3)
• Placethechoppingbladeintothedriveshaftinthecenterofthebowl.Put
theingredientsinthebowl.Pre-cutthelargeingredientpartsintosmall
piecesbeforeputtingthaninthebowl.Ifyouchoppingmeat,useonly
boneless meat. (Figure 4)
• Placethebowllidontopofthebowl.Rotatethelidanticlockwiseuntilthe
locking tabs slide in to the inner locking slot on the base and the handle.
(Figure 5)
• ApplicationsandproceduresismentionedintheTable2.
CHOPPING BLADE (F1) Table 2
Ingredient Quantity Speed Setting Work Time
Vegetables 600 gr. 2 10 sc.
Carrots 600 gr. 2 30 sc.
Tomatoes 600 gr. 2 20 sc.
Onion, Garlic 500 gr. PULSE 5 sc.
Herb, Parsley 100 gr. PULSE 5 sc.
Nut,Wallnut 500gr. 2 5sc.
Cheese 300 gr. PULSE, 2 10 sc.
Salami, Hot dog 500 gr. PULSE, 2 10 sc.
Meat, Fish, Poultry 500 gr. PULSE, 2 20 sc.
Frozen Fruit 1000 gr. 2 20 sc.
BLENDING / PUREEING (Figure 12)
• Blenderisusedforblendingorpureeingprocess.
• Thebowlandbowllidmustbelockedintopositionfortheblendertooperate.
Noblade,discoranotheraccessoriesarerequiredtoputintobowl.
• Placethebowloverdriveshaft,locateonmotorbaseandrotatethebowl
anticlockwiseuntilitlocksintoposition.(Figure3)
• Placethebowllidontopofthebowlandrotatethelidanticlockwiseuntil
the locking tabs slide in to the inner locking slot on the base and the handle.
(Figure 5)
• Removetheblendersafetylockingcoverbyrotatingclockwisetounlock
and lifting it out.
• Placeblenderjugontothemotorbase,turnthejuganticlockwiseuntilit
locks into place. (Figure 12)
• Puttheingredientsintheblenderjug.
• Placetheblenderlidintopositionontopofjugandrotateantilockwiseuntil
it locks into place. (Figure 12)
• Attachthelidstopperbypressingitdown.
• Afteruse,alwaysremovejugfrombaseandinsertblendersafetylockcover.To
removejug,holdhandleandturninaclockwisedirection.
• ApplicationandproceduresismentionedintheTable3.
BLENDER JUG Table 3
DRINKS,
MILKSHAKES,
LEMONADE,
BUTTERMILK
Fillthejugtoatleast1/4fullremembertoleaveroomtoallowfroth
to form as the drink is aerated.
GROUND,COFFEE Coffee beans can be ground finely enough for infusion
or for a percolator. Blend 1/4 cup beans at a time.
ICE Tocrushice,place1cupicecubesand1/4cupofwaterintothejug
andprocessusingthePULSEswitch.Thiswilltakeapproximately
15 seconds.
SOUPS, SAUCES Placethelessthan1000ml.mixtureinthejugforpureeing.Speeds
2-3, until desired consistency.
MAYONNAISE,
DRESSINGS
Afterplacingthemixtureexceptoilinthejug, pouroilintothe
juggraduallythroughopeninginlidwithmotorrunning.Blend
on speed 2.
WHIPPED,CREAM Place1cupcreamwithsugarandvanillaintothejug.Blend
until thickened.
COOKEDPEAS,
BEANS,POTATOES
Placethecookedvegetablesinthejugforpureeing.Ifnecessary,
addsomeliquidlikemilkorwatertoimprovetheconsistencyof
the mixture.
FRUIT Placethefruit(e.g.apples,peaches,bananas)inthejugfor
pureeing.Ifnecessary,atlittlelemonjuicetopreventthefruitfrom
discolouring or add some liquid to obtain a smooth puree.
BEATING / WHIPPING (Figure 7)
• CreamAttachmentisusedforbeatingorwhippingprocess.
• Placethebowloverthe driveshaft,locate onmotorbaseandrotatethebowl
anticlockwiseuntilitlocksintoposition.(Figure3)
• PlacetheCreamAttachmentontothedriveshaftinthecenterofthebowl.Putthe
ingredientsinthebowl.(Figure7)
• Placethebowllidontopofthebowl.Rotatethelidanticlockwiseuntilthelockingtabs
slide in to the inner locking slot on the base and the handle. (Figure 5)
• ApplicationsandproceduresarementionedintheTable4.
CREAM ATTACHMENT Table 4
Ingredient Quantity Speed Setting Work Time
Mayonnaise 600 ml. 1 15 sc.
Souces 600 ml. 1 20 sc.
Egg 10 ea. 1 --> 2 5 sc.
Icecream 500 gr. 1 --> 2 20 sc.
Whipping Cream 500 gr. 1 --> 2 20 sc.
Lemonade, Buttermilk 700 ml. 2 10 sc.
SweetDough 700gr. 1-->2 1min.
GRATING / SLICING / CHIPPING (Figure 6)
• Discsetsareusedforgrating,slicingandchippingprocess.
• Placethebowloverthe driveshaft,locate onmotorbaseandrotatethebowl
anticlockwiseuntilitlocksintoposition.(Figure3)
• Withthesmoothfaceofthediscplateuppermost,fittherequiredbladeintothedisc
holder. To do this, first identify the recess marked “PUSH” along one of the long sides
of the blade. Insert the retaining slot on the opposite side in to the disc holder. Then
gentlypushdownontheareaofthediscmarked“PUSH”toclickthemetaldiscinplace.
Place disc holder on to the disc shaft ensuring that slots on top of shaft are located on
the underside of the disc holder. Place the disc holder and shaft on the drive shaft in
thecenterofthebowl.
• Placethebowllidontopofthebowl.Rotatethelidanticlockwiseuntilthelockingtabs
slide in to the inner locking slot on the base and the handle. (Figure 6)
• Pre-cutthelargeingredientpartsintosmallpiecesbeforefillingtheminthebowl.
• Inserttheingredientintothefillingtubeandusethepushertoguidethroughthetube.
Neverusefingerstopushfooddownthefillingtube.(Figure9)
• Whicheverplateisbeingused,speed2orpulseisrecommended.Youcanincreasethe
speedto3ifnecessary.Don’tusespeed1.
• ApplicationsandproceduresismentionedintheTable5.
COARSE AND MEDIUM GRATING DISC (C5, C4) Table 5
ONIONS,POTATOES,
CELERIAC, APPLES
PEARS
Pack into the filling tube and process using firm pressure. Peel and cut into pieces
if necessary to fit the filling tube.
CARROTS,
CUCUMBER,
TOMATOES, CABBAGE
Preparethevegetablesandpackintothefillingtube.Packingverticallywillgive
shorter shreds than packing horizontally. Process using firm pressure.
CHEESE Cut the cheese to fit the filling tube snugly process using light pressure on the pusher
to prevent the cheese crumbling.
FINE GRATING DISC (C3)
CHOCOLATE Break chocolate into pieces to fit the filling tube and process using firm pressure.
ONIONS Peeltheonionsandchopintohalves.Placeonionsinthefillingtube,cutedgedown.
Process using firm pressure.
GARLIC Peel and place minimum 250 g. into the filling tube and process using firm pressure.
Tohelpwashtheingredientsthrough,pour1/4cupoliveoil.
SLICING DISC (C1)
ONIONS Peel the onions and halve if to large to fit into the filling tube. Please them in
the filling tube.
CARROTS,EGGPLANT,
BANANAS,
CUCUMBERS
For rings arrange foods vertically in the filling tube, cutting them so they are even
in height. For slices arrange foods horizontally in the filling tube and process
using firm pressure.
MUSHROOMS Pack the mushrooms in the filling tube on their sides and process using firm pressure.
APPLES, PEARS
BEANS,GREEN
PEPPER
Peel if desired and quarter the fruit. Lie the quarters on their sides in the tube Cut
into lengths, pack horizontally into the filling tube and process using firm pressure.
CHEESE Cutthecheeseintopieceslargeenoughtojustfitthefillingtube.Processusinglight
pressure on the filling tube to prevent cheese crumbling.
CABBAGE Cutcabbageintowedgestofitfillingtubeandprocessusingfirmpressure.
LETTUCE Separate the leaves of the lettuce, roll them firmly, pack into the filling tube and
process using firm pressure.
 Loading...