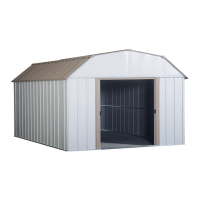
Do you have a question about the Arrow CO1014-C1 and is the answer not in the manual?
| Brand | Arrow |
|---|---|
| Model | CO1014-C1 |
| Category | Outdoor Storage |
| Language | English |
Study and understand this owner's manual for easier construction.
Review all instructions before you begin assembly for successful results.
Building must be anchored to prevent wind damage and a base is necessary for level construction.
Check to be sure that you have all the necessary parts for your building.
Select a dry and calm day for installation; avoid wind and wet ground.
Two or more people should work together for easier assembly.
Lists basic tools and materials needed for construction.
Choose a level area with good drainage and sufficient working space.
Handle pieces carefully, wear gloves, eye protection, and long sleeves.
Practice caution with tools; be familiar with power tool operation.
Keep children and pets away from the worksite to avoid accidents.
Do not assemble if parts are missing; call for assistance.
Ensure ladder is open and on even ground; do not concentrate weight on the roof.
Do not attempt assembly on a windy day due to panel "sail" effect.
Periodically clean and wax the exterior surface; touch up scratches.
Keep roof clear of leaves and snow; consider strengthening kits for snow country.
Keep door tracks clear; lubricate annually; keep doors closed and locked.
Use washers; regularly check and retighten loose screws, bolts, nuts.
Use a plastic sheet (vapor barrier) under the floor for good ventilation to reduce condensation.
Wash off part numbers; use silicone caulking for watertight seals.
Extra roof beams and braces for added protection against heavy snow.
Kits to anchor the building to the ground or concrete.
Organizer for tools; fits all Arrow storage buildings.
A simple floor frame system made of heavy-duty galvanized steel.
Steel bars to install quickly and easily for storage or workbench.
Heavy-duty galvanized steel shelf units to organize storage space.
A simple kit recommended for a base; keeps items above ground.
Build your own base using treated lumber and plywood.
Pour a concrete slab at least 4" thick, level and flat.
Anchors with cable and clamps for use with any base.
Secure building to wood or posts using wood screws.
Anchors to concrete slab or footing using lag screws.
Securing the building to a concrete slab or footing.
Lists and identifies screws, nuts, bolts, washers, and other hardware.
Detailed list of all parts with key numbers, part numbers, descriptions, and quantities.
Visual guide showing how parts fit together using key numbers.
Instructions for assembling the front, side, and rear floor frames.
Assembling rear wall channels, side wall channels, rear wall angles, and side wall angles.
Instructions for assembling the main roof beam and side roof beam assemblies.
Assembling the door track using a splice, track pieces, and door slides.
Assembling the four corners of the floor frame and ensuring it is square and level.
Attaching corner panels and front/rear wall panels to the floor frame.
Fastening rear and side wall channels to provide rigidity to walls.
Fastening rear wall angle, side wall angles, and door track assembly to the top of walls.
Securing wall panels to the frame and wall channels.
Fastening front wall channels and door jambs for door opening reinforcement.
Applying edge trim and joining large and small gables.
Lifting and fastening gables, and attaching single roof beams.
Fastening track supports, weather stripping, and roof beam braces.
Positioning and fastening the right roof panel to the roof beam and gable.
Installing the left roof panel and initial ridge caps.
Installing more roof panels and overlapping ridge caps.
Installing remaining roof panels, ridge caps, and peak caps.
Attaching side, right, and left roof trim to the lower end of roof panels.
Assembling the right door, including handle brace, vertical and horizontal braces.
Installing doors into door slides and adjusting them for proper fit.
Anchoring the completed building to the ground.
Instructions for installing a purchased Floor Frame Kit.
Manual for assembling the floor frame kit, including parts lists.
Specifies the type, quantity, and thickness of plywood needed.
Check local codes, follow directions, ensure parts fit, remove manual from carton.
Prepare the earth bed by removing sod, leveling, and tamping.
Instructions for cutting plywood to size and fastening it to the frame.
Diagrams showing dimensions and numbering for plywood sheets for different building sizes.
Rust is natural oxidation from moisture; problem areas include holes, edges, and scratches.
Avoid nicks, use washers, keep tracks clear, and touch up scrapes.
 Loading...