7
making sure that latch engages. (Fig 5).
STAPLES: Place staples into magazine from
outside (Fig 6). Never attempt to completely remove
pusher assembly as this may damage the tool and
void the warranty. Close pusher assembly until it
snaps into place. On very hard surfaces,firing recoil
may interfere with nail/staple penetration.Enhance
driving power by firmly placing one hand on top of
cap.(Fig 7).
5.2 Firing your tool
1. To fire your tool, make sure tool is powered on.
place down on your workpiece depressing the
contact safety on the front of the tool. Once the
contact safety is depressed, push the trigger to fire
your staple. You must pick up the front of the tool and
reactivate the contact safety for each shot. The tool
will operate in low temperatures down to 32°F (0°C)
and in higher temperatures up to 104°F (40°C).
5.3 How to determine proper staple leg size
In choosing the proper staple leg length for a job,
there are two basic things to consider:
1. Thickness of material to be stapled.
5. OPERATION
WARNING:Make sure you have read all safety
instructions. This tool comes completely assembled.
There is no assembly required. Make sure tool is
powered off before any of operations.
5.1 Operation
1. Make sure tool is powered off.
2. Power tool has a bottom load staple magazine.
Turn tool upside down and squeeze pusher
assembly (Fig 2).
3. Pull pusher assembly out until it stops to reveal the
staple magazine (Fig 3).
4. Place stick of staples or brad nails in the bottom
channel to the left of the channel (from the
perspective of looking down at the channel).
Push slide closed and make sure the latch
engages.
5. For brads, Be sure nail heads are pointing down.
For pin, be sure the flat end are pointing down, and
the sharp tip are pointing up. Push slide closed,
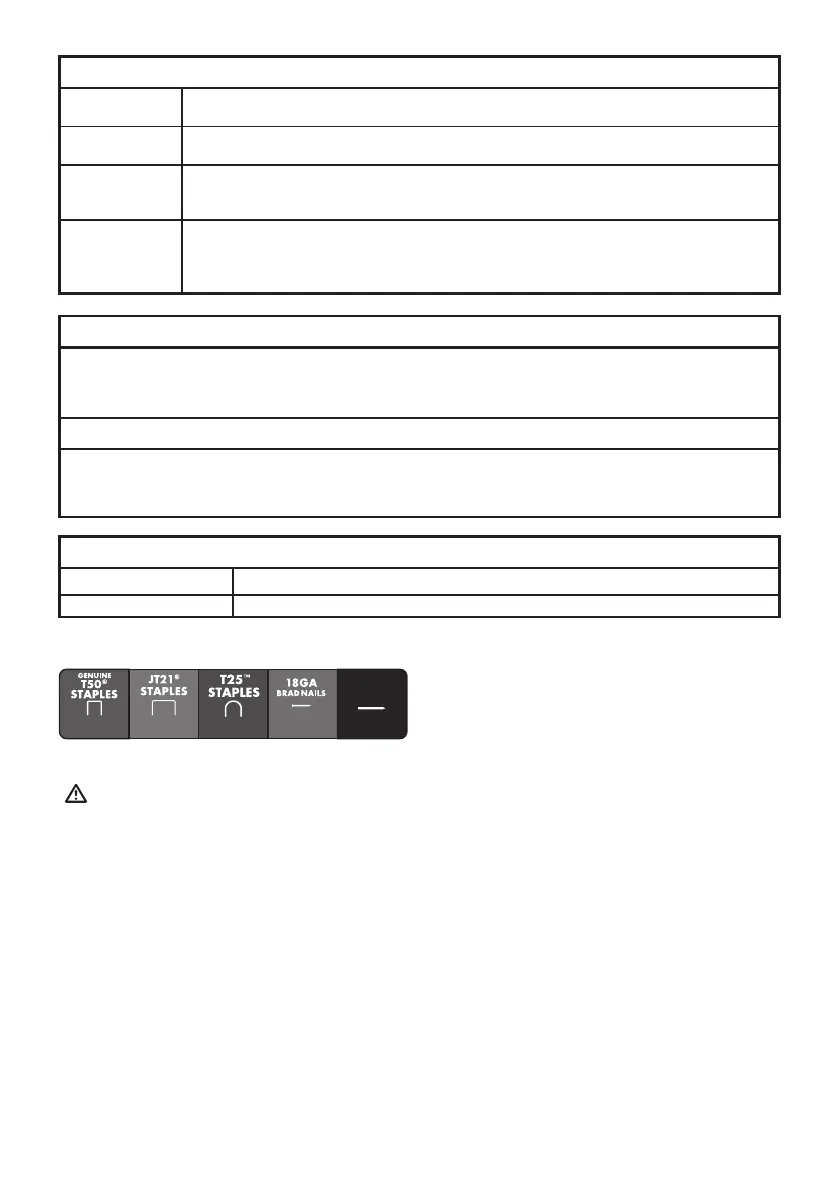
THE TRACKER CAN FIRE BELOW STAPLE & NAILS
6-10mm
(1/4"-3/8")
15mm
(5/8")
15mm
(5/8")
6-14mm
(1/4"-9/16")
10-14mm
(3/8"-9/16")
18GA
PIN NAILS
STAPLE LENGTH GUIDELINES
1/4” 6mm
5/16” 8mm
3/8” 10mm
1/2” 12mm
9/16”14mm
Can be used on window screens & shades, light draperies, shelf papers, closet lining, etc.
Can be used on light upholstery and other relatively thin materials.
LEG LENGTH
5/8”(15mm)
RECOMMENDED USES
Picture framing, small molding
BRAD AND PIN LENGTH GUIDELINES
Low Voltage Cabling (for cables less than 6mm Dia and 50V Max)
STAPLER: APPLICATIONS
• Upholstering
• Decor
• Wire
CANVAS/SCREEN APPLICATIONS
• Holiday Light
• Antenna wiring
• Telephone Wiring
• Alarm system wire
• Cable TV
• Audio System
• Stretching Canvas-Art
• Mesh/Screening
• Framing
• Framing Fabric
• Needlepoint
Can be used where thickness of material being stapled is substantial, for example,
foam insulation board or heavy folded draperies(about 1/4’’(6.3mm) to (9.5mm) thick).
(For cable 6mm max wire dia 50 V max voltage)
Can be used on insulation, weather stripping, wire mesh, carpet pads, canvas and other
materials of moderate strength where material thickness is up to about 3/16’’ maximum.
 Loading...