3
10. Because of the potential for inadvertent arterial
placement, one of the following techniques should be
utilized to verify venous access. Insert the fluid primed
blunt tip transduction probe into the rear of the plunger
and through the valves of the Arrow
®
Raulerson
Syringe. Observe for central venous placement via a
wave form obtained by a calibrated pressure
transducer. Remove transduction probe (refer to
Fig. 4).
Fig. 4
Alternate Technique:
If hemodynamic monitoring equipment is not available
to permit transducing a central venous wave form,
check for pulsatile flow by either using the transduction
probe to open the syringe valving system or by
disconnecting the syringe from the needle. Pulsatile
flow is usually an indicator of inadvertent arterial
puncture. Precaution: The color of the blood
aspirated is not always a reliable indicator of venous
access.
10
11. Using the two-piece Arrow Advancer™, advance
spring-wire guide through syringe into vein. Warning:
Aspiration with spring-wire guide in place will
cause introduction of air into syringe. Precaution:
To minimize the risk of leakage of blood from
syringe cap do not reinfuse blood with spring-wire
guide in place.
Arrow Two-Piece Advancer™
Instructions:
• Using your thumb, straighten the “J” by retracting
the spring-wire guide into the Arrow Advancer™
(refer to Figs. 5, 6).
Fig. 5
Fig. 6
When the tip is straightened, the spring-wire guide is
ready for insertion. Centimeter marks are referenced
from “J” end. One band indicates 10 cm, two bands
20 cm, and three bands 30 cm.
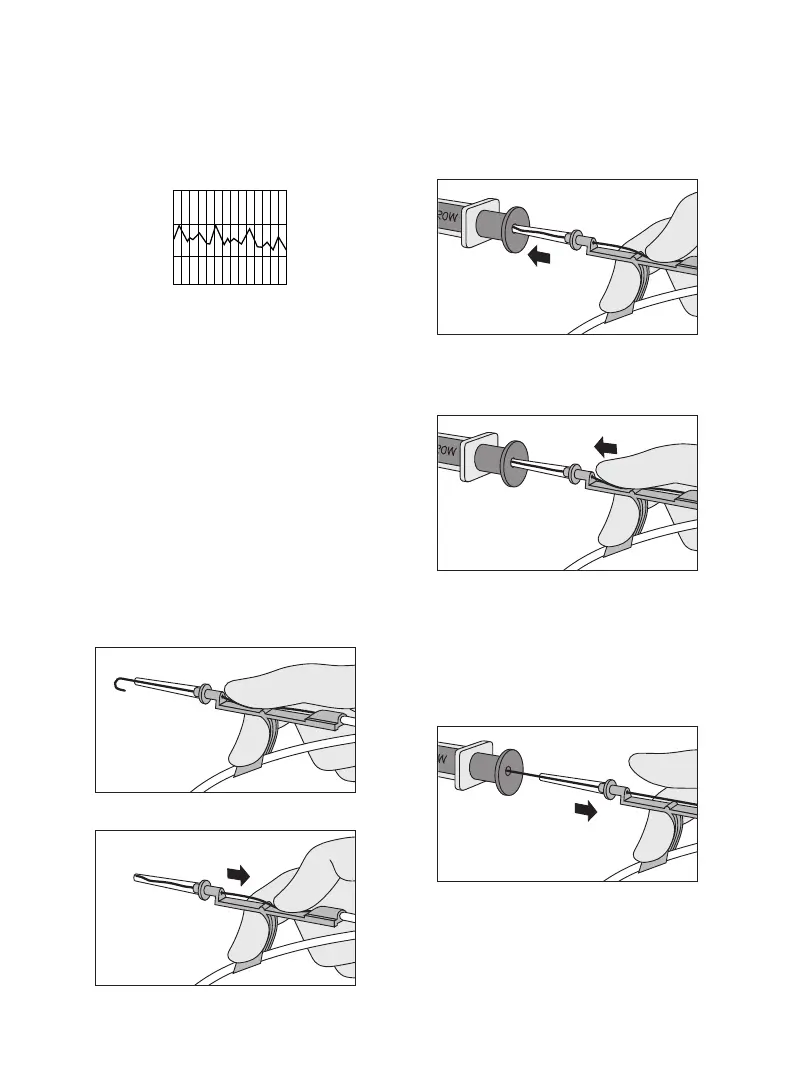
Introducing the Spring-Wire Guide:
• Place the tip of the Arrow Advancer™ – with “J”
retracted – into the hole in the rear of the Arrow
®
Raulerson syringe plunger (refer to Fig. 7).
Fig. 7
• Advance spring-wire guide into the syringe
approximately 10 cm until it passes through the
syringe valves (refer to Fig. 8).
Fig. 8
• Raise your thumb and pull the Arrow Advancer™
approximately 4 cm to 8 cm away from the syringe.
Lower thumb onto the Arrow Advancer™ and while
maintaining a firm grip on the spring-wire guide,
push the assembly into the syringe barrel to further
advance the spring-wire guide. Continue until
spring-wire guide reaches desired depth (refer to
Fig. 9).
Fig. 9
Alternate Technique:
If a simple straightening tube is preferred, the
straightening tube portion of the Arrow Advancer™
can be disconnected from the unit and used separately.
Separate the Arrow Advancer™ tip or straightening
tube from the blue Advancer™ unit. If the “J” – tip
 Loading...