4
portion of the spring-wire guide is used, prepare for
insertion by sliding the plastic tube over the “J” to
straighten. The spring-wire guide should then be
advanced in the routine fashion to the desired depth.
12. Advance the guide wire until triple band mark reaches
rear of syringe plunger. Advancement of “J” tip may
require a gentle rotating motion. Warning: Do not cut
spring-wire guide to alter length. Do not withdraw
spring-wire guide against needle bevel to minimize
the risk of possible severing or damaging of spring-
wire guide.
13. Hold spring-wire guide in place and remove introducer
needle and Arrow
®
Raulerson Syringe (or catheter).
Precaution: Maintain firm grip on spring-wire
guide at all times. Use centimeter markings on spring-
wire guide to adjust indwelling length according to
desired depth of indwelling sheath placement.
14. Enlarge cutaneous puncture site with cutting edge of
scalpel positioned away from the spring-wire guide.
Precaution: Do not cut guide wire. Lock scalpel in
the protected position.
15. Thread tapered tip of dilator/access device assembly
over spring-wire guide. Grasping near skin, advance
assembly with slight twisting motion to a depth
sufficient to enter vessel. Dilator may be partially
withdrawn to facilitate advancement of access device
through tortuous vessel. Precaution: Do not
withdraw dilator until the access device is well
within the vessel to minimize the risk of damaging
the catheter tip.
16. Advance access device assembly off dilator into
vessel, again grasping near skin and using slight
twisting motion.
17. To check for proper access device placement within
the vessel, attach syringe to distal side port for
aspiration. Hold access device assembly in place and
withdraw spring-wire guide and dilator sufficiently to
allow venous blood flow to be aspirated into distal side
port. Precaution: Maintain firm grip on spring-wire
guide at all times.
18. Holding access device assembly in place, remove
guide wire and dilator as a unit. Place sterile-gloved
finger over hemostasis valve. Warning: To minimize
the risk of possible vessel wall perforation do not
leave tissue dilator in place as an indwelling
catheter. Warning: Although the incidence of
spring-wire guide failure is extremely low,
practitioner should be aware of the potential for
breakage if undue force is applied to the wire. Flush
and connect distal side port to appropriate line as
necessary. Confirm and monitor proximal port by
aspirating until free flow of venous blood is observed.
Connect all pigtails to appropriate Luer-Lock line(s) as
required. Unused port(s) may be “locked” through
injection cap(s) using standard hospital protocol.
Pinch/slide clamps are provided on pigtails to occlude
flow through each lumen during line and injection cap
changes. Precaution: To minimize the risk of
damage to pigtails from excessive pressure, each
clamp must be opened prior to infusing through
that lumen.
19. Feed catheter through access device assembly into
vessel. Advance catheter to desired position.
Warning: Hemostasis valve must be occluded at all
times to minimize the risk of air embolism or
hemorrhage. If catheter introduction is delayed,
temporarily cover valve opening with sterile-gloved
finger until obturator is inserted. Use Arrow
®
obturator, either included with this product or sold
separately, as dummy catheter with hemostasis
valve assembly. This will ensure that leakage does
not occur and inner seal is protected from
contamination.
14
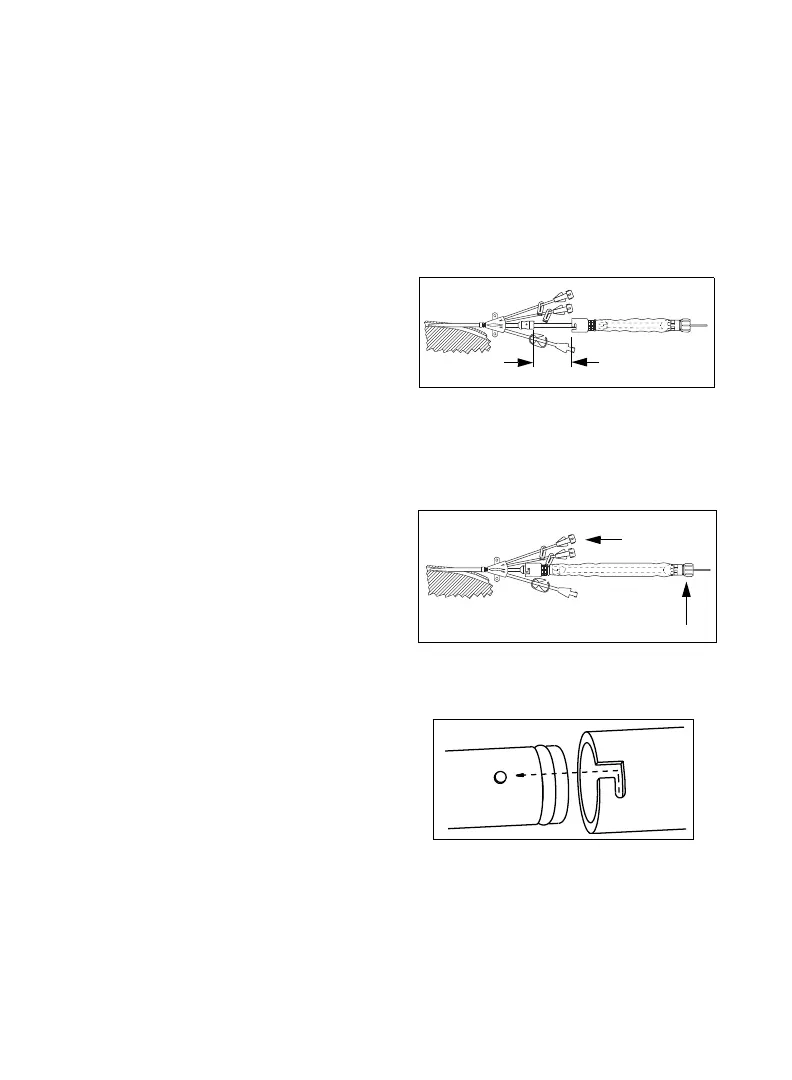
20. Hold access device in place and reposition catheter
contamination shield so that distal hub is
approximately five inches (12.7 cm) from hemostasis
valve (refer to Fig. 10).
Fig. 10
21. Hold rear hub (Tuohy-Borst adapter end) of catheter
contamination shield in place. Disengage distal hub
from inner feed tube by moving forward. Advance
distal hub forward toward hemostasis valve assembly.
Hold assembly in place (refer to Fig. 11).
Fig. 11
22. Press distal hub of catheter contamination shield over
assembly cap. Twist to lock (refer to Fig. 12).
Fig. 12
• Orient slot in hub with locking pin on assembly cap.
• Slide hub forward over cap and twist.
23. Grasp insertion catheter through front portion of
catheter contamination shield and hold in place while
repositioning Tuohy-Borst adapter end as desired
(refer to Fig. 13). Precaution: Do not reposition
Tuohy-Borst adapter end on insertion catheter once
moved to this final position.
Press distal hub over
cap seal (twist to lock)
Tuohy-Borst adapter
hold in place
Advance toward
Hemostasis valve
 Loading...