5
Fig. 13
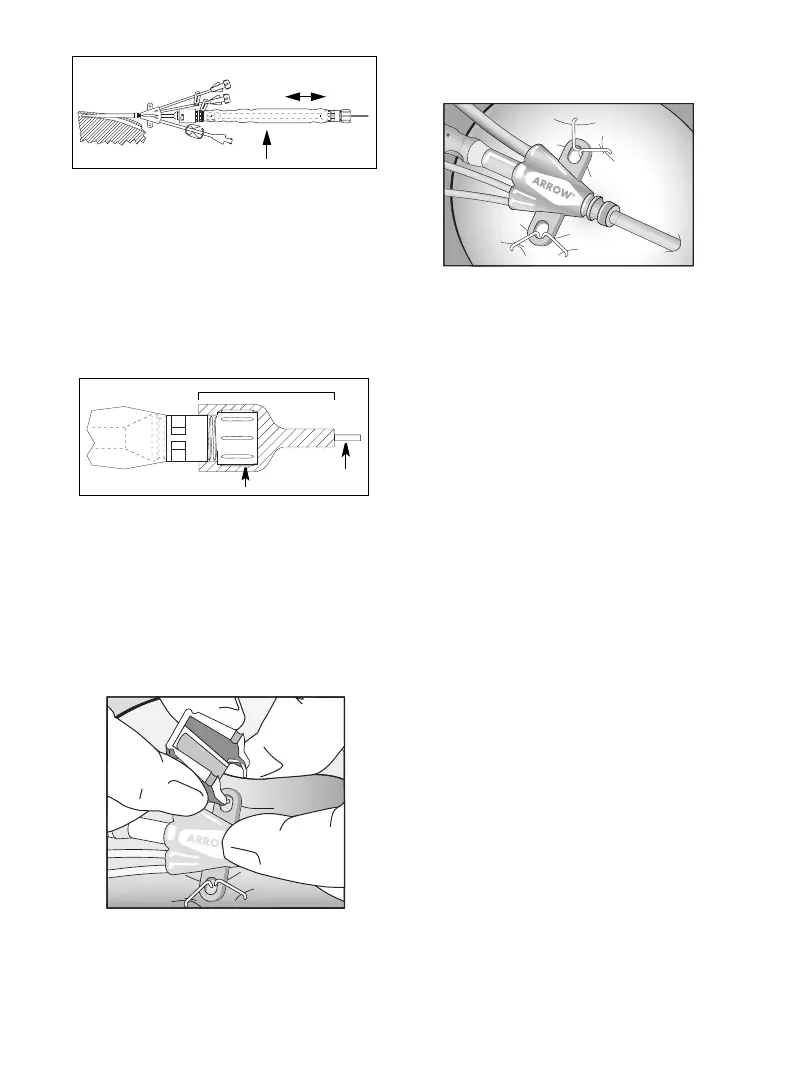
24. Tighten Tuohy-Borst adapter by pressing down on cap
and simultaneously turning clockwise to secure hub to
catheter. Gently pull insertion catheter to verify
securement. Precaution: Do not overtighten Tuohy-
Borst adapter to minimize the risk of lumen
constriction or insertion catheter damage.
25. Tuohy-Borst adapter end of catheter contamination
shield should be secured with sterile tape to inhibit
insertion catheter movement (refer to Fig. 14).
Precaution: Do not apply tape to the transparent
sheathing on the shield to minimize the risk of
tearing material.
Fig. 14
26. In kits where provided, secure access device to patient
using staple anchoring device or suture per hospital/
agency protocol. Precaution: Do not suture directly
to the outside diameter of access device to minimize
the risk of cutting or damaging access device or
impeding flow.
Staple Anchoring Device Instructions:
• Position thumb and index finger of dominant hand
on indented surface of staple anchoring device.
• Pass staple point through eye of access device suture
hub (refer to Fig. 15).
Fig. 15
• Tent skin and position with hub eye between staple
opening. Precaution: Do not place staple over
access device body or extension lines except at
indicated anchoring location to minimize the risk
of damage to access device.
• Firmly squeeze anchoring device together to close
staple and secure access device to skin (refer to
Fig. 16).
Fig. 16
• Repeat procedure through other suture eyes, if
applicable. Discard anchoring device upon
completion.
27. Dress puncture site per hospital protocol. Precaution:
Maintain the insertion site with regular, meticulous
redressing using aseptic technique.
28. Record the insertion procedure on the patient's chart.
Catheter Removal Procedure:
1. Precaution: Place the patient in a supine position.
2. Remove dressing, if applicable. Precaution: To
minimize the risk of cutting the access device, do
not use scissors to remove the dressing.
3. Twist distal hub of catheter contamination shield to
allow removal from locking pin on hemostasis valve
assembly. Withdraw catheter from valve. Warning:
Hemostasis valve must be occluded at all times to
minimize the risk of air embolism or hemorrhage.
Temporarily cover valve opening with sterile-gloved
finger until catheter or obturator is inserted.
Access Device Removal Procedure:
1. Precaution: Place the patient in a supine position.
2. Remove dressing, if applicable. Precaution: To
minimize the risk of cutting the access device, do
not use scissors to remove the dressing.
3. Using staple remover, remove staple(s), where
applicable, or remove sutures from primary suture site.
Precaution: Be careful not to cut the access device.
4. Withdraw device from hemostasis valve. Cover
hemostasis valve with sterile-gloved finger. Warning:
Hemostasis valve must be occluded at all times to
minimize the risk of air embolism or hemorrhage.
5. Warning: Exposure of the central vein to
atmospheric pressure may result in entry of air into
the central venous system. Remove access device
slowly, pulling it parallel to the skin. As access device
exits the site, apply pressure with a dressing
impermeable to air, e.g. Vaseline
®†
gauze. Because the
residual access device track remains an air entry point
until completely sealed, the occlusive dressing should
remain in place for at least 24-72 hours dependent
upon the amount of time the access device was
indwelling.
11,15,16,18
6. Upon removal of the access device, inspect it to make
sure that the entire length has been withdrawn.
7. Document removal procedure.
Reposition seal
end as desired
Grasp catheter here
Catheter
Tuohy-Borst adapter
Sterile tape
 Loading...