Problem: You need to add 3 mics to a mixer, which only has one
available channel.
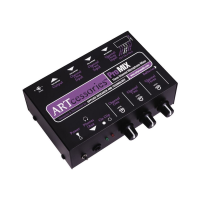
Solution: Insert a ProMIX between the mics and the mixer. Each
mic channel on the ProMIX has both phantom power and low-
frequency cut selectable via DIP switches plus a level control.
The balanced XLR line output can be connected to a mic input
on the mixer and headphones or a powered monitor can be
connected to the Phone/Aux output. And if AC power is not avail-
able,the ProMIX runs on batteries as well as with an AC adapter.
Specifications:
• 3 low-impedance XLR mic channels
• 3 level controls
• 3 phantom power on/off DIP switches
• 3 low-frequency cut on/off DIP switches
• A low-impedance balanced XLR line output
• Mono 1/4” Phones/Aux. output
• Clip LED (fires 3dB below the onset of clipping)
• On/off Power switch,with LED
• Output Phantom Power:12V DC
• Optional 2 x 9V Battery Power yields 18V Phantom Power
• Low Cut:-3dB @ 100Hz
• Input and Output Impedance: 600 ohms
• THD: 0.02%
• Max Output Level: +14dB
• Max Input Level: -14dB
• Clip Headroom: 3dB
• Max Gain: +60dB
• Power:12V DC (adapter) / 2x 9V Batteries
• Dimensions:5.625 x 3.75 x 1.75 inches
(143mm x 92mm x 45mm)
• Weight: 1.5lb (680g)
Usage:
a.) If you are using the 12V AC adapter, connect the cable end to
the ProMIX’s 12V DC input and plug the other end into a 120V
AC outlet. Otherwise,make sure there are two 9V batteries
connected inside the battery compartment.
b.) Connect low-impedance mics to the 3 XLR inputs with mic
cables.
c.) If any mics require phantom power,set the appropriate
Phantom DIP switches to the on position (down).
d.) To avoid picking up unwanted low-frequency noise (rumble,
thumps, etc.),it is advisable to roll off the low frequency
response of mics other than those specifically for bass drum,
bass guitar amp,upright bass or keyboard amps. For all other
mics, set the Low Cut switches to the on position (up).
e.) Connect the balanced XLR (male) Output to the mic input on
the mixer with a low-impedance mic cable.
f.) Connect headphones to the Phone/Aux jack. Alternatively this
jack can be connected to the unbalanced input of an amplifier,
another mixer, etc.
g.) Flip the Power switch to the ON position. The PWR (power) LED
will illuminate.
h.) Adjust the Level controls for the desired mix and check the
Clip LED to make sure one or more of them are not turned up
too far. A small amount of Clip LED activity on occasional peaks
is acceptable as it fires 3dB below the onset of actual clipping
distortion.
i.) Adjust the input gain of the other mixer for best signal strength
without distortion.
March 2003
ProMIX
Three Channel Microphone Mixer
Creative audio solutions in cool little boxes.
ARTcessories
™
DESIGNED & DISTRIBUTED BY:APPLIED RESEARCH AND TECHNOLOGY • 215 Tremont Street • Rochester, New York 14608 • USA
For Customer Service,please call: 585.436.2720 • Email: cserve@artproaudio.com • www.artproaudio.com • ART-ARTcs-03/03
90 DAY
WARRANTY