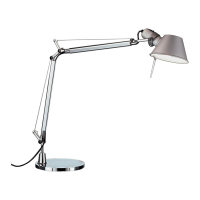
TOLOMEO MICRO
Apparecchio in classe II IP20
Design : Michele de Lucchi, Giancarlo Fassina
A
B
C
D
E
F
G
G
Avvertenze:
Prima di ogni operazione sull’ap-
parecchio disinserire la tensione
di rete.
Avis:
Déconnecter la tension de réseau
avant toute opération sur l’appa-
reil.
Note :
Prior to any work on the fixture
always switc h off the mains.
Vorsicht:
Vor jedem Eingriff an dem Gerät
die Netzspannung unterbrechen.
Advertencia:
Desconectar la tensión de red
antes de cualquier operación
sobre el aparado
Attenzione:
Usare esclusivamente le lampa-
dine del tipo e potenza indicate
nei dati di targa.
ARTEMIDE s.p.a. non si assume
alcuna responsabilità per prodotti
modificati senza preventiva autoriz-
zazione.
Attention:
Employer exclusivement les
ampoules du type et de la puis-
sance indiquée sur la plaque de
l’appareil.
ARTEMIDE spa décline toute
responsabilité pour les produits
modifiés sans autorisation préala-
ble .
Attention:
Only use bulbs of the type and
wattage indicated on the rating
plate.
ARTEMIDE spa not shoulder any
responsibilities should products
be modified without prior authori-
sat ion.
Achtung:
Ausschließlich Lampen verwen-
den, die dem auf dem Geräte-
schild angegebenen Typ und
Wert entsprechen.
ARTEMIDE s.p.a. nimmt keine
Verantwortung für ohne Vorge-
nehmigung geänderte Produkte
an.
Atencion:
Utiliza r exclusivamente las bom-
billas del tipo y potencia indicada
en la placa del aparado.
ARTEMIDE spa no seasumenin-
guna responsabilidad ante pro-
ductos modificados sin autoriza-
ción.
Istruzioni di montaggio.
Estrarre dall’imballo il corpo
lampada A e la base B. Assi-
curarsi che la rondella in pla-
stica C sia nella posizione
indicata dalla figura. Inserire
il corpo lampada A nella
base B. Capovolgere la base
B, posizionare l’elemento D,
la rondella E ed avvitare la
vite F. Agire sull’interruttore
posto sul cavo di alimenta-
zione per accendere e spe-
gnere la lampada. Agire sulle
due ghiere G per aumentare
o diminui re la rigi dità dei
movimenti dell’apparecchio.
Se si utilizza la lampada a
comodino si consiglia l’ im-
piego della lampadina da
40W incandescente. Se
invece si utilizza da tavolo/
scrivania si consiglia l’im-
piego della lampadina da
60W alog ena.
Instructions de montage.
Sortir le corps de la lampe A et
le socle B de l’em ballage.
S’assurer que la ron delle en
plastique C e st dans la posi-
tion, indiquée par la figure.
Insére r le corps de la lampe A
dans le socle B. Renverser le
socle B, positionner l’élément
D et la rondelle E et serrer la
vis F. Agir sur l’interrupteur,
positio nn é sur le cordon d’ali-
mentation, pour allumer et
éteindre la lampe. Agir sur les
deux bagues G pou r rendre
les mouvements de l’appareil
plus ou moins souples. En cas
d’utilisation de la lamp e
comme lampe de chevet, il est
conseillé d’utiliser une
ampoule de 40W à incande-
scence. En cas d’utilisation de
la lampe comme lampe de
bureau, il est, par contre, con-
seillé l’emploi d’une ampoule
de 60W alogène.
Assembly instructions.
Extract from the box the
body of the appliance A and
the base B. Make sure the
grommet C is in the position
shown in t he picture. Insert
the body of the appliance A
into the base B. Turn upside
down the base B , fit in the
item D, the g rommet E and
screw in the bolt F.Use the
switch on the power cable to
turn on and off the light.
Turn the ring nuts G to
in crease or decrease the
stiffness of movement of the
appliance. We recommend
a 40W incandescent bulb if
you use the appliance at
your bedside. We recom-
mend a 60W halogen bulb if
you use the appliance on
your desk.
Aufbaueinleitung
Aus der Ver packung de n Lam-
penkörper A und die Unter-
lage B herausziehen. Sich ver-
gewissern, dass sich die Pla-
stikscheibe C in der vom Bild
geze igten Stellung befindet.
Den Lampenkörper A in die
Unterlage B stecken. Die
Unterlage B umkehren, das
Eleme nt D,die Scheibe E posi-
tionieren und die Schraube F
anschrauben. Auf den sich auf
dem Versorgungskabel befin-
denden Schalter wirken, um
die Lampe ein- - und auszu-
schalten. Auf die beiden Nut-
muttern G wirken, um die
Bewegungssteifheit des
Geräts zuerhöhenoder zuver-
mindern. Wenn man die
Nachttischlampe verwendet,
empfiehlt man di e Anwendung
der 40W Glühbirne. Wenn man
die Tisc h/Schreibtischlampe
verwendet, empfiehlt man die
Anwendung der 60W Halo-
genlampe.
Inst rucciones para el montaje.
Extraiga del embalaje el
cuerpo de la lámpara A y la
base B. C ompruebe que la
arandela de plástico C estéen
la posición indicada en la
figura. Introduzca el cuerpo
de la lámpara A en la base B.
Vuelque la base B, posicione
el elemento D y la arand ela E,
lue go atornille el t ornillo F.
Encienda y apague la
lámpara mediante el interrup-
tor colocad o e n el cable de ali-
mentación. Aumente o dismi-
nuya la rigidez de los movi-
mientos del aparato manipu-
lando las dos virolas G. Si se
utiliza la lámpara en la mesilla
de noche se aconseja
emplear la bombilla de 40W.
incandescente. Si en cambio
se utiliza como lámpara de
mesa o escritorio, se aconseja
emplear la bombilla de 60W
halógena