Do you have a question about the aspenhome Queen Panel HB I251-412 and is the answer not in the manual?
| Brand | aspenhome |
|---|---|
| Model | Queen Panel HB I251-412 |
| Category | Indoor Furnishing |
| Language | English |
Safety instruction emphasizing the need for two or more people for installation.
Specifies the Phillips screwdriver as the required tool for assembly.
Attaches the left and right legs to the headboard using bolts, lock washers, and flat washers.
Connects the wood stretcher to the legs using bolts, lock washers, and flat washers.
Attaches side storage rails to headboard and footboard using bolts, washers, and nuts.
Arranges slats on rails and lays decking on slats, securing slats with wood screws.
Secures the decking to the slats using wood screws through pre-drilled holes.
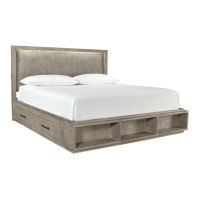
Details the dual USB ports for charging and touch switches located on both sides of the bed.
Highlights the integrated LED light strip and cedar-lined side rail drawers.
Attaches legs to headboard and wood stretcher to legs, similar to Queen bed assembly.
Installs the Cal King side ext kit to storage side rails using bolts and washers.
Attaches side rails to headboard and footboard using bolts, washers, and nuts.
Attaches wood blocks to the Cal King storage footboard using bolts, washers, and nuts.
Describes notching the filler board for the Cal King bed's specific placement.
Arranges slats and decking, securing slats to side storage rails with wood screws.
Secures the decking to the slats using wood screws through pre-drilled holes.
Secures the filler to the Cal King side ext kits with wood screws.
Instructions for inserting wood caps into the headboard for Cal King beds.
Highlights USB ports, touch switches, LED light strips, and cedar-lined drawers.