EasyManua.ls Logo

ASTRO-PHYSICS RAPAS - User Manual

ASTRO-PHYSICS RAPAS
6 pages
Print Icon
To Next Page IconTo Next Page
Loading...
1
RIGHT-ANGLE POLAR ALIGNMENT SCOPE (RAPAS)
INSTRUCTIONS
Congratulations on your receipt of our new polar alignment scope and your new-found freedom from neck strain. The
Astro-Physics Right-Angle Polar Scope has been machined to a very high level of accuracy. The optics and reticle are
also very precisely centered and collimated and require no further adjustment.
The RAPAS operation is simplicity itself. Utilizing the App on your smart device or
computer, you will simply move the real Polaris (or Sigma Octans in the southern
hemisphere) to the position on the reticle that is shown in the App by adjusting the
altitude and azimuth knobs of the mount. That is it...You are now polar aligned.
In order to achieve the greatest degree of accuracy, it will be necessary to level
your mount in the east-west direction. The north-south leveling is not important,
as you will make corrections with the altitude adjuster.
As with all polar alignment techniques, it is important to note that you may
experience slight changes in the accuracy of alignment when equipment
congurations are changed or if the alignment is done prior to loading the
counterweights and mounting your scopes. This is due to exures of the mount,
of the pier and of the ground on which it sits. The highest precision is obtained if
the RAPAS is used with the same equipment conguration each time.
Important Note: The use of secondary alignment routines following a RAPAS alignment may decrease
your polar alignment accuracy! DO NOT do Polaris or 2-Star alignments following the RAPAS
alignment!
Attaching the RAPAS Adapter to Your Mount:
With the exception of the Mach1GTO (serial # M10670 and later), 1100GTO and 1600GTO, it will be necessary to replace
your mount’s polar axis rear plate with the new RAPAS Adapter (except the 900 mounts which simply add the adapter to
the existing rear plate). Each mount type has an adapter designed specically for it. Please note that the new adapter will
add some dimension to the rear of your mount. This may require a slight modication to the foam lining of carry cases.
Mach1GTO (serial # M10670 and later), 1100GTO and 1600GTO
The Mach1GTO (serial # M10670 and later), 1100GTO and 1600GTO mounts have been designed to receive the Right-
Angle Polar Scope with no modication needed. Simply remove the Cap and the three place-holder screws and insert
the scope. Then lock it in place with the three thumbscrews. Be sure the RAPAS is tting ush to the mount’s rear plate
(snugging with a Phillips #2 screwdriver may help). Follow “The Basics for Aligning the RAPAS Adapter” below in order to
precision adjust the rear plate of these two mount types to gain greater accuracy.
1200 mounts (Illustration page 2) – Use RAP1200
Start by removing the 1200 mount’s
threaded Polar Axis Rear
Cap (M12660 or M12666)
and the Polar Alignment
Scope Plug (M4037), if
it has one. (Neither of
these two parts will be
used with the new conguration.) When
unscrewing the Polar Alignment Scope
Plug (M4037) be sure to ONLY remove
the M4037. Do not allow the bearing
thrust plate behind it to turn! Next,
remove the three Allen screws that attach
the existing rear plate (this plate will
not be re-used). Use the same screws to attach the RAP1200, being careful
to orient the adapter so that the two RAPAS alignment holes (these are not
through-holes) are towards the top. Secure the adapter in place and you are nished. This adapter must always remain
attached to the mount. Only the RAPAS itself will be removed. Reference the above photos left and right.
Attachment Screws (3)
Thumbscrews (3)
Push Screws (3)
Push Screw (3)
Alignment
Holes
RAPAS
Attachment Holes
Adapter
Attachment
Hole (3)
Eyepiece - focusable
with reticle
Illuminator - adjustable
brightness
Optical Tube with
25 mm f/8 lens
Attachment Thumb
Screws (3)
DO NOT LOOSEN
SCREW(s)
M4037
Question and Answer IconNeed help?

Do you have a question about the ASTRO-PHYSICS RAPAS and is the answer not in the manual?

Summary

Important Note: RAPAS Alignment

Attaching the RAPAS Adapter to Your Mount

Mach1 GTO, 1100 GTO, 1600 GTO Attachment

Mounts designed to receive the Right-Angle Polar Scope without modification. Remove cap and screws, insert scope, lock with thumbscrews.

1200 Mounts Attachment (Use RAP1200)

Remove rear cap and plug, then three Allen screws. Attach RAP1200 adapter, orienting alignment holes upwards. Adapter must remain attached.

900 Mounts Attachment (Use RAP900)

Mach1 GTO (M10669 & Earlier) Attachment (Use RAPM1)

Attaching the RAPAS Scope

Push-Pull Adjustment System Explained

Aligning RAPAS Adapter;Rear Plate Basics

AP Polar Alignment Scope Utility

Part of AP V2 ASCOM driver (v5.05.10+). Access utility via Start → Programs → Astro-Physics → ASCOM Driver.

iPhone;iPad;iPod Touch App

Astro-Physics PolarAlign App. Used for positioning Polaris or Sigma Octans on the reticle.

Windows Phone App

AP Polar Align App. Used for positioning Polaris or Sigma Octans on the reticle.

Android Phone App

Polar Finder App. Used for positioning Polaris or Sigma Octans on the reticle.

Using Push-Pull Screws for Adapter Alignment

Use push-pull screws to align star to hour angle. Loosen two attachment screws, push with paired set screw.

Drift Alignment R.A. Correction Method

Modified Drift Align Procedure

Align Dec. at equator/meridian using azimuth knobs. Align R.A. near zenith using altitude adjuster.

Key Considerations for Drift Alignment

Level mount East-West. Ensure all parts are tight. Adjust azimuth first, then altitude.

Using the RAPAS Without a Smart Device

Focusing Procedure

Realigning the Reticles North-South Orientation

Changing the Illuminator Batteries

Overview

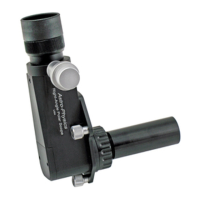
The Astro-Physics Right-Angle Polar Alignment Scope (RAPAS) is a precision-machined instrument designed to simplify and improve polar alignment for astronomical mounts, eliminating neck strain often associated with traditional polar scopes.

Function Description:

The RAPAS allows users to align their equatorial mount by positioning Polaris (or Sigma Octans in the Southern Hemisphere) on its reticle according to an associated smartphone or computer application. This is achieved by adjusting the mount's altitude and azimuth knobs. The device is designed for high accuracy, with optics and reticle precisely centered and collimated from the factory, requiring no further adjustment. It's important to note that secondary alignment routines (like Polaris or 2-Star alignments) should not be performed after a RAPAS alignment, as this may decrease accuracy.

Important Technical Specifications:

  • Optical Tube: Features a 25 mm f/8 lens.
  • Eyepiece: Focusable with a reticle.
  • Illuminator: Adjustable brightness, powered by two pre-installed 1.5 volt GPA76 button-style alkaline batteries.
  • Machining Tolerances: Measured in 10,000ths of an inch, ensuring high precision.
  • Mount Compatibility:
    • Mach1GTO (serial # M10670 and later), 1100GTO, 1600GTO: Designed to receive the RAPAS without modification. Users remove a cap and three placeholder screws, insert the scope, and secure it with three thumbscrews.
    • 1200 Mounts (1200DA White, 1200QMD, 1200SMD, 1200GTO): Requires replacing the mount's threaded Polar Axis Rear Cap (M12660 or M12666) and Polar Alignment Scope Plug (M4037, if present) with the RAP1200 adapter. The adapter is attached using the original screws, ensuring the two RAPAS alignment holes are towards the top. The bearing thrust plate must not be turned during this process.
    • 900 Mounts (900HDA, 900QMD, 900SMD, 900GTO): Requires removing the Polar Axis Rear Cap (M9403 or M12666) and Polar Alignment Scope Plug (M4037, if present). The existing rear plate remains in place and the RAP900 adapter is sandwiched between it and the axis, using new 10-32 x 5/8" screws. The single RAPAS alignment hole on the adapter must be towards the top. The bearing thrust plate must not be turned, and the existing rear plate's orientation must be maintained.
    • Mach1GTO (serial # M10669 and earlier): Uses the RAPM1 adapter, which is a two-part adapter. The inner adapter screws onto the polar axis, with an etched line oriented vertically. Three tiny set screws lock it in place. The second part of the adapter is then secured, ensuring the RAPAS alignment hole is towards the top.

Usage Features:

  • Ease of Use: Once the RAPAS adapter is installed, the RAPAS itself is simply inserted and secured with three thumbscrews, ensuring the eyepiece is upright and registration pin(s) align with the adapter's hole(s).
  • Mount Leveling: For greatest accuracy, the mount should be leveled in the East-West direction. North-South leveling is less critical as altitude adjustments compensate.
  • Equipment Configuration: Highest precision is achieved when the RAPAS is used with the same equipment configuration each time, as changes can introduce flexures affecting alignment accuracy.
  • Push-Pull Adjustment System: While the RAPAS is highly accurate out of the box, a "push-pull" system allows for precise adjustments to the adapter plate's angle if needed. This involves loosening attachment screws and pushing with set screws to fine-tune the polar star's position on the reticle. This system allows for swapping the RAPAS between multiple Astro-Physics mounts with high precision, provided each adapter has been adjusted.
  • Drift Alignment (R.A. Correction Method): The manual describes a modified drift alignment procedure to minimize both Dec. and R.A. drift, particularly at the zenith. This involves zeroing out Dec. drift at the celestial equator/meridian using azimuth knobs, then zeroing out R.A. drift near the zenith using altitude adjustments. Guiding aggressiveness should be set to 0% during this process.
  • Standalone Use: The RAPAS can be used without a smart device or computer by calculating the Polaris Hour Angle (RAPAS Reticle) using Local Sidereal Time and Polaris R.A. (JNOW).
  • Focusing Procedure: The RAPAS is pre-focused but can be adjusted. First, focus the eyepiece until the reticle lines are sharp (best done in daylight). If stars are not sharp, loosen the knurled ring on the front optical tube and turn the tube to focus, then retighten.
  • Reticle Orientation: The reticle's North-South orientation is pre-aligned but can be readjusted. This involves leveling the mount, centering Polaris with the azimuth adjuster, slightly loosening the "Do Not Loosen Screw(s)" on the scope's back (and potentially front), rotating the assembly to orient the reticle so Polaris moves vertically when adjusting altitude, then re-tightening the screw(s).

Maintenance Features:

  • Adapter Permanence: The RAPAS adapter must always remain attached to the mount. Only the RAPAS itself is removed.
  • Battery Replacement: The illuminator uses two GPA76 button-style batteries. To replace, unscrew the two halves of the illuminator. Batteries are inserted into the narrow section with the negative (-) side towards the eyepiece and the positive (+) side towards the tapered On/Off switch.

ASTRO-PHYSICS RAPAS Specifications

General IconGeneral
BrandASTRO-PHYSICS
ModelRAPAS
CategoryAdapter
LanguageEnglish