EasyManua.ls Logo

ASTRO BOX User Manual

ASTRO BOX
2 pages
To Next Page IconTo Next Page
Page #1 background imageLoading...
Page #1 background image
PLEASE READ THE INSTRUCTIONS CAREFULLY
BEFORE COMMENCING ASSEMBLY
Live: Normally Brown / Red
Neutral: Normally Blue / Black
Earth: Normally Green / Yellow
GB
LEGGERE ATTENTAMENTE LE ISTRUZIONI
PRIMA DI COMINCIARE L’ASSEMBLAGGIO
Cavo positivo: normalmente marrone o rosso
Cavo neutro: normalmente blu o nero
Cavo terra: normalmente verde o giallo
IT
LIRE ATTENTIVEMENT LES INSTRUCTIONS
AVANT DE COMMENCER LE MONTAGE
Phase: Normalement Brun / Rouge
Neutre: Normalement Bleu / Noir
Terre: Normalement Vert / Jaune
FR
LESEN SIE BITTE DIE ANWEISUNGEN
SORGFALTIG DURCH, BEVOR SIE MIT DEM
ZUSAMMENBAUEN BEGINNEN
Phase: Normalerweise Braun / Rot
Nulleiter: Normalerweise Blau / Schwarz
Erde: Normalerweise Grün / Gelb
DE
Issue: 1 30/10/2015 P.01 /02
ALL ELECTRICAL CONNECTIONS MUST BE FULLY COVERED WITH INSULATING TAPE.
Toutes les connections électriques doivent être entièrement recouvertes de ruban isolant.
Alle elektrischen Anschlüsse müssen vollständig mit Isolierband abgedeckt werden.
Tutte le connessioni elettriche devono essere coperte perfettamente con il nastro isolante.
!
FOR CEILING USE ONLY
Seulement pour montage au plafond
Da utilizzarsi solo al sotto
Nur für den Deckengebrauch
Issue: 1
BOX
7846 / SKU 1354002
Question and Answer IconNeed help?

Do you have a question about the ASTRO BOX and is the answer not in the manual?

ASTRO BOX Specifications

General IconGeneral
BrandASTRO
ModelBOX
CategoryOutdoor Light
LanguageEnglish

Summary

Product Introduction and Safety Precautions

Essential Pre-Assembly Guidance

Read all instructions thoroughly before starting assembly. Includes wire color identification for safe wiring.

Installation Environment

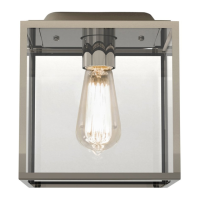
This product is designed for ceiling installation only.

Electrical Connection Requirements

All electrical connections must be completely covered with insulating tape for safety.

Installation Steps and Wiring

Step 1: Power Off

Ensure the power supply is turned off before commencing any installation or wiring work.

Step 2: Mounting Fixture

Securely attach the main fixture to the ceiling using the provided screws and tools.

Step 3: Wiring Connections

Connect the wires according to the color codes: Live (Brown/Red), Neutral (Blue/Black), Earth (Green/Yellow).

Step 4: Securing Diffuser

Attach the diffuser or cover plate to the main fixture after completing the wiring.

Step 5: Final Assembly

Complete the assembly by attaching any remaining parts or trim pieces.

Related product manuals