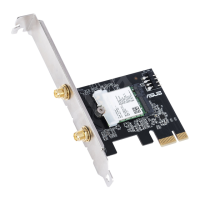
PCIE WIFI CARD/INTEL AX200
Installation
Q16327 / Revised Edition V3 / January 2020
1
2
4
3
8
6
5
7
English
To install the PCIE WIFI CARD/INTEL AX200:
1. Install the M.2 Wi-Fi card to M.2 Wi-Fi slot.
2. Firmly insert the pin ends of the two RF cables into the holes on the M.2 Wi-Fi card.
3. Attach the plastic cover to the M.2 Wi-Fi card, and then secure it with the bundled screw.
4. Insert the two RF cables into the bracket separately and secure them with the bundled screws.
5. Install the M.2 Wi-Fi card to PCIe slot on your motherboard.
6. Connect the USB 2.0 cable to the BT_USB header on the M.2 Wi-Fi module.
7. Connect the USB 2.0 cable to the USB 2.0 header on your motherboard.
8. Install the bracket to your chassis.
9. Connect the bundled antenna to the RF cable.
Français
Español
日本
語
Deutsch
Polski
Italiano
Important!
• This equipment should be installed and operated with a minimum distance of 20cm between the antenna
and your body.
• Before installing and using the M.2 card, carefully read the manual that came with the package.
• UseONLY the bundled RF cable and antenna.
• AnychangesormodicationstothisdevicenotexpresslyapprovedbyASUScouldcauseharmful
interference to radio communications and void the user’s authority to operate the equipment.
Para instalar la TARJETA WIFI PCIE/INTEL AX200:
1. Instale la tarjeta Wi-Fi M.2 en la ranura Wi-Fi M.2.
2. InsertermementelosextremosdeloscontactosdelosdoscablesRFeneloriciodelatarjetaWi-FiM.2.
3. Coloque la cubierta de plástico en la tarjeta Wi-Fi M.2 y, a continuación, fíjela con el tornillo incluido.
4. Inserte los dos cables de RF en el soporte por separado y fíjelos con los tornillos incluidos.
5. Instale la tarjeta Wi-Fi M.2 en la ranura PCIe de la placa base.
6. ConecteelcableUSB2.0alabasedeconexionesBT_USBdelmóduloWi-FiM.2.
7. ConecteelcableUSB2.0alabasedeconexionesUSB2.0delaplacabase.
8. Instale el soporte en el chasis.
9. Conecte la antena incluida al cable RF.
¡Importante!
• Cuando instale y utilice este equipo, hágalo de forma que haya una distancia mínima de 20 cm entre la antena y
su cuerpo.
• Antes de instalar y utilizar la tarjeta M.2, lea atentamente el manual incluido en el paquete.
• UtiliceSOLAMENTE el cable y la antena RF incluidos.
• TodosloscambiosomodicacionesrealizadasenestedispositivonoaprobadasexpresamenteporASUS
podrían provocar interferencias dañinas a las comunicaciones de radio y anular la autoridad del usuario para
operar el equipo.
Aby zainstalować KARTĘ WI-FI PCIE/INTEL AX200:
1. ZainstalujkartęWi-FiM.2wgnieździeWi-FiM.2.
2. WłóżpewniewtyczkidwóchkabliRFzpinamidootworówwkarcieWi-FiM.2.
3. ZałóżplastikowąosłonęnakartęWi-FiM.2,anastępnieprzymocujjązapomocądołączonejśruby.
4. WłóżosobnodwakableRFdowspornikaizabezpieczjezapomocądołączonychśrub.
5. ZainstalujkartęWi-FiM.2wgnieździePCIenapłyciegłównej.
6. PodłączkabelUSB2.0dozłączaheaderBT_USBwmoduleWi-FiM.2.
7. PodłączkabelUSB2.0dozłączaheaderUSB2.0napłyciegłównej.
8. Przymocuj wspornik do obudowy.
9. PodłączdołączonąantenędokablaRF.
Ważne!
• Tourządzeniepowinnobyćzainstalowaneiużywanewminimalnejodległości20cmmiędzyanteną,aciałem
użytkownika.
• PrzedinstalacjąirozpoczęciemkorzystaniazkartyM.2należyuważnieprzeczytaćdołączonydoniejpodręcznik.
• NależykorzystaćWYŁĄCZNIE z dostarczonego kabla RF i anteny.
• WszelkiezmianylubmodykacjetegourządzeniawykonanebezwyraźnegozezwoleniarmyASUSmogąbyć
przyczynąszkodliwychzakłóceńłącznościradiowej,atakżemogąpozbawićużytkownikaprawadoużywania
tegourządzenia.
手順
1. M.2Wi-FiカードをPCIetoM.2Wi-FiCardのM.2Socket1スロットに取り付けます。
2. RFケーブルの小さいコネクターを、M.2Wi-Fiカードの端子へしっかりと差し込みます。
3. プラスチックカバーをM.2Wi-Fiカードに取り付け、付属のネジで固定します。
4. RFケーブルの大きいコネクターをブラケットへ差し込み、付属のワッシャーとナットで固定します。
5. M.2Wi-Fiカードを取り付けたPCIetoM.2Wi-FiCardをマザーボードのPCIExpressスロットに取り付
けます。
6. 付属のUSB2.0ケーブルをPCIetoM.2Wi-FiCardに取り付けます。
7. USB2.0ケーブルのもう一方をマザーボードのUSB2.0コネクターに接続します。
8. PCIetoM.2Wi-FiCardのブラケットをケースに固定します。
9. 付属のアンテナをブラケットの端子に接続します。
重要:
• アンテナは人体から20cm以上離れた場所に設置してください。
• 本製品をご使用の前に、この説明書を必ずお読みいただき、正しく安全にお取り扱いください。
• RFケーブルとアンテナは、本製品に付属のものをご使用ください。
• ASUSTekComputerInc.が明示的に承認していない変更または改造により、機器を運用するユーザーの権
限が無効になる可能性があります。
Per installare la scheda PCIE WIFI/INTEL AX200:
1. Installate il modulo Wi-Fi M.2 nello slot Wi-Fi M.2 sulla scheda.
2. Inserite fermamente i terminali dei due cavi RF nei relativi fori della scheda Wi-Fi M.2.
3. CollegatelacoverinplasticaalmoduloWi-FiM.2,quindissatelaconlaviteindotazione.
4. InseriteiduecaviRFneisupportiseparatemente,quindissateliconlevitiindotazione.
5. Installate la scheda Wi-Fi M.2 nello slot PCIe della vostra scheda madre.
6. Collegate il cavo USB 2.0 all'header BT_USB sulla scheda Wi-Fi M.2.
7. Collegate il cavo USB 2.0 all'header USB 2.0 sulla scheda madre.
8. Fissate la scheda allo chassis.
9. Collegate l'antenna in dotazione al terminale RF.
Importante!
• Questoapparecchiodeveessereinstallatoeutilizzatoadunadistanzadialmeno20cmdalcorpo.
• PrimadiinstallareeusarelaschedaM.2leggeteattentamenteilmanualechetrovatenellaconfezione.
• UsateSOLAMENTE il cavo RF e l'antenna in dotazione.
• Qualsiasimodicaaquestodispositivo,nonespressamenteapprovatadaASUS,potrebbecausare
interferenze dannose alle comunicazioni radio e revocare l'autorizzazione dell'utente ad utilizzare il
dispositivo.
Pour installer la carte Wi-Fi PCIe Intel AX200 :
1. Installez la carte Wi-Fi M.2 dans l'emplacement Wi-Fi M.2.
2. Insérezfermementlesbrochesdel'extrémitédesdeuxcâblesRFdanslesoricesdelacarteWi-FiM.2.
3. AttachezlecouvercleenplastiquesurlacarteWi-FiM.2,puisxez-leaveclavisfournie.
4. InsérezséparémentlesdeuxcâblesRFdanslesupportetxez-lesaveclesvisfournies.
5. Installez la carte Wi-Fi M.2 dans l'emplacement PCIe sur votre carte mère.
6. RaccordezlecâbleUSB2.0auconnecteurBT_USBsurlemoduleWi-FiM.2.
7. RaccordezlecâbleUSB2.0auconnecteurUSB2.0survotrecartemère.
8. Installezlesupportsurvotrechâssis.
9. Connectezl'antennefournieaucâbleRF.
Important !
• Cetéquipementdoitêtreinstalléetutiliséavecunminimumde20cmdedistanceentrel'antenneetvotre
corps.
• Avantd'installeretd'utiliserlacarteM.2,lisezattentivementlemanuelfourni.
• UtilisezUNIQUEMENTlecâbleRFetl'antennefournis.
• ToutchangementoumodicationdecetappareilnonexpressémentapprouvéparASUSpeutcréerdes
interférences nuisibles et annuler le droit de l'utilisateur à faire fonctionner cet appareil.
So installieren Sie die PCIE WLAN-Karte/INTEL AX200:
1. InstallierenSiedieM.2WLAN-KarteindenM.2WLAN-Steckplatz.
2. SteckenSiediePolstückederbeidenRF-KoaxialkabelfestindieÖffnungenanderM.2WLAN-Karte.
3. BringenSiedieKunststoffabdeckunganderM.2WLAN-KarteanundbefestigenSiesiedannmitder
mitgelieferten Schraube.
4. SteckenSiediebeidenRF-KoaxialkabeleinzelnindieHalterungundbefestigenSiesiemitden
mitgelieferten Schrauben.
5. InstallierenSiedieM.2WLAN-KarteindenPCIe-SteckplatzaufIhremMotherboard.
6. VerbindenSiedasUSB2.0-KabelmitdemBT_USB-HeaderamM.2WLAN-Modul.
7. VerbindenSiedasUSB2.0-KabelmitdemUSB2.0-HeaderaufIhremMotherboard.
8. InstallierenSiedieHalterunginIhrGehäuse.
9. SchließenSiediemitgelieferteAntenneandasRF-Koaxialkabelan.
Wichtig!
• DiesesGerätsolltemiteinemMindestabstandvon20cmzwischenderAntenneundIhremKörperinstalliert
und betrieben werden.
• VorderInstallationundVerwendungderM.2-KartesolltenSiedasmitgelieferteHandbuchgewissenhaftlesen.
• VerwendenSieNURdasmitgelieferteRF-KoaxialkabelunddieAntenne.
• AlleÄnderungenoderModikationenandiesemGerät,dienichtausdrücklichdurchASUSgenehmigtsind,
könnenStörungenvonFunkübertragungenverursachenunddieBerechtigungdesBenutzerszumBetriebdes
Gerätserlöschenlassen.
繁體中文
簡體中文
請依照以下步驟安裝 PCIE Wi-Fi 卡/INTEL AX200:
1. 將M.2Wi-Fi卡安裝至M.2Wi-Fi插槽。
2. 將兩條RF傳輸線末端的針腳插入M.2Wi-Fi卡上的孔內。
3. 將塑膠蓋放置於M.2Wi-Fi卡上,接著用附贈的螺絲將其固定。
4. 將兩條RF傳輸線分別連接到後側面板擋板上,並用附贈的螺絲固定。
5. 將M.2Wi-Fi卡安裝到主機板上的PCIe插槽。
6. 將USB2.0傳輸線的一端連接到M.2Wi-Fi模組上的BT_USB接頭。
7. 將USB2.0傳輸線的另一端連接到主機板上的USB2.0接頭。
8. 將擋板安裝到機殼上。
9. 將包裝內含的天線連接到RF傳輸線。
重要!
• 此裝置必須安裝及運作於距離人體至少20公分以上的位置。
• 在安裝與使用M.2卡時,請仔細閱讀包裝內含的使用手冊。
• 僅能使用包裝內含的RF傳輸線及天線。
• 任何未經華碩明確批准的對裝置的變更或修改都可能對無線電通訊造成有害干擾,並影響使用者
操作該裝置的權限。
請按照以下步驟安裝 PCIE Wi-Fi 卡/INTEL AX200:
1. 將M.2Wi-Fi卡安裝到M.2Wi-Fi插槽。
2. 將兩根RF傳輸線末端的針腳插入M.2Wi-Fi卡上的孔內。
3. 將塑料蓋放置於M.2Wi-Fi卡上,然後用附贈的螺絲將其固定。
4. 將兩根RF傳輸線分別連接到後側面板擋板上,並用附贈的螺絲固定。
5. 將M.2Wi-Fi卡安裝到主板上的PCIe插槽。
6. 將USB2.0傳輸線的一端連接到M.2Wi-Fi模塊上的BT_USB接頭。
7. 將USB2.0傳輸線的另一端連接到主板上的USB2.0接頭。
8. 將擋板安裝到機箱上。
9. 將包裝內含的天線連接到RF傳輸線。
重要!
• 此設備必須安裝及運行於距離人體至少20釐米以上的位置。
• 在安裝與使用M.2卡時,請仔細閱讀包裝內含的用戶手冊。
• 僅能使用包裝內含的RF傳輸線及天線。
• 任何未經華碩明確批准的對設備的變更或修改都可能對無線電通信造成有害干擾,並影響用戶操
作該設備的權限。