Do you have a question about the Asus P4B533 and is the answer not in the manual?
Provides critical safety guidelines related to electrical hazards during installation and use.
Lists safety precautions for operating and handling the motherboard and system.
Details the structure of the manual, outlining its chapters and content.
Directs users to additional resources for product and software updates.
Introduction to the ASUS P4B533 motherboard, highlighting features and technologies.
Lists all items included in the P4B533 motherboard package.
Details key technologies and features of the motherboard.
Details key technologies and features of the motherboard.
Describes additional solutions and features enhancing the motherboard's functionality.
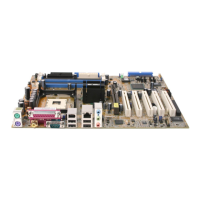
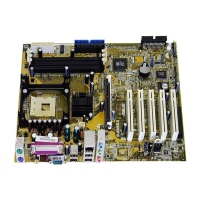
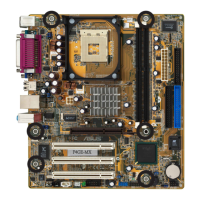
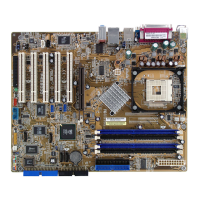
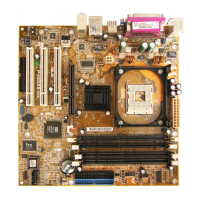
Provides a general overview of the motherboard's physical layout and components.
Identifies and lists the main physical components on the motherboard.
Provides a detailed list of the motherboard's technical specifications.
Guides the user through the physical installation process of the motherboard.
Details the correct orientation for installing the motherboard in the chassis.
Explains where to place screws to secure the motherboard in the chassis.
Illustrates the physical layout and placement of components on the motherboard.
Lists essential precautions and steps to take before installing hardware.
Introduces the CPU socket and the Intel Pentium 4 processor.
Introduces the CPU socket and the Intel Pentium 4 processor.
Provides step-by-step instructions for installing the CPU into the socket.
Guides the installation of the CPU heatsink and fan assembly for proper cooling.
Explains how to connect the CPU fan cable to the motherboard.
Describes the DDR DIMM sockets and their specifications.
Describes the DDR DIMM sockets and their specifications.
Details the supported memory configurations and combinations for the DIMM sockets.
Provides step-by-step instructions for installing a DIMM into the socket.
Provides step-by-step instructions for removing a DIMM from the socket.
Describes the available expansion slots for adding cards.
Guides the user on how to install an expansion card into a PCI or AGP slot.
Explains how to configure an installed expansion card through software settings.
Describes the six 32-bit PCI slots available on the motherboard.
Details the AGP slot, its specifications, and compatibility.
Explains the function and configuration of DIP switches and jumpers.
Explains how to enable or disable JumperFree mode for BIOS configuration.
Details how to set the CPU frequency multiple using DIP switches.
Explains how to select the CPU external frequency using DIP switches.
Describes the jumper for enabling/disabling keyboard wake-up functionality.
Explains the jumper for adjusting CPU Vcore over-voltage settings.
Details jumpers for enabling USB device wake-up from sleep modes.
Explains the jumper for selecting internal or external speakers for POST messages.
Describes jumpers to enable or disable SMBus 2.0 support.
Details jumpers for automatic switching of audio signals for front panel audio.
Explains jumpers for selecting speaker output for 6-channel audio.
Describes jumper to enable or disable the onboard PCI audio controller.
Explains how to clear CMOS settings using the CLRTC jumper.
Describes the various internal connectors on the motherboard.
Explains the IDE connectors for hard disk drives and CD-ROM drives.
Explains the connectors for ATX power supplies and auxiliary power.
Describes the connectors for CPU, chassis, and power supply fans.
Describes the USB header for additional USB ports.
Describes internal audio connectors and line-in/out ports.
Details the connector for system front panel functions like power and reset.
Provides instructions for the initial startup sequence of the system.
Explains the ASUS POST Reporter feature and its vocal messages.
Details the correct procedure for shutting down and powering off the computer.
Instructions for managing and updating the system's BIOS.
Guides on updating the BIOS using the ASUS EZ Flash utility.
Explains how to update the BIOS using the AFLASH utility in DOS mode.
Explains how to configure system settings using the BIOS Setup utility.
Describes the main menu bar options available in the BIOS setup utility.
Explains the function of navigation keys and symbols in the BIOS legend bar.
Covers basic system configuration settings in the BIOS.
Allows setting the system's current time.
Allows setting the system's current date.
Enables setting and managing BIOS passwords for system security.
Allows configuration of advanced system settings.
Allows setting the CPU's internal frequency.
Sets the system bus and PCI bus frequency.
Allows automatic or manual selection of AGP/PCI frequencies.
Configures onboard I/O devices like serial ports and floppy drives.
Configures settings for PCI slots and devices.
Configures power saving features to reduce consumption.
Activates or deactivates automatic power saving features.
Configures system power-up behavior and wake-up options.
Displays system temperatures, fan speeds, and voltages.
Configures the system's boot sequence and boot device priorities.
Sets the order in which devices are checked for booting.
Options for saving changes, discarding changes, and exiting the BIOS setup.
Saves current BIOS settings and exits the setup utility.
Provides guidance on installing supported operating systems on the motherboard.
Details the contents and usage of the motherboard's support CD.
Instructions on how to insert and run the support CD.
Describes the main menu of the support CD and its options.
Lists and describes the software applications available on the support CD.
Utility for updating motherboard BIOS and drivers.
Utility for monitoring system vital components.
Software for customizing vocal POST messages.
Lists available device drivers for installed hardware.
Installs Intel Chipset Software Installation Utility.
Improves storage subsystem performance.
Shows Flash BIOS utility DOS version for updates.
Displays ASUS contact information.
Provides details on motherboard software applications.
Utility for updating motherboard BIOS and drivers via Internet.
Customizes the system's boot logo.
| Brand | Asus |
|---|---|
| Model | P4B533 |
| Category | Motherboard |
| Language | English |