Do you have a question about the Asus P5W64 WS Professional and is the answer not in the manual?
Welcome message and introduction to the motherboard.
Lists the items included in the motherboard package.
Highlights the unique capabilities and technologies of the motherboard.
Details the key hardware specifications and processor support.
Describes AI-driven features like Stack Cool 2 and AI Quiet.
Explains unique ASUS technologies like DDR2-800 support and AI Overclocking.
Essential precautions and checks before installing hardware components.
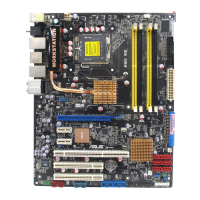
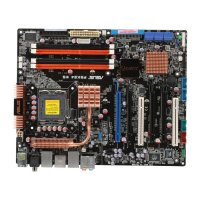
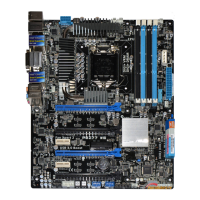
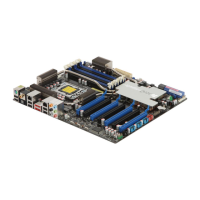
Provides a visual guide to the motherboard layout and component placement.
Instructions on orienting the motherboard correctly within the chassis.
Details on securing the motherboard to the chassis using screws.
Description of the Stack Cool 2 passive cooling solution.
Diagram showing the location of all connectors and components on the motherboard.
Lists and categorizes motherboard slots, jumpers, and connectors.
Information and compatibility details for the CPU socket and processors.
Step-by-step guide for installing the CPU into the LGA775 socket.
Instructions for mounting the CPU heatsink and fan assembly.
Procedure for safely removing the CPU heatsink and fan assembly.
Details on installing and configuring DDR2 memory modules.
Describes the DDR2 DIMM sockets and their specifications.
Guidelines for installing memory modules for optimal dual-channel performance.
Step-by-step instructions for inserting a DDR2 DIMM into a socket.
Procedure for safely removing a DDR2 DIMM from a socket.
Information on available expansion slots like PCI Express and PCI.
Steps for installing an expansion card into the motherboard slots.
Guides on configuring installed expansion cards via BIOS settings.
Details on IRQ assignments for various motherboard devices and slots.
Information on the PCI Express x16 slots and their operational modes.
Details on the capabilities and usage of the PCI slots.
Explanation of motherboard jumpers and their functions.
Procedure for clearing the CMOS Real Time Clock RAM data.
Identification and description of all motherboard connectors.
Details on the ports and connectors located on the motherboard's rear panel.
Description of internal connectors for case headers and drives.
Guide to the initial power-on sequence and system checks.
Table listing BIOS beep codes and their corresponding error meanings.
Methods for properly shutting down the computer system.
Steps to turn off the computer using the operating system's shutdown feature.
Explanation of how to use the power switch for sleep or soft-off modes.
Overview of utilities for managing and updating the system BIOS.
Guide to using ASUS Update for BIOS management within Windows.
Instructions for creating a bootable floppy disk for BIOS updates.
Details on using EZ Flash 2 for updating BIOS directly from the BIOS chip.
Guide to updating BIOS using the AFUDOS utility in DOS environment.
Information on recovering corrupted BIOS using support CD or floppy disk.
Introduction to accessing and navigating the BIOS setup utility.
Overview of the BIOS setup screen layout and navigation keys.
Explanation of displayed items within each BIOS menu.
How to access and interact with sub-menus in the BIOS setup.
Details on changing values within BIOS configuration fields.
How pop-up windows are used to display configuration options.
Explanation of scroll bars for navigating through BIOS menus.
Information on how to access help within the BIOS setup utility.
Overview of system information displayed on the BIOS Main menu.
How to set the system time within the BIOS.
How to set the system date within the BIOS.
Setting the type and configuration for the floppy disk drive.
Option to select the language for the BIOS interface.
Configuration settings for IDE devices connected to the motherboard.
Detailed settings for configuring IDE devices and SATA modes.
Displays auto-detected system specifications like BIOS, CPU, and memory.
Access to advanced system settings for CPU and other devices.
Settings for CPU overclocking and frequency adjustments.
Displays the status of the LAN cable connection during POST.
Settings for enabling or disabling USB ports and controllers.
Displays CPU-related information and advanced CPU settings.
Advanced settings for motherboard chipset features and timings.
Options to enable or disable onboard devices like audio and LAN.
Advanced settings for PCI Plug and Play devices and resource allocation.
Settings for ACPI and Advanced Power Management (APM) features.
Selection of ACPI states for system suspend operations.
Determines if VGA BIOS POST is invoked upon S3/STR resume.
Option to add tables for ACPI 2.0 specifications.
Enables or disables ACPI support in the Advanced Programmable Interrupt Controller.
Settings for power button behavior and power-on events.
Features for monitoring system hardware like fan speeds and temperatures.
Options for configuring the system's boot sequence and behavior.
Sets the order of devices for system boot-up.
Controls boot-related features like Quick Boot and Full Screen Logo.
Settings for system security, including BIOS passwords.
Access to special function utilities like EZ Flash and O.C. Profile.
Utility for easily updating the BIOS without booting into DOS.
Allows saving and loading overclocking profiles for system performance.
Options for saving, discarding changes, or loading default BIOS settings.
Information on supported operating systems and installation requirements.
Details on the contents of the motherboard support CD.
Instructions on how to launch the support CD interface.
Lists available device drivers for installing and activating hardware.
Provides access to software applications and utilities from the support CD.
Utility for creating RAID/Serial ATA driver disks.
Access to user manuals for third-party components and applications.
Information on how to contact ASUS for support.
Provides access to motherboard specs, support forms, and file lists.
Details on software applications like ASUS MyLogo2 and AI utilities.
Utility for customizing the system's boot logo.
LAN cable diagnostic utility for fault detection.
Utility for adjusting system performance and power consumption.
Feature to minimize power consumption and reduce system noise.
Application for overclocking CPU speed within the Windows environment.
Utility for monitoring system components like fan speed and temperature.
Software for configuring and managing high-definition audio features.
Information on setting up RAID arrays using Intel ICH7R Southbridge.
Steps for installing SATA hard disks for RAID array creation.
Details on configuring RAID 0, RAID 1, RAID 5, and RAID 10.
Guide to creating a RAID driver disk for OS installation.
Explanation of Intel Extended Memory 64 Technology for 64-bit OS support.
Details on EIST for dynamic CPU performance and power management.
Information on Intel's Hyper-Threading Technology for improved multitasking.
| ECC | Yes |
|---|---|
| Number of memory slots | 4 |
| Maximum internal memory | 8 GB |
| Processor socket | LGA 775 (Socket T) |
| Processor manufacturer | Intel |
| Manageability features | WOL @ PME, WOR @ PME, PXE, AI NET |
| PS/2 ports quantity | 2 |
| USB 2.0 ports quantity | USB 2.0 ports have a data transmission speed of 480 Mbps, and are backwards compatible with USB 1.1 ports. You can connect all kinds of peripheral devices to them. |
| Parallel ports quantity | 1 |
| Firewire (IEEE 1394) ports | 0 |
| Audio chip | ADI AD1988B |
| Audio output channels | 7.1 channels |
| Motherboard form factor | ATX |
| Compatible operating systems | Windows Vista Windows XP Windows 2000 |
| RAID levels | 0, 1, 10 |
| Depth | 245 mm |
|---|---|
| Width | 305 mm |