Do you have a question about the Asus P8Z68-V PRO/GEN3 and is the answer not in the manual?
Introduction to the ASUS P8Z68-V PRO/GEN3 motherboard and its features.
Lists the items included in the motherboard package for verification.
Details the unique and advanced features of the motherboard.
Provides an overview of the motherboard's key features and technologies.
Explains the advanced power design for performance and stability.
Highlights proprietary features developed by ASUS for enhanced user experience.
Describes features designed for silent and cool operation.
Details user-friendly installation and system building features.
Covers additional unique features and technologies of the motherboard.
Important precautions and safety guidelines before installing components.
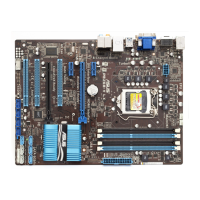
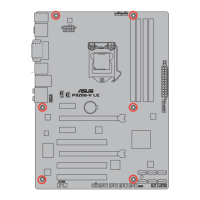
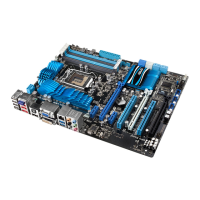
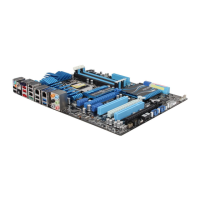
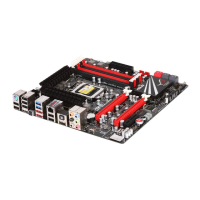
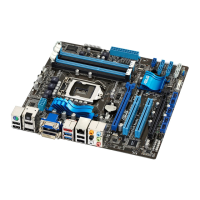
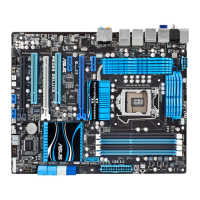
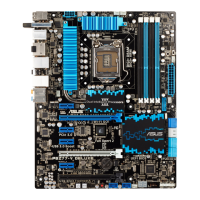
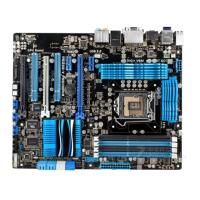
An overview of the motherboard layout and its components.
Diagram illustrating the physical arrangement of components on the motherboard.
Instructions for installing the CPU into the motherboard socket.
Details on installing DRAM modules into the motherboard slots.
Information on various expansion slots like PCIe and PCI.
Description of onboard switches for system tuning and control.
Explanation of the onboard LEDs and their status indications.
Guide to configuring jumpers for specific motherboard functions.
Details on connecting internal components to motherboard headers.
Step-by-step guide for assembling a PC with the motherboard.
Lists necessary tools and components for PC assembly.
Detailed instructions for securely installing the CPU.
Guide for mounting the CPU cooler and fan.
Instructions for correctly installing memory modules.
Steps for mounting the motherboard into the PC chassis.
Guidance on connecting the ATX power supply cables.
Instructions for connecting SATA storage devices.
Details on connecting front panel connectors like USB and audio.
Guide for installing expansion cards into slots.
Information on connecting external peripherals to rear I/O ports.
Diagrams for connecting audio devices and speaker configurations.
Steps for the initial power-on and system startup procedure.
Procedure for properly shutting down the computer system.
Introduction to the ASUS UEFI BIOS and its purpose.
How to enter and navigate the BIOS setup utility.
Description of the user-friendly EZ Mode interface for BIOS setup.
Description of the Advanced Mode for detailed BIOS configuration.
Overview of the Main menu in the Advanced BIOS mode.
Settings for overclocking and performance tuning.
Detailed configuration options for CPU and system devices.
Settings related to the CPU's operation and features.
Configuration options for the system agent and integrated graphics.
Settings for the Platform Controller Hub (PCH) chipset.
Options for configuring SATA storage devices and RAID modes.
Settings for managing USB ports and devices.
Enabling or disabling integrated motherboard devices.
Advanced Power Management settings for system power states.
Displays system temperatures, voltages, and fan speeds.
Configures system boot order and options.
Access to utilities for system management and maintenance.
Utility for updating the motherboard BIOS.
Allows saving and loading BIOS settings profiles.
Options for saving changes, loading defaults, or discarding changes.
Instructions and precautions for updating the BIOS.
Method for updating BIOS from within Windows.
Method for updating BIOS using a USB flash drive.
Utility for recovering a corrupted BIOS.
Method for updating BIOS in DOS environment.
Information on supported operating systems and installation best practices.
Overview of the drivers, software, and utilities on the support DVD.
Instructions on how to access and use the motherboard support DVD.
Guide to accessing user manuals and documentation from the support DVD.
Detailed descriptions of the software applications included.
Introduction to the all-in-one ASUS utility suite.
Details on the DIGI+ VRM software for voltage and frequency control.
Information on the Bluetooth utility for device connectivity.
Details on the TurboV EVO utility for overclocking.
Information on the EPU utility for energy saving.
Details on the FAN Xpert utility for fan speed control.
Information on the Probe II utility for system monitoring.
Details on the Ai Charger+ utility for faster USB charging.
Guide to configuring audio settings and drivers.
Information and setup for SATA RAID solutions.
Explanation of different RAID levels (0, 1, 5, 10).
Steps for installing SATA hard disks for RAID.
How to enable RAID mode in the BIOS setup.
Using the utility to manage RAID volumes.
Procedure for creating a RAID driver disk for OS installation.
Method to create RAID driver disk via BIOS.
Method to create RAID driver disk from within Windows.
Steps for loading RAID driver during OS setup.
Workaround for Windows XP recognizing USB floppy drives.
Setup and configuration for ATI CrossFireX multi-GPU technology.
Prerequisites for enabling ATI CrossFireX technology.
Preparation steps, including uninstalling old drivers.
Step-by-step guide for installing multiple ATI graphics cards.
Instructions for installing graphics card drivers.
How to enable CrossFireX feature via Catalyst Control Center.
Setup and configuration for NVIDIA SLI multi-GPU technology.
Prerequisites for enabling NVIDIA SLI technology.
Step-by-step guide for installing multiple NVIDIA graphics cards.
Instructions for installing NVIDIA graphics card drivers.
How to enable SLI feature via NVIDIA Control Panel.
Information on the LucidLogix Virtu GPU virtualization software.
Guide for installing the LucidLogix Virtu hardware components.
Steps to configure LucidLogix Virtu software.
| Non-ECC | Yes |
|---|---|
| Memory channels | Dual-channel |
| Number of memory slots | 4 |
| Supported memory types | DDR3-SDRAM |
| Maximum internal memory | 32 GB |
| Supported memory clock speeds | 1066, 1333, 1600, 1866, 2133, 2200 MHz |
| Processor socket | LGA 1155 (Socket H2) |
| Processor manufacturer | Intel |
| Compatible processor series | Intel Celeron, Intel Pentium |
| USB 2.0 connectors | 3 |
| Number of EATX power connectors | 1 |
| Number of Parallel ATA connectors | 0 |
| USB 2.0 ports quantity | 6 |
| Audio chip | Realtek ALC892 |
| Component for | PC |
| Motherboard chipset | Intel Z68 |
| Audio output channels | 7.1 channels |
| Motherboard form factor | ATX |
| RAID levels | 0, 1, 5, 10 |
| Supported storage drive interfaces | SATA II, SATA III |
| Cables included | SATA |
| Maximum graphics card memory | 1748 MB |
| Parallel processing technology support | Quad-GPU CrossFireX, Quad-GPU SLI |
| Controller 2nd interface type | Marvell PCIe SATA/JMicron JMB362 |
| LAN controller | Intel® 82579 |
| Bluetooth version | 2.1+EDR |
| Ethernet interface type | Gigabit Ethernet |
| BIOS type | UEFI |
| ACPI version | 2.0a |
| BIOS memory size | 64 Mbit |
| Depth | 244 mm |
|---|---|
| Width | 305 mm |