Second Edition/ March 2015
Model: ASUS_Z008D (ZE550ML),
ASUS_Z00AD (ZE551ML)
Before you start, ensure that you have read all the safety
information and operating instructions in this User Guide
to prevent injury or damage to your device.
NOTE: For the latest updates and more detailed
information, please visit www.asus.com.
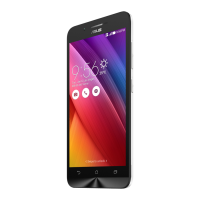
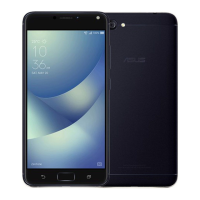
Front features
Power key
P-sensor/Light sensor
Touch screen
display
Receiver
Touch keys
LED indicator
Front camera
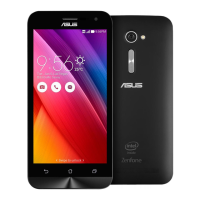
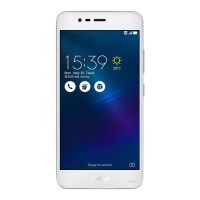
Side features
NOTE: Pry open the rear cover from the groove.
Audio jack
Micro USB port
Power key Microphone
Groove
Microphone
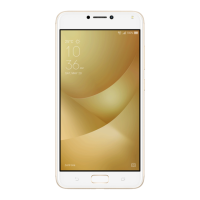
Rear features
NOTES:
• Removetherearcovertodisplaythedualmicro
SIM and microSD card slots.
• ThemicroSIMcardslotssupportWCDMA,DC-
HSPA,GSM/EDGE,andFDD-LTEnetworkbands.
• ThemicroSDcardslotsupportsmicroSDand
microSDHCcardformats.
Rear camera
Volume key
Flash
Rear cover
Speaker
Charging your ASUS Phone
To charge your ASUS Phone:
1. ConnecttheUSBconnectorintothepoweradapter’s
USB port.
2. ConnecttheotherendofthemicroUSBcableto
your ASUS Phone.
3. Plugthepoweradapterintoawallsocket.
NOTES:
• Useonlythepoweradapterthatcamewithyour
device.Usingadifferentpoweradaptermay
damage your device.
• UsingthebundledpoweradapterandASUSPhone
signalcabletoconnectyourASUSPhonetoa
poweroutletisthebestwaytochargeyourASUS
Phone.
• Theinputvoltagerangebetweenthewalloutlet
andthisadapterisAC100V-240V.Theoutput
voltageofthemicroUSBcableis+9V=2A,18W/
+5.2V=1.35A,7W.
IMPORTANT!
• WhenusingyourASUSPhonewhileitispluggedto
apoweroutlet,thegroundedpoweroutletmustbe
neartotheunitandeasilyaccessible.
• WhenchargingyourASUSPhonethroughyour
computer, ensure that you plug the micro USB
cabletoyourcomputer’sUSB2.0/USB3.0port.
• AvoidchargingyourASUSPhoneinan
environmentwithambienttemperatureofabove
35
o
C(95
o
F).
3
1
2
3. Insert the micro SIM card into one of
the slots.
1. Locate the groove on the
bottom-rightcornerofyour
ASUS Phone.
Installing a micro SIM card
To install a micro SIM card:
2. Pry the cover loose
and then pull the rear
cover off.
Micro SIM card 1
Micro SIM card 2
IMPORTANT: Use only a micro SIM card on your ASUS
Phone.AtrimmedSIMcardmaynotproperlytintoand
maynotbedetectedbyyourASUSPhone.
NOTE: MicroSIMcardslot1supports4G/3G/2G
networkbands.MicroSIMcardslot2supports2G
networkbandonly.
1. Locate the groove on the
bottom-rightcornerofyour
ASUS Phone.
Installing a microSD card
To install a microSD card:
2. Pry the cover loose
and then pull the rear
cover off.
3. Insert the microSD card into
the microSD card slot.
CAUTION: Do not use sharp tools or solvent on your
device to avoid scratches on it.
IMPORTANT: ThersttimeyoupoweronyourASUS
Phone,youwillseetheWelcomescreen.Touchthe
menu to select your preferred language then touch Next
Step.Followtheonscreeninstructionstosetupyour
ASUS Phone.
Turning your ASUS Phone on or off
PressthepowerkeyatthetopofyourASUSPhoneto
powerthedeviceonortopoweritoff.
Power key
FCC Regulations:
Thisdevicecomplieswithpart15oftheFCCRules.
Operationissubjecttothefollowingtwoconditions:(1)
Thisdevicemaynotcauseharmfulinterference,and
(2) this device must accept any interference received,
including interference that may cause undesired
operation.
Changesormodicationsnotexpresslyapprovedbythe
partyresponsibleforcompliancecouldvoidtheuser‘s
authority to operate the equipment.
Thisequipmenthasbeentestedandfoundtocomplywith
thelimitsforaClassBdigitaldevice,pursuanttopart15
oftheFCCRules.Theselimitsaredesignedtoprovide
reasonableprotectionagainstharmfulinterferencein
aresidentialinstallation.Thisequipmentgenerates,
uses and can radiate radio frequency energy and, if not
installedandusedinaccordancewiththeinstructions,
may cause harmful interference to radio communications.
However,thereisnoguaranteethatinterferencewill
not occur in a particular installation. If this equipment
does cause harmful interference to radio or television
reception,whichcanbedeterminedbyturningthe
equipment off and on, the user is encouraged to try to
correcttheinterferencebyoneormoreofthefollowing
measures:
- Reorientorrelocatethereceivingantenna.
- Increasetheseparationbetweentheequipmentand
receiver.
- Connecttheequipmentintoanoutletonacircuit
differentfromthattowhichthereceiverisconnected.
- Consultthedealeroranexperiencedradio/TV
technician for help.
IC Regulations:
ThisdevicecomplieswithIndustryCanada’slicence-
exemptRSSs.Operationissubjecttothefollowingtwo
conditions:
(1) Thisdevicemaynotcauseinterference;and
(2) Thisdevicemustacceptanyinterference,including
interference that may cause undesired operation of
the device.
LeprésentappareilestconformeauxCNRd'Industrie
Canadaapplicablesauxappareilsradioexemptsde
licence.L'exploitationestautoriséeauxdeuxconditions
suivantes:
(1) l'appareilnedoitpasproduiredebrouillage,et
(2) l'utilisateurdel'appareildoitacceptertoutbrouillage
radioélectriquesubi,mêmesilebrouillageest
susceptibled'encompromettrelefonctionnement."
CANICES-3(B)/NMB-3(B)
Thedevicecouldautomaticallydiscontinuetransmission
incaseofabsenceofinformationtotransmit,or
operationalfailure.Notethatthisisnotintendedto
prohibittransmissionofcontrolorsignalinginformation
ortheuseofrepetitivecodeswhererequiredbythe
technology.
- thedeviceforoperationintheband5150–5250
MHz is only for indoor use to reduce the potential for
harmfulinterferencetoco-channelmobilesatellite
systems;
- themaximumantennagainpermittedfordevices
intheband5725–5825MHzshallcomplywiththe
e.i.r.p.limitsspeciedforpoint-to-pointandnon
point-to-pointoperationasappropriate.
TheICIDforthisdeviceis3568A-Z00AD.
E10273
User Guide