Do you have a question about the AT&T CLP99573 and is the answer not in the manual?
Lists all items included in the package for the AT&T cordless phone.
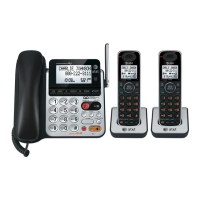
Connect the telephone base, charger, and power adapter to set up the phone.
Insert the battery into the cordless handset for power.
Instructions for mounting the telephone base unit onto a wall.
Configure the current date and time for accurate call logging.
Adjust the loudness of the phone's incoming call ringer.
Pair a Bluetooth enabled cell phone or headset with the base unit.
Transfer contacts from a paired cell phone to the base unit.
Record a custom greeting for the answering system.
Configure how many rings before the answering system answers.
Add, review, and dial entries stored in the phone's directory.
View incoming calls that were not answered using the Caller ID feature.
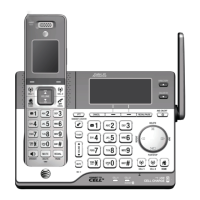
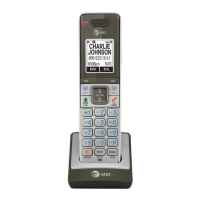
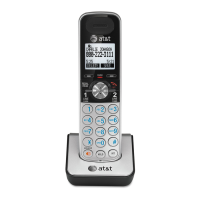
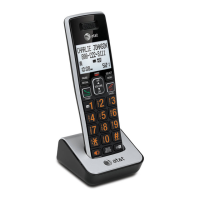
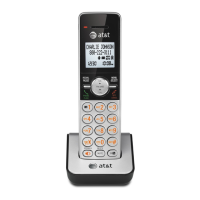
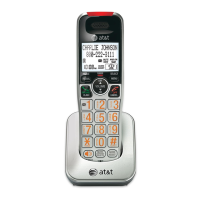
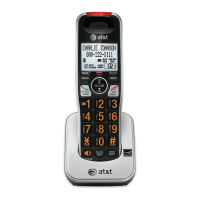
Identifies and explains the functions of buttons on the handset.
Explains how to use the built-in answering system and voicemail.
This document describes the setup, operation, and maintenance of a cordless telephone system, specifically the CLP99183/CLP99283/CLP99353/CLP99383/CLP99453/CLP99483/CLP99553/CLP99573/CLP99583 series. It functions as a quick start guide, providing essential instructions for basic use, with a recommendation to consult the full user's manual for more comprehensive details.
The core function of this device is to provide cordless telephone communication, integrating with both traditional landlines and Bluetooth-enabled cellular phones and headsets. It features an answering system, caller ID, and a directory for storing contacts.
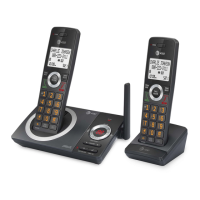
The initial setup involves several basic steps. First, the telephone base and charger need to be installed. This includes plugging the telephone base power adapter into an electrical outlet and connecting the telephone line cord to a telephone wall jack. If DSL high-speed Internet service is present, a DSL filter (not included) is required to prevent interference. The base can also be optionally mounted on a wall by aligning it with wall plate studs and sliding it down to secure it.
Next, the handset battery must be installed. This involves opening the battery compartment cover, connecting the battery, and placing it inside the compartment, then replacing the cover. Once the battery is installed, the handset should be placed on the telephone base or charger. It is crucial to charge the handset for at least 30 minutes before initial settings and for 11 hours before its first use to ensure optimal battery performance.
After the physical setup, several common settings need to be configured. The date and time should be set on either a cordless handset or the telephone base. This involves navigating through the menu, entering the month, day, year, hour, and minute, and then selecting AM or PM.
The ringer volume can be adjusted to one of six levels or turned off entirely. This setting is accessible through the menu on the handset or base.
A key feature of this system is its Bluetooth integration. Users can add Bluetooth-enabled cell phones or headsets to the telephone base. The pairing process involves accessing the Bluetooth menu, selecting "Add device," and then choosing between "Add cellular" or "Add headset." For cell phones, users must disconnect the phone from any other Bluetooth device, place it near the base, and then turn on the base's discoverable mode. On the cell phone, users search for the AT&T phone (AT&T DECT 6.0) and enter a passcode (typically 0000) if prompted. For headsets, the process is similar, requiring the headset to be set to discoverable mode and its PIN (typically 0000) to be entered. Bluetooth wireless technology operates within a short range (up to 30 feet), and keeping the connected device within 15 feet of the telephone base is recommended for optimal performance.
The device offers a comprehensive set of operational features.
Directory: The system can store up to 200 entries in its directory. To add a contact, users navigate to the directory menu, select "Add contact," enter the telephone number, choose the contact type (Home, Cell, Work, or Other), and then enter a name. Directory entries can be reviewed and dialed by pressing the DIR button on the handset or DIRECTORY button on the telephone base. Users can scroll through the list or use dialing keys to search by name. Calls can be made using the home line or one of the cell lines (CELL 1 or CELL 2).
Caller ID: The caller ID log stores up to 50 entries. Users can review and dial caller ID entries by pressing the CID button on the handset or CALLER ID button on the telephone base and scrolling through the list. Calls can be made using the home line or one of the cell lines. The system displays "XX missed calls" when there are unanswered incoming calls. This indicator is erased once all missed calls have been reviewed. Alternatively, users can press and hold CANCEL in idle mode to erase the missed call indicator without reviewing the log.
Answering System: The telephone has a built-in answering system. Users can set their own announcement or use the preset one. To record an announcement, users access the "Answering sys" menu, select "Announcement," then "Record annc," and speak into the handset or base, pressing STOP to end. The number of rings before the answering system picks up can be set to 2, 3, 4, 5, 6, or "Toll saver." Toll saver answers after two rings if there are new messages, or after four rings if there are no new messages, helping to avoid long-distance charges when checking for messages remotely. The answering system can be turned on or off via the ANS ON/OFF button. Messages can be played, repeated, deleted, and skipped using dedicated buttons.
Handset Operation: The handset features a menu button, volume controls, and dedicated buttons for directory (DIR), caller ID (CID), home line, and cell lines (CELL 1, CELL 2). It also has a FLASH button for call waiting, a CANCEL button, and a SPEAKER button for speakerphone calls. The MUTE button allows muting a call, while the REDIAL/PAUSE button accesses the redial list and adds dialing pauses. The TONE * and QUIET # buttons are used for setting and deactivating QUIET mode.
Bluetooth Cell Phone Directory Download: The system allows downloading a cell phone directory. This feature requires the cell phone to be paired, active, and connected. Users navigate to the Bluetooth menu, select "Download dir," choose the source (Phone memory, SIM card only, or Phone and SIM), and initiate the download. A passcode may be required. For Android OS 2.3 or above, users can download the Connect to Cell™ application (Caller ID manager and Alerts manager) from the Google Play Store for extended flexibility.
The primary maintenance aspect highlighted is battery charging. Regular charging for at least 30 minutes before initial settings and a full 11-hour charge before first use are critical for battery longevity and performance. The document also implicitly suggests keeping the connected Bluetooth device within 15 feet of the telephone base for optimal performance, which can be considered a usage-related maintenance tip to ensure reliable connectivity.
For customer service or product information, users are directed to the AT&T telephones website or provided with toll-free numbers for support in the US and Canada. The document also includes legal disclaimers regarding Bluetooth trademarks and other intellectual property.
| Model Number | CLP99573 |
|---|---|
| Brand | AT&T |
| Type | Cordless Phone |
| DECT 6.0 | Yes |
| Caller ID | Yes |
| Speakerphone | Yes |
| Display | LCD |
| Number of Handsets | 5 |
| Call Waiting | Yes |
| Answering System | Yes |
| Range | Up to 1000 feet |
| Standby Time | Up to 7 days |
| Intercom | Yes |
| Expandable | Up to 12 handsets |
| Voicemail | Yes |
| Headset Jack | Yes |
| Phonebook Capacity | 200 entries |