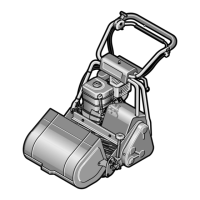
Petrol
Petrol deteriorates over time. Engine starting
may be difficult if you use petrol kept for more
than 30 days. Always run the fuel tank dry when
storing over 30 days.
1. Remove the petrol filler cap
7
, slowly add un-
leaded petrol to the tank
8
, fill to approx.
halfway up the fuel strainer.
2. Replace the petrol filler cap
7
.
3. Wipe up any spilt petrol from the engine be-
fore starting the mower.
Engine Oil
The mower is not supplied with oil in the engine,
however it is possible that there is a small quan-
tity in the engine. It is essential to fill with oil be-
fore starting the engine to avoid damage to
your engine. It is important to use the recom-
mended oil to avoid damage to your engine.
1. With the mower standing on level ground,
unscrew and remove the oil filler dip stick
18
.
2. Wipe the oil filler dip stick
18
clean; insert the
oil filler dip stick
18
, then remove it again. Do
not screw it in. Check the oil level.
3. Add a good-quality SAE 30 API SF in small
quantities at a time, allowing it to settle. Re-
peatedly add oil and check the level until it
reaches the max. position dip stick
18
. The
engine may require up to 0.4 litres of oil.
4. Refit the oil fill dip stick
18
.
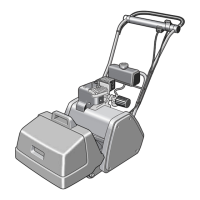
Grassbox/bag
Attach/remove the grassbox
10
as shown.
Height of Cut Adjustment
Your mower has an infinitely adjustable height
of cut between 6 - 35 mm with four markings
21
between these (numbered 1 - 4) as a guide to
adjustment. A fifth position labelled „S“ should
only be used with the scarifier cassette acces-
sory or to achieve a particularly short cut if the
lawn is very flat. The height of cut is adjusted by
turning the knob
19
at the right hand rear of the
machine. The comb will also require adjust-
ment, see „Comb Adjustment“.
Comb Adjustment
Your mower is fitted with an adjustable comb
25
which can be brought into use on the lower
heights of cut. The comb is set by loosening the
screws
24
and rotating the comb until the tines
just touch the ground. You may need to re-ad-
just after changing the height of cut. Take care
not to set the comb too deep, as this could
cause damage to either your mower or lawn.
Cutting Long Grass Using Side Wheel Kit (ap-
propriate models only)
Your mower is fitted with a full width front roller
which is suitable for normal smooth lawns. For
cutting longer, coarse grass a side wheel kit can
be fitted.
To fit this kit proceed as follows:
1. Tilt the mower back and wedge securely.
2. Remove the front roller/comb assembly by re-
moving bolt
26
and removing screw
24
on both
sides.
3. Fit the side wheel
29
, on to the side wheels
spindle
28
.
4. Fit each side wheel assembly on both sides of
the roller brackets as shown and fix with bolt
30
Refit the full width roller by following steps 1-4 in
reverse.
D
Starting and Stopping
Starting from Cold
1. Move the throttle lever
1
to position .
2. Move the engine cut-off switch
6
to „
I
“.
3. Turn the petrol tap
14
„On“.
4. Move the choke lever
11
to .
5. Pull the recoil cord handle
13
. Allow the recoil
handle to return slowly after each pull.
6. Gradually turn the choke lever
11
to .
Starting from Hot
Follow “Starting from Cold” using steps 1,3 & 5
only.
If the engine does not start or will not continue
to run, follow the “Starting from Cold” proce-
dure with choke
11
lever between the
and position.
Stopping
1. Move the throttle lever
1
to position .
2. Move the engine cut-off switch
6
to „0“.
3. Turn the petrol tap
14
„Off“.
Engaging cylinder cutter and rear roller
1. Start engine.
2. Push the red safety latch
2
forward and grad-
ually squeeze the cutter control lever
3
to-
wards the top handle
5
.
3. Gradually squeeze the drive control lever
4
towards the top handle
5
.
4. Release the safety button
2
.
5. Adjust the speed as required by moving the
throttle lever
1
between and .
6. To stop, release both control levers
4
and
3
.
B
 Loading...