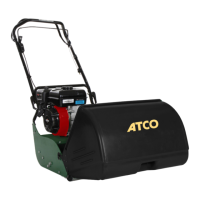
This document serves as the operating instructions for ATCO Cylinder Lawnmowers, specifically the Clipper 16 (ATP6012), Clipper 20 (ATP20012), and Clipper 20 Club (ATP20G12) models. It emphasizes the importance of reading and understanding the instructions before operating the mower to ensure correct assembly and safe use. The manual also highlights that these instructions are a general guide and do not supersede national or local codes, advising users to contact local authorities for clarity on laws related to appliance operation. It is recommended to keep the instructions in a safe place for future reference.
Function Description
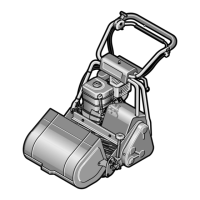
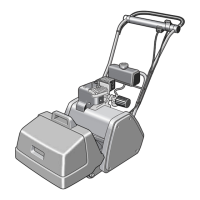
The ATCO Cylinder Lawnmowers are designed for cutting grass in residential and, for a limited period, commercial settings. They operate by means of a cutting cylinder that works in conjunction with a bottom blade to achieve a clean cut. The mower is propelled forward by a rear roller driven by an engine, with speed controlled by a throttle lever. An Operator Presence Control (OPC) lever ensures safety by stopping the engine when released. The cutting height is adjustable to suit different grass and ground conditions. The machine is designed for efficient grass collection into a dedicated grass catcher.
Important Technical Specifications
The manual provides a table of specifications for the different models:
- Clipper 16:
- Weight: 69kg
- Cut width: 400mm
- Clipper 20:
- Weight: 73kg
- Cut width: 500mm
- Clipper 20 Club:
- Weight: 73kg
- Cut width: 500mm
Further detailed engine specifications are referred to in a separate Engine Owner's Manual. The device also has a noise limit of 96 dB (LWA).
Usage Features
- Assembly: The complete handle assembly must be attached to the main mower body using fastening bolts. The 'Cam Lock' levers are used to swing the upper handle into the operating position and lock it in place. Some camlock handles may be reversed for shipping and require adjustment. The throttle control cable, OPC cable, and roller clutch cable need to be attached and adjusted during assembly.
- Starting the Engine: Before starting, ensure the roller clutch lever is disengaged and the ignition switch (if fitted) is in the 'ON' position. The OPC lever must be pulled back and held against the handlebar to release the engine brake. For a cold engine, the choke control should be moved to 'ON'. The starter cord handle grip is pulled slowly until resistance is felt, then forcefully to prevent kick-back. Once the engine starts and warms up, the choke is moved to 'OFF', and the throttle control is set to the desired speed.
- Stopping the Engine: To stop the machine, release the Roller clutch lever and then reduce the engine speed. Releasing the OPC lever automatically shuts off the engine.
- Mowing Operation:
- Flat Open Areas: It is recommended to first cut a margin approximately three mower widths at each end, then mow at right angles to the margins with parallel cuts. The mower can be controlled by the Roller clutch lever.
- Sloping Areas: Mowing on slopes requires extra care. Mow across the slope wherever possible, with the machine pointing slightly uphill. If mowing up and down, press down on the handle on the upward run to increase traction if the rear roller slips.
- Pausing: When emptying the grass collector, close the throttle to allow the engine to idle, which automatically uncouples the drive to the cutting cylinder. Releasing the OPC lever stops the engine.
- Cutting Height Adjustment: The height of cut can be adjusted by rotating the handwheel located forward of the chain cover. Turning anti-clockwise shortens the cut, and clockwise lengthens it. It is advised not to set the cutting height so low that the baseplate touches the ground, and not to cut below 12mm for a healthy lawn. For very long grass, the highest possible cut is recommended. Uneven cutting height can be adjusted by slackening a bolt on the front right-hand roller bracket and tapping the roller up or down.
- Grass Deflector Adjustments: The deflector can be adjusted by slackening two bolts on the front edge of the main frame and moving the deflector in or out to ensure cuttings are thrown correctly into the collector.
- Cutting Cylinder Adjustments: To maintain clean cutting, the cutting cylinder needs to be adjusted relative to the baseplate. This involves turning adjusting screws on both sides of the machine clockwise until the cutting cylinder just makes contact with the baseplate. The setting should then be backed off slightly so that paper is folded, not cut, when placed between the cylinder and blade. Harsh settings increase wear.
- Roller Clutch Adjustment: Adjustment may be required due to cable stretch. There are two adjusting points: the cable anchor at the top of the handle and the draw bolt through the centre of the clutch. The cable anchor is adjusted by rotating the thumb wheel anti-clockwise to increase clutch pressure. The draw bolt is adjusted by removing the chain and shaft covers, then adjusting the nut on the inner end of the draw bolt until the clutch operating lever is parallel to the mower side plate when the clutch drive is just engaging.
Maintenance Features
- General Maintenance: A direct relationship exists between the mower's life and the care given to it. It is important to thoroughly clean and inspect the mower after each use.
- Servicing the Engine: Refer to the separate Engine Owner's Manual for engine servicing details.
- Inspecting and Lubricating the Mower: The cylinder bearings are sealed for life and do not require lubrication. Other lubrication points should be oiled approximately every 25 hours of operation with SAE30-40 oil. These points include:
- Driving Chains: Keep moistened with oil. This requires removing the chain cover.
- Roller Clutch Lever Pivot Points: Apply oil.
- Front Rollers: Apply oil to the roller shaft at each end.
- Height Adjustment Screw Thread, Hand Wheel, and all Pivot Points: Apply oil.
- Cables: Apply oil to each end.
- Self Adjusting Chain Adjuster: Apply oil to pivot.
Warning: Never lubricate while the engine is running.
- Transmission Adjustment: Periodic chain adjustments are necessary due to normal stretch and wear. Chains should be slightly slack. To adjust, remove the chain cover, slacken the nut securing the nylon adjuster, re-position the adjuster, and re-tighten the nut. Secondary and final drive chains usually only require adjustment when the cutting unit is re-ground.
- Cleaning and Storage:
- After Use: Thoroughly clean the engine, chassis, rollers, and grass catcher. Avoid using a high-pressure water jet around the engine, as it can force water into places that drive out lubricants or cause ignition damage.
- Long Term Storage (30 days or more):
- Close the fuel shut-off valve (if fitted) and drain the fuel tank.
- Start and run the mower until all remaining fuel in the system is used.
- While the engine is warm, drain the engine oil and refill with the correct grade.
- Remove the spark plug, pour 5ml of engine oil into the cylinder, crank slowly to distribute the oil, and replace the spark plug.
- Store the mower in a clean, dry area away from direct sunlight.
- Adjust the cutting cylinder away from the bottom blade and apply a thin layer of grease to the cutting edges to prevent corrosion.
- If possible, spray the mower with a thin film of light oil to protect it.
- Always store the mower on a flat, level surface.
- Troubleshooting: The manual includes a troubleshooting section covering common faults such as uncut grass, scalping, excessive bottom blade wear, engine starting issues, erratic running, misfires, poor idling, overheating, vibrations, noise, and oil leaks. It provides possible causes and remedies for each issue, advising consultation with an Authorized Atco Service Agent if faults persist.
The ATCO lawnmower comes with a 2-year guarantee for domestic use against faulty parts or manufacture from the date of purchase. For commercial use, the guarantee period is 90 days. Repairs must be carried out by an authorized service dealer. The guarantee is subject to the product being serviced at recommended intervals. Normal wear and tear, routine replacement parts, and defects resulting from misuse, alteration, improper assembly, adjustment, neglect, or accident are not covered. The engine manufacturer guarantees the engine fitted to the machine. This guarantee is in addition to and does not detract from statutory or common law contractual rights. Users are advised to keep their receipt as proof of purchase.