KA7171
USB-PS/2 KVM Adapter Module with Local Console Quick Start Guide
Hardware
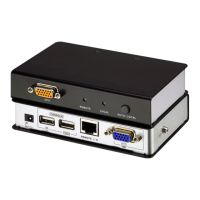
1. KVM Port
2. Remote LED
3. Local LED
4. Operating Mode Selection Pushbutton
5. Console Ports
6. Power Jack
7. Remote I/O
8. Grounding Terminal
Hardware Installation
Grounding
To prevent damage to your installation it is important that all devices
are properly grounded.
1. Use a grounding wire to ground the KA7171 by connecting one end
of the wire to the grounding terminal, and the other end of the wire
to a suitable grounded object.
Make sure that the power to any device that you connect to the installation has been turned off.
You must unplug the power cords of any computers that have the Keyboard Power On function.
KA7171 Front View KA7171 Rear View KA7171 Side View
2. Make sure that the computer and the monitor that the KA7171
connects to are properly grounded.
3. For increased grounding protection, use STP (shielded twisted pair)
cable to connect the Local console to the KVM switch. There are two
methods that can be used:
1. In addition to the eight paired wires, STP cable also contains a
grounding wire. Solder this wire to the RJ-45 connector as shown
here:
2. The second method is to use the STP cable shielding for grounding.
In this case, make sure that the shielding makes tight contact with
the top inside of the RJ-45 connector as shown here:
In either case, make sure that the sides of the RJ-45
connector make tight contact with the grounding contacts
on the sides of the RJ-45 socket.