B
Installation
© Copyright 2023 ATEN
®
International Co. Ltd.
ATEN and the ATEN logo are registered trademarks of ATEN International Co., Ltd.
All rights reserved. All other trademarks are the property of their respective owners.
Part No. PAPE-1223-Y10G Released: 03/2023
4K Wireless Presentation Switch /
4K Wireless Presentation Switch
with Quad View
Quick Start Guide
VP2020 / VP2021 VP2030 /
VP2031
A
Hardware Overview
Package Contents
1 VP2020 / VP2030 4K Wireless
Presentation Switch / VP2021 / VP2031
4K Wireless Presentation Switch with
Quad View
1 power adapter and power cord
2 WiFi antennas
1 user instructions
Support and Documentation Notice
All information, documentation, rmware,
software utilities, and specications
contained in this package are subject to
change without prior notication by the
manufacturer.
To reduce the environmental impact of
our products, ATEN documentation and
software can be found online at
http://www.aten.com/download/
Technical Support
www.aten.com/support
Scan for more information
ATEN Website
VP2020 VP2021
User Manual
The terms HDMI, HDMI High-Denition
Multimedia Interface, and the HDMI Logo are
trademarks or registered trademarks of HDMI
Licensing Administrator, Inc.
4 4
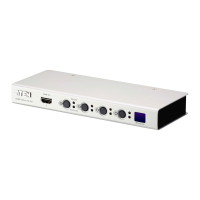
1
2
3
7
8 9
10
5
6
VP2020 / VP2021 / VP2030 / VP2031 Front View
VP2020 / VP2021 / VP2030 / VP2031 Rear View
WiFi WiFiAudio PowerHDMI VGA EthernetUSB
USBUSB-C
4
1
2
3
7
7
8
5
6
VP2020 / VP2021 VP2030 / VP2031
(Front)
Power
Adapter
Speakers
VP2020 / VP2021 / VP2030 / VP2031
(Rear)
WiFi
Antenna
WiFi
Antenna
4
Internet
Touchscreen
Projector
Mouse
USB Flash
Drive
A
Hardware Overview
1
power pushbutton / LED
2
USB-C port
3
USB 3.0 Type-A port
4
WiFi antenna ports
5
audio out
6
HDMI out
7
USB 2.0 Type-A port
8
VGA out
9
Ethernet port
10
power jack
B
Installation
1
Connect an HDMI-enabled display to the unit’s HDMI output port.
2
Connect a VGA projector to the unit’s VGA output port.
3
(Optional) Connect a set of speakers to the unit’s audio output port.
Note: If the VGA output port is used, connect a set of speakers for audio
output.
4
(Optional)
• To operate the unit via OSD (on-screen display), connect a USB mouse to
the unit’s USB 2.0 Type-A, USB 3.0 Type-A, or USB-C ports.
• To use a USB-enabled touchscreen, connect the USB-enabled touchscreen
to the unit’s USB 2.0 Type-A, USB 3.0 Type-A, or USB-C and HDMI output
ports.
• To use a USB ash drive for storage purposes, connect the USB ash drive
to the unit's USB 2.0 Type-A, USB 3.0 Type-A, or USB-C ports.
5
To allow access to the web interface and to provide WiFi coverage for the
meeting members, connect an Ethernet cable to the unit’s Ethernet port.
Optionally, connect the unit to a PoE-supported network switch for web
interface accessibility, WiFi coverage, and power supply.
6
(Optional) Connect the power adapter to the unit’s power jack.
7
Install the WiFi antennas to the unit’s WiFi antenna ports.
8
Power on the unit by pressing the power pushbutton, and the power LED
lights blue.
9
Download the ATEN Wireless Presentation App to join a meeting, share
contents, switch displays, and congure system settings to the unit.
C
Operation
You can operate the unit using the web interface, or ATEN Wireless
Presentation App.
Web GUI
The web interface allows you to congure system settings. Upon rst login,
use the default IP address 192.168.0.60 and the default credentials
(administrator /password).
Mobile App
The ATEN Wireless Presentation App is designed to help you conveniently join a
meeting, share contents, switch displays, and congure system settings to your
VP2020 / VP2021 / VP2030 / VP2031 device. To join a meeting, follow the steps
below.
1. Scan the QR code to install the ATEN Wireless Presentation App.
2. Follow the on-screen instructions to join the meeting.
VP2020 / VP2021 / VP2030 / VP2031 4K Wireless Presentation Switch / 4K Wireless Presentation Switch with Quad View
www.aten.com
A
Description de l’appareil
1
Bouton-poussoir/voyant d’alimentation
2
PortUSB typeC
3
PortUSB3.0 typeA
4
Ports d’antenne Wi-Fi
5
Sortie audio
6
SortieHDMI
7
PortUSB2.0 typeA
8
SortieVGA
9
Port Ethernet
10
Prise d’alimentation
B
Installation
1
Branchez un écranHDMI au port de sortieHDMI de l’appareil.
2
Branchez un projecteur VGA au port de sortie VGA de l'appareil.
3
(Facultatif) Branchez un ensemble de haut-parleurs au port de sortie audio
de l’appareil.
Remarque: si le port de sortieVGA est utilisé, branchez un ensemble de
haut-parleurs pour reproduire le son.
4
(Facultatif)
• Pour utiliser l’appareil en utilisant l’achage à l’écran (OSD), branchez
une sourisUSB au portUSB2.0 de typeA, au portUSB3.0 de typeA ou
au portUSB de typeC de l’appareil.
• Pour utiliser un écran tactile compatible USB, branchez l'écran tactile
compatible USB aux ports de sortie USB 2.0 de type A, USB 3.0 de type A
ou USB-C et HDMI de l'appareil.
• Pour utiliser une clé USB pour le stockage, branchez-la aux ports USB 2.0
de type A, USB 3.0 de type A ou USB-C de l'appareil.
5
Pour accéder à l’interface Web et mettre un réseau Wi-Fi à disposition des
membres de la réunion, connectez un câble Ethernet au port Ethernet. Il
est également possible de connecter l’appareil à un commutateur réseau
compatiblePoE pour permettre l’accès à l’interface Web, fournir un réseau
Wi-Fi et partager l’alimentation électrique.
6
(Facultatif) Branchez l’adaptateur d’alimentation à la prise d’alimentation
de l’appareil.
7
Insérez les antennes Wi-Fi dans les ports d’antenne Wi-Fi de l’appareil.
8
Mettez sous tension l’appareil en appuyant sur le bouton-poussoir
d’alimentation. Le voyant bleu d’alimentation s’allume.
9
Téléchargez l’applicationATENWirelessPresentation pour participer à
une réunion, partager des contenus, changer d’écran et congurer les
paramètres système de l’appareil.
C
Fonctionnement
Pour commander l’appareil, utilisez l’interface Web ou l’applicationATENWirel
essPresentation.
Interface utilisateur graphique Web
L’interface Web vous permet de congurer les paramètres système. À la
première connexion, utilisez l’adresseIP par défaut 192.168.0.60 et les
informations d’identication d’usine (administrator/password).
Application mobile
L’applicationATENWirelessPresentation vous permet de participer à une réunion,
de partager des contenus, de changer d’écran et de congurer les paramètres
système de votre commutateurVP2020 / VP2021 / VP2030 / VP2031 de manière
conviviale. Pour participer à une réunion, suivez les étapes ci-après.
1. Scannez le codeQR pour installer l’applicationATENWirelessPresentation.
2. Suivez les instructions à l’écran pour participer à la réunion.
Commutateur de présentation sans lVP2020 / VP2021 / VP2030 / VP2031 4K/Commutateur de présentation sans l à quatre vues4K
www.aten.com
A
Hardwareübersicht
1
Einschalttaste / LED
2
USB-C-Anschluss
3
USB 3.0 Typ-A Anschluss
4
WLAN-Antennenanschlüsse
5
Audio-Ausgang
6
HDMI-Ausgang
7
USB 2.0 Typ-A Anschluss
8
VGA-Ausgang
9
Ethernet-Anschluss
10
Netzadapterbuchse
B
Installation
1
Schließen Sie einen HDMI-fähigen Bildschirm an den HDMI-Ausgang des
Geräts an.
2
Schließen Sie einen VGA-Projektor an den VGA-Ausgangsanschluss des
Geräts an.
3
(Optional) Schließen Sie einen Satz Lautsprecher an den Audioausgang des
Geräts an.
Hinweis: Schließen Sie bei Verwendung des VGA-Ausgangs den Satz
Lautsprecher an den Audioausgang an.
4
(Optional)
• Um das Gerät über OSD (On-Screen-Display) zu bedienen, schließen Sie
eine USB-Maus an den USB 2.0 Typ-A-, USB 3.0 Typ-A- oder
USB-C-Anschluss des Geräts an.
• Um einen USB-fähigen Touchscreen zu verwenden, schließen Sie den
USB-fähigen Touchscreen an den USB 2.0 Typ-A. USB 3.0 Typ-A oder
USB-C und dem HDMI-Ausgang an.
• Für die Nutzung eines USB-Sticks zum Speichern schließen Sie den USB-
Stick an den Anschluss USB 2.0 Typ-A, USB 3.0 Typ-A oder USB-C des
Geräts an.
5
Um den Zugri auf die Weboberäche zu ermöglichen und die
WLAN-Abdeckung für die Besprechungsteilnehmer sicherzustellen,
schließen Sie ein Ethernet-Kabel an den Ethernet-Anschluss des Geräts
an. Schließen Sie das Gerät optional an einen Netzwerk-Switch mit PoE-
Unterstütztung an, um den Zugri auf die Weboberäche, die
WLAN-Abdeckung und die Stromversorgung zu sicherzustellen.
6
(Optional) Schließen Sie das Netzteil an die Strombuchse des Geräts an.
7
Bringen Sie die WLAN-Antennen an den WLAN-Antennenanschlüssen des
Geräts an.
8
Schalten Sie das Gerät ein, indem Sie den Netzschalter drücken.
Die Netz-LED sollte blau aueuchten.
9
Laden Sie die ATEN Wireless Presentation App herunter, um an einer
Besprechung teilzunehmen, Inhalte freizugeben, Anzeigen umzuschalten
und Systemeinstellungen für das Gerät zu kongurieren.
C
Bedienung
Sie können das Gerät über die Weboberäche oder die ATEN Wireless
Presentation App bedienen.
Web-GUI
Über die Weboberäche können die Systemeinstellungen konguriert werden.
Verwenden Sie bei der Erstanmeldung die Standard-IP-Adresse 192.168.0.60
und die Standard-Anmeldedaten (administrator/password).
Mobile App
Mit der ATEN Wireless Presentation App können Sie bequem an einer
Besprechung teilnehmen, Inhalte freigeben, Monitore wechseln sowie
Systemeinstellungen für Ihr VP2020 / VP2021 / VP2030 / VP2031-Gerät
kongurieren. Um an einer Besprechung teilzunehmen, führen Sie die folgenden
Schritte aus.
1. Scannen Sie den QR-Code, um die ATEN Wireless Presentation App zu
installieren.
2. Befolgen Sie die Anweisungen auf dem Bildschirm, um an der Besprechung
VP2020 / VP2021 / VP2030 / VP2031 4K Wireless Presentation Switch / 4K Wireless Presentation Switch mit Quad View
www.aten.com
A
Reseña del hardware
1
Botón de encendido/led
2
Puerto USB-C
3
Puerto USB 3.0 tipo A
4
Puertos para antenas wi
5
Salida de audio
6
Salida HDMI
7
Puerto USB 2.0 tipo A
8
Salida VGA
9
Puerto Ethernet
10
Conector de alimentación
B
Instalación
1
Conecte una pantalla habilitada para HDMI al puerto HDMI de salida de la
unidad.
2
Conecte el proyector VGA al puerto de salida VGA de la unidad.
3
Opcionalmente, conecte un juego de altavoces al puerto de salida de audio
de la unidad.
Nota: Si el puerto VGA de salida está en uso, conecte un juego de
altavoces a la salida de audio
4
(opcional).
• Para operar la unidad mediante la visualización en pantalla, conecte un
ratón USB a uno de los puertos USB de la unidad (2.0 tipo A, 3.0 tipo A o
tipo C).
• Para utilizar la pantalla táctil habilitada para USB, conéctela a uno de los
puertos USB (2.0 tipo A, 3.0 tipo A o tipo C) o al puerto HDMI de salida.
• Para usar la unidad ash USB con nes de almacenamiento, conéctela a
un puerto USB 2.0 Tipo-A, USB 3.0 Tipo-A, o USB-C.
5
Para permitir el acceso a la interfaz web y proporcionar cobertura wi a los
participantes de una reunión, conecte un cable Ethernet al puerto Ethernet
de la unidad. Opcionalmente, conecte la unidad a un conmutador de red
compatible con alimentación a través de Ethernet (PoE), cobertura wi y
unidad de alimentación.
6
Opcionalmente, conecte el adaptador de corriente al conector de
alimentación.
7
Instale las antenas wi a los puertos para las antenas wi de la unidad.
8
Encienda la unidad accionando el pulsador de encendido. Tras el encendido,
el piloto led de alimentación se ilumina de color azul.
9
Descargue la aplicación Wireless Presentation de ATEN para participar en
una reunión, compartir contenidos, alternar entre pantallas y congurar la
unidad.
C
Funcionamiento
Puede operar la unidad mediante la interfaz web o la aplicación Wireless
Presentation de ATEN.
Interfaz gráca de usuario web
La interfaz web le permite congurar el sistema. Al iniciar sesión por primera
vez, use la dirección IP predeterminada 192.168.0.60 y las credenciales de
acceso por defecto (administrator/password).
Aplicación móvil
La aplicación Wireless Presentation de ATEN se ha desarrollado para posibilitarle
su participación en reuniones, compartir contenidos, alternar entre pantallas y
congurar el sistema de sus dispositivos VP2020 / VP2021 / VP2030 / VP2031. Para
participar en una reunión, siga los pasos que se indican a continuación.
1. Escanee el código QR para instalar la aplicación Wireless Presentation de ATEN.
2. Siga las instrucciones en pantalla para unirse a una reunión.
Conmutadores inalámbricos para presentaciones 4K VP2020 / VP2021 / VP2030 / VP2031 y conmutador inalámbrico para presentaciones con vista
www.aten.com
A
Panoramica hardware
1
Pulsante di alimentazione/LED
2
Porta USB-C
3
Porta USB 3.0 Type-A
4
Porte per antenne Wi-Fi
5
Uscita audio
6
Uscita HDMI
7
Porta USB 2.0 Type-A
8
Uscita VGA
9
porta Ethernet
10
Presa di alimentazione
B
Installazione
1
Collegare un display abilitato HDMI alla porta di uscita HDMI dell'unità.
2
Collegare un proiettore VGA alla porta di uscita VGA dell'unità.
3
(Opzionale) Collegare un set di altoparlanti alla porta di uscita audio
dell'unità.
Nota: Se si utilizza la porta di uscita VGA, collegarvi un set di altoparlanti
per l'uscita audio.
4
(Opzionale)
• Per utilizzare l'unità tramite OSD (on-screen display), collegare un mouse
USB alle porte USB 2.0 Type-A, USB 3.0 Type-A o USB-C dell'unità.
• Per utilizzare uno schermo tattile abilitato USB, collegare lo schermo
tattile abilitato USB alle porte di uscita USB 2.0 Type-A, USB 3.0 Type-A o
USB-C e HDMI dell'unità.
• Per utilizzare un'unità ash USB per l'archiviazione, collegare l'unità ash
USB alle porte USB 2.0 Tipo-A, USB 3.0 Tipo-A o USB-C dell'unità.
5
Per consentire l'accesso all'interfaccia Web e fornire la copertura Wi-Fi
ai membri della riunione, collegare un cavo Ethernet alla porta Ethernet
dell'unità. Opzionalmente, collegare l'unità a uno switch di rete PoE per
l'accessibilità dell'interfaccia Web, la copertura Wi-Fi e l'alimentazione.
6
(Opzionale) Collegare l'adattatore di alimentazione al jack di alimentazione
dell'unità.
7
Installare le antenne WiFi sulle porte per antenne WiFi dell'unità.
8
Accendere l'unità premendo il pulsante di alimentazione, quindi il LED di
alimentazione si accenderà in blu.
9
Scaricare l'app ATEN Wireless Presentation per partecipare a una riunione,
condividere contenuti, cambiare display e congurare le impostazioni di
sistema sull'unità.
C
Funzionamento
È possibile azionare l'unità utilizzando l'interfaccia Web o l'app ATEN Wireless
Presentation.
Web GUI
L'interfaccia Web consente di congurare le impostazioni di sistema. Al primo
accesso, utilizzare l'indirizzo IP predenito 192.168.0.60 e le credenziali
predenite (administrator/password).
Mobile App
L'app ATEN Wireless Presentation è progettata per agevolare la partecipazione
dell'utente a una riunione, consentirgli di condividere contenuti, cambiare display
e congurare le impostazioni di sistema sul proprio dispositivo
VP2020 / VP2021 / VP2030 / VP2031. Per partecipare a una riunione, attenersi alla
procedura seguente.
1. Eettuare la scansione del codice QR per installare l'app ATEN Wireless
Presentation.
2. Seguire le istruzioni sullo schermo per partecipare alla riunione.
Switch per presentazioni wireless 4K VP2020 / VP2021 / VP2030 / VP2031 / Switch per presentazioni wireless 4K con vista
www.aten.com
A
Обзор оборудования
1
Кнопка питания со светодиодом
2
Порт USB-C
3
Порт USB 3.0 Type-A
4
Разъемы для WiFi антенны
5
Аудиовыход
6
Выход HDMI
7
Порт USB 2.0 Type-A
8
Выход VGA
9
Порт Ethernet
10
Разъем питания
B
Установка
1
Подключите дисплей с поддержкой HDMI к выходному разъему
HDMI на устройстве.
2
Подключите VGA-проектор к выходному VGA-порту устройства.
3
(Дополнительно) Подключите динамики к выходному аудиоразъему
на устройстве.
Примечание.
При использовании выходного разъема VGA
подключите к устройству динамики для воспроизведения звука.
4
(Дополнительно)
•
Чтобы управлять устройством с помощью экранного меню,
подключите USB мышь к разъему USB 2.0 Type-A, USB 3.0 Type-A
или USB-C на устройстве.
•
Чтобы использовать сенсорный экран с поддержкой USB,
подключите его к разъему USB 2.0 Type-A, USB 3.0 Type-A или
USB-C на устройстве, а также к выходному разъему HDMI.
•
Для использования USB-накопителя в целях хранения
информации его можно подключить к портам устройства USB 2.0
Type-A, USB 3.0 Type-A или USB-C.
5
Чтобы предоставить доступ к веб-интерфейсу и развернуть сеть
WiFi для участников собрания, подключите кабель Ethernet к порту
Ethernet на устройстве. Устройство также можно подключить к
сетевому коммутатору с поддержкой PoE, чтобы предоставить
доступ к веб-интерфейсу, развернуть сеть WiFi и подать питание на
устройство.
6
(Дополнительно) Подключите адаптер питания к разъему питания на
устройстве.
7
Подключите антенны WiFi к разъемам для антенн WiFi на
устройстве.
8
Включите устройство, нажав на кнопку питания. Светодиодный
индикатор питания загорится синим светом.
9
Скачайте приложение ATEN Wireless Presentation, чтобы
участвовать в собраниях, делиться контентом, переключать дисплеи
и настраивать системные параметры устройства.
C
Эксплуатация
Для управления устройством можно использовать веб-интерфейс или
приложение ATEN Wireless Presentation.
Графический веб-интерфейс
Веб-интерфейс служит для настройки системных параметров.
При первом входе в систему используйте IP-адрес по умолчанию
(
192.168.0.60
) и учетные данные по умолчанию (имя пользователя/
пароль:
administrator/password
).
Мобильное приложение
Приложение ATEN Wireless Presentation облегчает участие в собраниях,
обмен контентом, переключение дисплеев и настройку системных
параметров на устройствах VP2020 и VP2021
/ VP2030 / VP2031. Чтобы
присоединиться к собранию, выполните шаги ниже.
1. Сканируйте QR-код, чтобы установить приложение ATEN Wireless
Presentation.
2. Следуйте инструкциям на экране, чтобы присоединиться к собранию.
VP2020 / VP2021 / VP2030 / VP2031 Беспроводной презентационный коммутатор 4K / Беспроводной презентационный коммутатор 4K с многопотоковой
www.aten.com