WWW.ATKBINDINGS.COM | PROUDLY MADE IN ITALY SINCE 2007 28
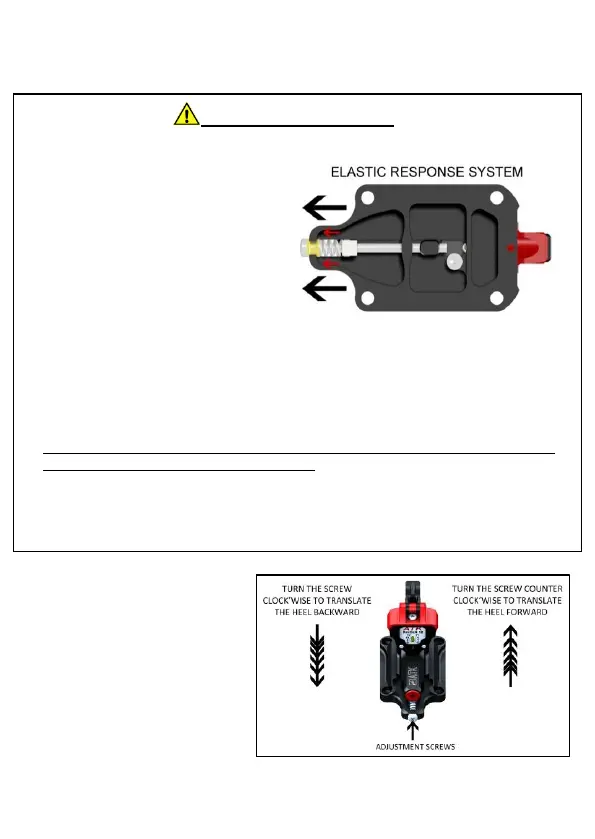
3.2| ADJUSTMENT
1. Hook the boot to the toe part.
2. Translate the heel part on the plate
the boot to step in.
3. Step into the heel part with the boot
between boot and heel.
4. Micro-adjust the heel position and
gauge, heel and boot.
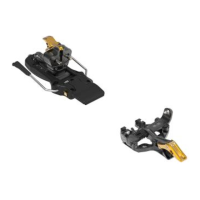
WARNING! DANGER!
The binding model “RT 10” is provided with the
“E.R.S.” system (ELASTIC RESPONSE SYSTEM),
developed to support an aggressive and heavy
charge skiing style with an elastic response to
compressions and jumps, improving the ski
control, precision and flex performance.
“E.R.S.” does not eliminate the need of a gap of
4 mm in between boot and heel: to respect the
imposed distance is a compulsory point in order
to miss undesired malfunctions and /or
damages to the material, with consequent
dangers for the user or third parties.
The adjustment operation must be done manually by using a good quality PH2 screwdriver.
The adjustment range provided by the plate is 20 mm (0,+10mm,-10mm); the adjustment range is marked
by a scale and included within two “STOP” logos.
During the adjustment operations it is ABSOLUTELY FORBIDDEN to overtake the two side lines marked
with the “STOP” logo.
Using the heel with an over range adjustment could lead to malfunctions and/or structural damages to
the binding with possible greater dangers for the User.
A wrong installation distance between boot and binding (smaller than 3.5mm or bigger than 4.5mm) can
cause an early as sudden structural failure of the binding with irreparable damages to the binding/ski/boot
system and/or prevent or modify the release performance in the event of a fall with consequent greater
risks for the athlete or third parties.
 Loading...