EasyManua.ls Logo

Atlas 59172 User Manual

Atlas 59172
16 pages
To Next Page IconTo Next Page
Page #1 background imageLoading...
Page #1 background image
Visit our website at: http://www.harborfreight.com
Email our technical support at: productsupport@harborfreight.com
Battery and charger sold separately
Visit our website at: http://www.harborfreight.com
Email our technical support at: productsupport@harborfreight.com
Battery and charger sold separately
Owners Manual & Safety Instructions
Save This Manual Keep this manual for the safety warnings and precautions, assembly,
operating, inspection, maintenance and cleaning procedures. Write the product’s serial number in the
back of the manual (or month and year of purchase if product has no number). Keep this manual and the
receipt in a safe and dry place for future reference. 22i
When unpacking, make sure that the product is intact
and undamaged. If any parts are missing or broken,
please call 1-888-866-5797 as soon as possible.
Copyright
©
2022 by Harbor Freight Tools
®
. All rights reserved.
No portion of this manual or any artwork contained herein may be reproduced in
any shape or form without the express written consent of Harbor Freight Tools.
Diagrams within this manual may not be drawn proportionally. Due to continuing
improvements, actual product may differ slightly from the product described herein.
Tools required for assembly and service may not be included.
Read this material before using this product.
Failure to do so can result in serious injury.
SAVE THIS MANUAL.
Question and Answer IconNeed help?

Do you have a question about the Atlas 59172 and is the answer not in the manual?

Atlas 59172 Specifications

General IconGeneral
BrandAtlas
Model59172
CategoryTrimmer
LanguageEnglish

Summary

Warning Symbols and Definitions

! DANGER

Definition of DANGER hazard level.

! WARNING

Definition of WARNING hazard level.

! CAUTION

Definition of CAUTION hazard level.

NOTICE

Definition of NOTICE advisory.

Important Safety Instructions

Gardening Appliance Safety

Key safety precautions for electric gardening appliances.

Battery Tool Use and Care

General Battery Safety

Covers preventing unintentional starting, handling, charging, and storage.

Lithium Battery Safety Warnings

Handle with Care

Keep dry, avoid opening, dropping, shorting, puncturing, incinerating, or high temps.

Charge According to Instructions

Use correct charger and inspect pack before use.

Vibration Hazard

Reduce Vibration Injury

Examine health, use suitable gloves, take breaks, grip lightly.

General Safety

Blade Rotation

Allow blade to stop before handling.

Avoid Wet Conditions

Do not use in rain, snow, or wet grass.

Daylight Use & Inspection

Use during daylight; inspect blade/guard.

Grounding

Prevent Electric Shock

Ensure proper grounding and use qualified electrician.

Extension Cords

Charger Compatibility

Extension cords must not be used with this item's Charger.

Specifications

Setup Before Use

Review important safety information before setup.

Functions

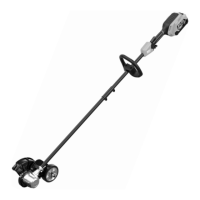
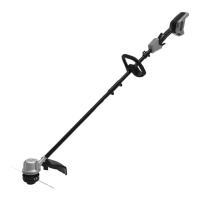
Overview of the edger's key functions and components.

Assembly Instructions

Attach The Auxiliary Handle

Steps to attach the auxiliary handle to the upper shaft.

Assemble The Shaft

Steps to connect and secure the upper and lower shafts.

Cut Depth Adjustment

Adjusting Cut Depth

Loosen knob, adjust blade to ground, tighten knob.

Operating Instructions

Preparation for Operation

Wear safety gear, inspect area, use two hands.

Charging Battery Pack

Charge battery before use per charger instructions.

Installing and Removing Battery Pack

Procedure for inserting and removing the battery.

Edger Operation

Guidelines for safe and effective edger use.

User Maintenance and Storage

Cleaning, Maintenance, and Lubrication

Procedures for cleaning, maintenance, and lubrication.

Replacing the Blade

Steps for removing and replacing the edger blade.

Replacing The Wheel

Procedure for removing and replacing the wheel assembly.

Replacing The Rubber Flap

Procedure for removing and replacing the rubber flap.

Parts List and Diagram

Assembly Diagram

Visual representation of all parts and their assembly order.

Record Product Serial Number

Limited 90 Day Warranty

Details of the product's warranty coverage and terms.

Related product manuals