Menu: Device
settings/ options
Record: Press to
start/stop recording
Main Interface
Waveform Monitoring Menu
Monitor Assist Menu
OR
04:08:01:23
Record Trigger: set by supported
camera/or rolling timecode trigger
Play: Enter
playback mode
Touch the Waveform
Monitoring icon to
reveal WFM functions
TIP: Press the center of the
screen to hide overlays
Waveform
monitoring
Luma Parade
Focus Assist
Touch the Monitor
Assist icon to reveal the
Monitor Assist functions
Transparency
Drag the slider to adjust the Opacity
controls of the WFM overlays
Focus Zoom
Toggle 1:1 to display 1:1 pixel
mapping, the indicator box
shows the location of the
screen you are viewing
Toggle 2:1 to magnify the
display, the indicator box shows
your viewing location, move the
zoomed location by dragging
across the screen or selecting
a portion of the indicator box.
Audio monitoring
level
Monitor
assist
RGB Parade
Zebra Pattern
Audio Metering
Cut and tag
Display / LUT options
Vectorscope
False Colour
Vectorscope
Zoom
Blue Only
Exposure
Safe Areas: Touch once
for action area, and
twice to add title area
1 3 5 7 A
Record
Waveform & Monitor Assist Functions
Cinema Guides
Toggle to display 16:9,
2.40, 2.35, 1.9, 1.85, 4:3
Attach AC / Optional Battery or
Power Station Photo/Video
Attach the supplied battery to the
Ninja Assassin.
To utilize Atomos continuous power
functionality, connect the optional Atomos
Power Station Photo/Video via the DC
power connection on the Ninja Assassin.
The Ninja Assassin utilizes only one
battery source at a time. This way a
battery can be removed, charged and
replaced during operation so long
as one battery with adequate charge
remains connected. Refer to the User
Manual for more information.
On/O & Screen lock
Briey press the circular button on the
side of the Ninja Assassin to power-
up the unit. To shut down, hold the
button for at least 4 seconds (until unit
turns off).
When in operation, a single press of
the power on/off button will lock the
display and controls. A second press
will enable the display and touch
controls.
Audio input
3.5mm mini jack input for connection
of external inputs from at line level
such as a Camera output, mixer etc.
DC Power
Connect DC power from an external source such as the
optional Atomos Powerstation Photo/Video, the Ninja
Assassin will automatically switch to this source.
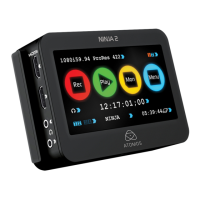
The Ninja Assassin is controlled by a simple
user-friendly touchscreen interface. Pictured
are the main controls seen when the Ninja
Assassin is rst powered up and there is a
video input connection.
Use the small blue arrows to open menus and
toggle options.
For example, touching the Video Input
Format will bring up the central input /
output menu.
Tally Light
Red Tally light indicates active recording. (the green light on
the screen face of the Ninja Assassin will also ash red during
recording). The Tally can be turned off in the menu options.
Battery Release Button
Press the release button to remove the battery.
LANC Remote
Optionally control the Ninja Assassin using LANC remote control
connection (use a 2.5mm TRS/ 3-pin plug). Share remote control with
other devices (loop through) by connecting them to the second LANC
connector cable with optional LANC splitter cable.
Stereo Line Out
Stereo Line out for monitoring Headphones.
HDMI In
HDMI input connection used to record to the Ninja Assassin.
HDMI Out
HDMI Output connection for devices with an HDMI input.
Connect and power-up
Touchscreen / User Interface
Battery
Align the connectors, slide the battery into
the lock position.
HDD/SSD Master Caddy II
Line up the Master Caddy II to the Ninja
Assassin disk bay and slide into place. To
remove, slide the caddy out.
IMPORTANT: Avoid removing the caddy
whilst recording as this may cause data
corruption
.
Source input
for recording
Video Input Format
and Pulldown Status
Recording
Quality
File Name
Scene/Shot/Take
Recording Time
Remaining
Continuous Power/
Battery Indicator
Record Status &
Pulldown Indicator
Status indicating
attention is required
Output Video
Resolution
Time code Settings
Display options / LUT
Video Input
Resolution
Monitor Assist
Functions
Record Trigger
Audio Control Panel
- Tap to control
audio input sources,
gains and channel
monitoring/recording.
Please refer to the
manual for more
information.
Headphone
Line Out Volume
Rec/Play/Menu Waveform
Monitoring
Monitor
Assist
Cut and Tag
Favorite/Reject
SSD
Solid State Drive [SSD].
For recommendations refer to:
> www.atomos.com/drives
HDMI Cable
HDMI cables need to support the HDMI 1.4 High Speed
standard.
Battery (Sold separately)
We recommend that you charge new batteries before using them.
To begin, connect battery to charger and commence charging. While
charging, the red charge light will illuminate. When the red charge light
turns green, the battery is 100% charged.
Assemble the Master Caddy II
Fix the Solid State Drive into the Master Caddy as shown (right). Align
screw holes on all three pieces and assemble completely. Insert screws
last.
Handle the SSD with care
Avoid contact with circuit board and connectors. Refer to manufactures
manual for handling instructions.
Format SSD
Once your SSD is inserted into the caddy, format it in your Ninja Assassin
recorder by selecting the BLUE arrow next to Recording Time
Remaining, Press Format HDD/SSD and follow the on-screen
instructions. For more information refer to the User Manual.
Checklist
Thank you for purchasing the Atomos Ninja Assassin, combining professional 4K/HD recording, monitoring, playback and
editing in a compact, lightweight, affordable add-on to existing DSLR and mirrorless cameras. With so many Recorder, Monitor,
Playback & Edit features included, please take the time to read through this Quick Start Guide and register your product for free
updates and extended warranty (atomos.com/registration).
You will also need (Sold separately)
Getting started
q 1 x Ninja Assassin Recorder
q 1 x Master Caddy II Drive caddy
q 1 x AC/DC Power Supply
q 1 x Soft Case
q 1 x Red Ninja Armor Bumper
q 1x Quick Start Guide
DOWNLOAD THE FULL
NINJA ASSASSIN USER MANUAL
www.atomos.com/support
ACTIVATE AVID DNxHD
®
IF REQUIRED
www.atomos.com/activation
EXTENDED 3 YR WARRANTY
Register now to extend your warranty to 3 years
from date of purchase.
www.atomos.com/registration
Important: DO NOT over-tighten the screws or else the alignment
of the Master Caddy II cannot be guaranteed.
QUICK START GUIDE
NINJA ASSASSIN
Anamophic Guides
Toggle to display 4:3 2x,
2x, 1.5, 1.33 aspect ratios.
Note: 4:3 2x will only
display with a 4K input
from the Pansonic GH4
Focus Peaking modes
Switch between Color / Mono /
Outline Focus Assist modes. Drag
the slider to adjust Focus Assist
Color for Color / Mono / Outline.
Zebra threshold
Adjust the Zebra (%) by dragging
the slider.
75%
75%
Brightness
Change the Dynamic Range of the
WFM overlays by dragging the slider
Display sizes
Touch to change the position of the
WFM overlays
50%
Battery
The Ninja Assassin can be powered via the included
Power supply or via a NPF L series style battery.
Sata Adaptor
To connect your drive to a computer for editing, Atomos oers
a USB 3.0 to SATA adaptor (ATOMDCK003) or 3rd party SATA
adaptors may also be used.