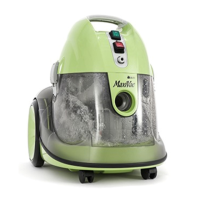
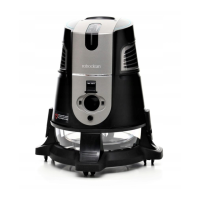
This document describes the Aura Vacuum Cleaner, a versatile cleaning system designed for both wet sweeping and carpet washing. It utilizes a water-based filtration system, making it suitable for various cleaning tasks, including water-based filtration and carpet washing. The device is available in two models: 114HW (MaxiVac) and 114RW (TechnoVac).
Function Description
The Aura Vacuum Cleaner is a multi-purpose device capable of:
- Sweeping: Dry vacuuming with water-based filtration.
- Wet Spill Vacuuming: Removing liquid spills from floors.
- Carpet Washing with Shampoo: Deep cleaning carpets using shampoo.
- Blowing: Functionality for blowing air, useful for various tasks.
The core of its operation relies on a water-based filtration system, which is designed to trap dust and allergens effectively, providing a cleaner exhaust air compared to traditional bag or cyclonic vacuum cleaners.
Important Technical Specifications
The technical specifications are largely similar for both models, with some key differences:
| Feature |
114HW - MaxiVac |
114RW - TechnoVac |
| Wet/Dry Sweeping |
✓ |
✓ |
| Washing Function |
✓ |
✓ |
| Motor Power (max) |
1000 Watt |
1000 Watt |
| Vacuum |
1950 mmSS |
1950 mmSS |
| Voltage / Frequency |
220 - 240 V AC, 50/60 Hz |
220 - 240 V AC, 50/60 Hz |
| Air Flow |
200m³/h |
200m³/h |
| Water Suction Rate |
1 - 1,5 L/sec. |
1 - 1,5 L/sec. |
| Fresh Water Tank Capacity |
7 L |
3,5 L |
| Dirty Water Tank Capacity |
8,5 L |
6 L |
| Weight |
12,7 kg |
10,8 kg |
| IP Code |
IPX4 |
IPX4 |
| Protection Class |
II |
II |
Key Differences:
- Fresh Water Tank Capacity: The MaxiVac (114HW) has a larger 7 L capacity, while the TechnoVac (114RW) has a 3.5 L capacity.
- Dirty Water Tank Capacity: The MaxiVac (114HW) has an 8.5 L capacity, whereas the TechnoVac (114RW) has a 6 L capacity.
- Weight: The MaxiVac (114HW) is heavier at 12.7 kg, compared to the TechnoVac (114RW) at 10.8 kg.
Both models share the same motor power, vacuum strength, voltage/frequency, air flow, water suction rate, IPX4 code (indicating protection against splashing water), and Protection Class II.
Usage Features
The Aura Vacuum Cleaner is designed for ease of use across its various functions.
Sweeping:
- Open head unit: Release securing clips.
- Lift head unit: From the dirt collection tank.
- Attach suction group.
- Place sponge filter: In the direction of the arrow.
- Place filter slot: In the direction of the arrow.
- Tighten filter: Securing lock clockwise.
- Add clean water: Up to the level indicated.
- Place head unit and attach suction hose: To inlet connector.
- Insert handle: Into end of telescopic tube.
- Attach floor cleaning nozzle: To telescopic tube and lock it in place.
- Pull power cable: And insert its plug into the main power supply.
- Press green button: For power. If the machine is on, the red LED will be illuminated.
Important for Sweeping:
- The pump switch MUST NOT be used in any vacuuming mode.
- Use of the pump without water will lead to PUMP FAILURE.
- Only switch the pump on when using the device for carpet washing purposes.
- All filters should be checked and cleaned after each use.
Wet Spill Vacuuming:
The process is similar to sweeping, but with specific warnings:
- WARNING: Do not use the device to vacuum any hazardous liquids like flammable liquids, corrosives, acids, oil-based liquids, etc.
- WARNING: During wet vacuuming, if the water level exceeds the tank, the noise of the device will be higher. In that case, unplug the device and discharge the water from the tank.
Carpet Washing with Shampoo:
- Attach suction group.
- Place sponge filter: In the direction of the arrow.
- Place filter slot: In the direction of the arrow.
- Tighten filter: Securing lock clockwise.
- Make sure tank is empty.
- Place head unit: On the dirt collection tank.
- Attach clean water tank: To the rear of the dirt collection tank.
- Fill the tank with tap water. (Do not fill the tank with hot water.)
- Pour two caps of shampoo: Into the clean water tank.
- Insert suction pipe: Into the tank and attach the the free end of the suction pipe to the inlet port of the head unit.
- Place head unit: And attach suction hose to inlet connector.
- Insert handle: Into end of the telescopic tube.
- Attach big/mini washing nozzle: To the telescopic tube and lock it in place.
- If needed, attach the rubber: To the big/mini washing nozzle by sliding tool onto the front of the head.
- Attach free end of washing set's tube extension: To the big/mini washing nozzle. To attach the tube extension, insert and turn it clockwise 90 degrees. To release, turn it anticlockwise 90 degrees and remove.
- Attach the washing set's tube extension: To the free end of the washing set tube and lock it by turning.
- Attach the spray trigger: To the handle.
- Secure the spraypipe: To both external surfaces of the telescopic tube and suction hose by using the securing clamps.
- Insert long end of the washing set's spraypipe: To the checkvalve inlet.
- First press power on green button. If the machine is on, the LED light on the switch will be illuminated. Then press the pump on red button. If the pump is on, the LED light on the switch will be illuminated.
- Press the trigger: To begin spraying water from big/mini washing nozzle.
Blowing:
- To use the blowing feature, remove the cover and sponge filter on the rear air outlet duct of your device.
- Attach the blowing apparatus (Accessory 10).
- Turn on the device by inserting the hose end into the blowing apparatus. The blowing feature is ready to use.
Maintenance Features
After Carpet Washing and Wet Vacuuming:
- Turn off the on/off switch: And unplug the device.
- Remove all attachment and suction-hose: From the device.
- Empty the dirty water reservoir: Wipe with a cloth to remove dirt, rinse thoroughly with warm water, and allow to dry completely before storage.
- Remove sponge filter: Rinse and allow to dry completely.
- Rinse and clean all parts and accessories: Thoroughly and allow to dry completely.
- To clean the suction-hose: Flush clean by running hot tap water through it and allow to dry completely before using again or storage.
Cleaning and Maintenance Steps:
- Lift the head unit: From the dirt collection tank.
- To drain remaining water: Turn the head unit sideways as in the way it is.
- Remove the filter cover: By turning the lock anticlockwise and pulling outwards.
- Remove the filter slot: In the direction of the arrow.
- Remove the sponge filter: In the direction of the arrow.
- Remove the suction group.
Washing Process Warnings and Precautions:
- Surfaces to be washed must be thoroughly swept first.
- It is strongly recommended to use Aura shampoo.
- Other shampoos, cleaning chemicals, foaming liquid, or powder detergents may damage the device.
- Never run the pump when the water tank is empty.
- If the water in the tank runs out while the pump is running, turn off the water pump immediately.
- Repeat the cleaning process a few times for very dirty carpets and upholstery.
- Before using your washed items such as carpets, sofas, etc., let them dry for about two hours.
Important:
- Always unplug the device from the mains power before maintenance or cleaning.
- Maintenance must be performed by an authorized service technician.