Do you have a question about the Auto Meter PowerNet BCT-460DTNA and is the answer not in the manual?
Discusses common reasons for battery failure, including application, installation, maintenance, age, and charging issues.
Outlines the visual inspection steps for belts, battery, and starting system components before testing.
Explains the use of Bluetooth for communication between the control and load modules, including range limitations.
Describes Wi-Fi usage for communication with the AMPNET server and firmware updates.
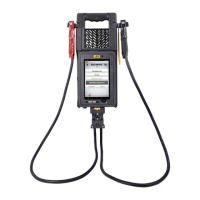
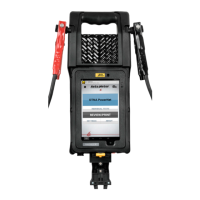
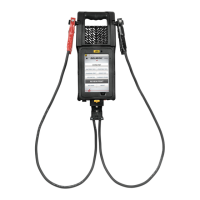
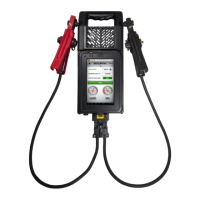
Details the physical components of the BCT-460DTNA, including the Control Module and Load Module.
Explains how to power on, off, and reboot the Load Module using its push button.
Guides users on how to access the tool's options menu via the three-dot icon on the main screen.
Covers firmware updates, battery status monitoring, data upload, and Bluetooth settings management.
Provides instructions on preparing and connecting adaptors to vehicle components for testing.
Lists common connection errors, such as reversed clamps or poor contact, and their on-screen warnings.
Displays a safety screen requiring user acknowledgment before proceeding with the PowerNet test.
Prompts the user to choose between starting a new test or resuming a previously started test.
Allows users to select customer complaints related to battery, starter, or other vehicle systems.
Guides users to enter the Vehicle VIN, Repair Order ID, Odometer, and Technician ID.
Asks if the vehicle has an auxiliary battery pack, determining if that test sequence will be performed.
Instructs the user to connect the tester to the battery pack to begin the initial starter battery pack test.
Details the process of entering battery rating, type, and serial number, either manually or via QR code scan.
Guides the user to perform a battery inspection, checking for dirt, cracks, posts, and connections.
Instructs users to select the type of battery (AGM, Standard/Flooded) from the available options.
Guides users to input the battery temperature, a critical parameter for accurate testing.
Explains that if a battery pack has a low state of charge, it needs to be charged before proceeding.
Details entering battery rating, type, and serial number for the auxiliary battery pack.
Guides the user to inspect the auxiliary battery for damage and connection integrity.
Instructs users to select the type of auxiliary battery (AGM, Standard/Flooded).
Guides users to input the temperature of the auxiliary battery for testing.
Presents a prompt to acknowledge a damaged battery that cannot be tested, affecting test data.
Details entering battery rating, type, and temperature for individual battery tests.
Instructs users to select the type of individual battery being tested.
Guides users to input the temperature of the individual battery for testing.
Explains the tester may apply a load to remove surface charge from the battery when needed.
Shows the results screen for a damaged battery, indicating zero readings for key metrics.
Lists various test result categories like "Low State of Charge", "Good Near End of Life", "Charge and Test", "Good Battery", and "Bad Battery".
Prompts the user to make indicated repairs based on test results for failed batteries.
Explains that batteries replaced after failing must be retested using the same process.
Presents a prompt for damaged auxiliary batteries, acknowledging that no test will be performed.
Details entering battery rating, type, and temperature for auxiliary battery tests.
Instructs users to select the type of auxiliary battery (AGM, Standard/Flooded).
Guides users to input the temperature of the auxiliary battery for testing.
Explains the tester may apply a load to remove surface charge from auxiliary batteries as needed.
Shows the results screen for a damaged auxiliary battery, indicating zero readings for test metrics.
Lists various test result categories for auxiliary batteries, similar to individual battery tests.
Details potential outcomes of auxiliary battery tests, including low charge, good, or bad results.
Guides users to reassemble the battery pack after repairs or replacements have been made.
Instructs to connect the tester for a final battery pack test after individual battery re-testing.
Outlines the starter inspection steps, focusing on cable connections and integrity.
Details connecting the large and small leads to the starter and battery pack for the cable test.
Presents possible results for the starter cable test, indicating good or bad voltage drop.
Explains the option to accept voltage drop results "As Is" if the test fails multiple times.
Shows the results for failed starter cables, including voltage drop measurements and a failed status.
Presents a prompt to acknowledge a damaged starter that cannot be tested, affecting test data.
Guides users through the process of connecting and initiating the starter test.
Displays results for a damaged starter, indicating zero values for cranking parameters.
Asks if the vehicle cranks, directing the test flow based on the response.
Prompts the user to start the engine, indicating whether it is running or not.
Shows the screen indicating the starter test is running and requires the user to wait.
Prompts the user to enter the number of cylinders for the vehicle's engine.
Lists potential starter test outcomes including Abutment, See Engine Diagnostics, Good Starter, Fail Low RPM, and Bad Starter.
Checks for low voltage on the IMS circuit to determine if the starter or start enable circuit is faulty.
Guides the user to disconnect the wire from the start enable input for testing.
Presents results for the start enable circuit test, indicating potential faults in the starter or circuit.
Shows the "Running Starter Test" screen, indicating the test is in progress.
Explains how to diagnose if the starter or start enable circuit is faulty based on voltage readings.
Outlines the alternator inspection steps, including belts, tension, and cable connections.
Details connecting large leads to the alternator and small leads to the battery pack for the cable test.
Presents results for the alternator cable test, indicating good or bad charging voltage drop.
Prompts the user to enter the rated alternator output value for the test.
Explains the option to accept voltage drop results "As Is" if the test fails multiple times.
Shows results for good and bad alternator cable voltage drops, including specific measurements.
Presents a prompt to acknowledge a damaged alternator that cannot be tested, affecting test data.
Guides users to select the alternator type and enter the rated output before starting the test.
Displays results for a damaged alternator, showing zero values for voltage regulation and charging current.
Outlines the alternator inspection steps, including belts, tension, and cable connections.
Shows the preparation screens for the alternator test, indicating the system is getting ready.
Instructs to hold the engine idle at approximately 1000 RPM for voltage stabilization.
Instructs to rev the engine to governor speed and wait for voltage stabilization.
Asks if the alternator has a remote sense circuit, guiding the test flow accordingly.
Prompts the user to turn on accessories like headlights and HVAC blower if required.
Lists potential outcomes of the alternator test, including good alternator and various diode failure results.
Guides users to disconnect the remote sense from the alternator and repeat the governor test.
Advises diagnosing the alternator remote sense circuit for specific failure types.
Shows results for a bad remote sense wire, indicating zero voltage and charging current.
Prompts to reconnect the auxiliary battery pack if equipped, after test completion.
Confirms that test data has been sent to AMPNET and provides a link to the website.
Allows users to select replaced parts and enter any necessary notes for the completed test.
| Brand | Auto Meter |
|---|---|
| Model | PowerNet BCT-460DTNA |
| Category | Test Equipment |
| Language | English |