Do you have a question about the AUTOHELM Navcenter 300 and is the answer not in the manual?
Details the process for mounting the Navcenter 300 using a clip-in bracket.
Explains permanent installation using the clip-in bracket and fixing studs.
Describes mounting the Navcenter 300 overhead or to a chart top using kits.
Details mounting the Navcenter 300 to a rail or stanchion using a remote station kit.
Covers powering the Navcenter 300 directly or from the SeaTalk bus.
Explains connecting GPS/Loran transducers via NMEA or SeaTalk.
Explains how the Navcenter 300 powers up and the initial caution display.
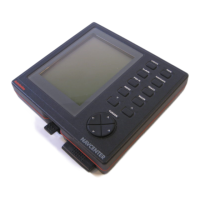
Describes the purpose of each key on the Navcenter 300 unit.
Explains how chart detail varies based on cartridge coverage and boundaries.
Details the beep confirmations for key presses and errors.
Guides on adjusting LCD brightness and contrast settings.
Explains the chart area and symbols used on the Navcenter display.
Describes how to move the cursor and pan the chart display.
Explains how to adjust the chart scale using the V and keys.
Details how to customize chart display options like depths, names, and features.
Explains how the Navcenter displays SeaTalk data pages and databoxes.
Guides on accessing and navigating the SETUP menu for customization.
Guides on setting up the Autohelm SeaTalk GPS position transducer.
Explains setting an alarm distance for waypoint arrival.
Explains how to enter local magnetic variation for accurate bearings.
Describes how to set the displayed heading to magnetic or true.
Details how to customize displayed units for speed, depth, distance, etc.
How to exit the SETUP menu and return to the chart display.
Describes accessing the INSTALLATION menu from the OPTIONS menu.
Explains navigating using pre-planned routes and storing up to 10 routes.
Details creating routes by entering waypoints and connecting them.
Covers storing, retrieving, erasing, and reversing routes.
Guides on starting and stopping track control for route navigation.
Explains advancing waypoints, selecting targets, and track history.
Covers placing, deleting, and converting event marks on the chart.
How to include previously saved waypoints in a new route.
View route details like ETA, bearing, and distance.
Explains Navcenter's compatibility with SeaTalk instruments for data display.
Information received via SeaTalk bus displayed as "Live" data pages.
Describes databoxes and pages displaying navigation data.
How to modify or update data within SeaTalk pages.
Guides on enabling and displaying databoxes on the chart.
Displays recorded SeaTalk data graphically for up to 24 hours.
Details computed functions like True Wind, VMG, and VMG-GND.
How the Navcenter interacts with SeaTalk autopilots for navigation.
Interfacing the Navcenter with non-SeaTalk autopilots via NMEA 0183.
How to create an emergency waypoint when a crew member goes overboard.
Procedure to deactivate the Man Overboard facility.
How to measure distance and bearing between points on the chart.
Explains the three modes (OFF, AUTO, KEYPAD) for the anti-theft feature.
Guides on programming the anti-theft pin number and setting modes.
Procedures to disable the CodeLock anti-theft feature.
How to connect the Navcenter to a mains supply for home use.
Details connecting a serial printer to the Navcenter's NMEA output port.
How to configure the Navcenter's output to "PRINTER" for printing.
Identifies common issues and their probable causes and cures.
Lists detailed technical specifications of the Navcenter 300 unit.