Do you have a question about the Autopot AQUAvalve easy2grow Kit and is the answer not in the manual?
Guide on checking AQUAvalve alignment and silicon seal for proper water flow.
Instructions for cleaning, disassembly, and descaling the AQUAvalve unit.
Detailed steps for assembling the easy2grow kit, including pot preparation, valve connection, and reservoir setup.
Recommendations for plant establishment and system activation timing.
The AQUAvalve™ is a crucial component of the easy2grow Kit, designed to automate the watering and feeding of plants by controlling the flow of nutrient solution from a reservoir to the plant pots. This innovative valve ensures that plants receive water and nutrients on demand, promoting healthy growth and reducing the need for manual intervention.
The core function of the AQUAvalve™ is to regulate the water level in the plant tray. It operates on a simple yet effective float mechanism. When the water level in the tray drops, the float within the AQUAvalve™ descends, opening the valve and allowing nutrient solution to flow in from the reservoir. As the water level rises to a predetermined point, the float ascends, closing the valve and stopping the flow. This cycle ensures that plants have access to a consistent supply of water and nutrients without being overwatered or underwatered. The system is designed to allow plants to establish before the system is turned on, typically for 7-10 days, to encourage a stronger and healthier root system.
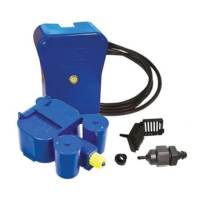
The easy2grow Kit, which utilizes the AQUAvalve™, consists of several key components that work together to create a self-watering system. These include a 12.4-gallon reservoir with a lid, a 2Pot tray with a lid, two 2.2-gallon pots, the AQUAvalve™ itself, a 1/4" top hat grommet, a 1/4" golf filter, a 1/4" in-line tap, 5 feet of 1/4" pipe, two Root Control Sheets, and two PotSock Squares. The reservoir stores the nutrient solution, which is then delivered to the AQUAvalve™ via the 1/4" pipe. The AQUAvalve™ is positioned in the 2Pot tray, which holds the two plant pots. The Root Control Sheets and PotSock Squares are used to prevent roots from growing into the AQUAvalve™ and blocking the system.
Setting up the easy2grow Kit is a straightforward process. First, the pots are filled with a suitable growing medium, and plants are potted up. It's recommended to water the plants manually and allow them to drain outside the tray for 7-10 days to help them establish. Next, the Root Control Sheets are placed in the pots with the gold face down. The AQUAvalve™ is then prepared by removing its collar, pushing the 1/4" pipe through the collar, and attaching it to the AQUAvalve™ nozzle. The collar is then re-screwed, ensuring not to overtighten it. The AQUAvalve™ is connected to the T-section in the tray, ensuring it is level. PotSock Squares are fitted over the bases of the pots.
The 1/4" pipe needs to be cut to an appropriate length to connect the reservoir to the AQUAvalve™. A 1/4" top hat grommet is pushed into the reservoir, and the 1/4" pipe is pushed through it. Inside the reservoir, the 1/4" filter is pushed into the 1/4" pipe. Finally, both pots are placed in the tray, ensuring they are clean, and the lid is placed over the valve onto the tray.
For optimal performance, the reservoir should always be raised to a minimum of 6 inches above the highest AQUAvalve™. It's crucial to refill the reservoir when approximately one-third of the solution remains, as the reservoir should never be allowed to run empty. The system is designed to work best with mineral fertilizers, and organic fertilizers are not recommended as they can block the small pipework. Before placing pots in the tray, all substrate should be cleaned from the bottom and sides of the pots to ensure the system remains clean. The system works well with free-draining substrates such as soil/perlite, coco/perlite, soil/clay pebbles, coco/clay pebbles, and rockwool/clay pebbles.
Proper maintenance of the AQUAvalve™ is essential for its longevity and efficient operation. At the end of each growing season, the AQUAvalve™ should be cleaned using warm soapy water, with an old toothbrush being helpful for this task. The AQUAvalve™ is designed for easy disassembly. The top float can slide all the way across, and the bottom float can be unclipped from its pivoting position. The circular discs fitted to the top float can also be removed using pliers to grip the raised point. During disassembly, it's advisable to remove the silicones to prevent them from getting lost.
It is also useful to have a paper clip or pipe cleaner on hand to clear any lime scale build-up that may have occurred in the AQUAvalve™ nozzle during the growing season. Blowing through the AQUAvalve™ nozzle can also help remove any build-up. However, it is strictly advised not to use a drill or drill bit to clear the AQUAvalve™ nozzle, as this can potentially damage the AQUAvalve™ beyond repair.
Ensuring the silicon component of the AQUAvalve™ is sitting parallel on the hole below it is critical for correct flooding and draining. This can be checked by holding the AQUAvalve™ at eye level to see the silicon fitted to the top float resting on the hole. The silicon must create a tight seal when touching the hole. If it appears not to be sitting parallel, the top float should be lifted, pressure applied to one side of the silicon, and then the float dropped back into position. This procedure can be repeated if necessary until a proper seal is achieved.
| Number of Pots | 2 |
|---|---|
| Material | Plastic |
| Category | Lawn and Garden Equipment |
| Valve Type | AQUAvalve |
| Pot Size | 8.5 liters |
| Reservoir Compatibility | Compatible with various reservoir sizes |
| Usage | Indoor/Outdoor |