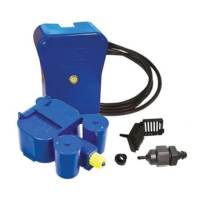
Tank
1x AQUAvalve
1x AQUAvalve cover
1x circular spirit level
1x 16-6mm inline filter
1x 6mm golf filter 1x 6mm top hat grommet 1 x 1.5m 6mm pipe
Note: The easy2GO kit can be placed anywhre in the tray
Using 6mm golf filter
Using 16-6mm inline filter
and standard hosepipe
Minimum pot size 5 litres
Minimum tray depth 30mm
Maximum tray size 1.2m/sq
Assembly instructionseasy2GO contents
Suggested layouts
Reservoir
6mm pipe
6mm top hat grommet
16mm pipe
6mm golf filter
16-6mm inline filter
AQUAvalve
Cut 6mm pipe to appropriate
length if required.
5
1
For ease of assembly lay out the contents of your easy2GO kit.
Then place your flat tray into position.
Minimum recommended tray depth is 30mm.
Maximum tray size 1.2m/sq.
Ensure your tray is level.
3
Place AQUAvalve cover over the AQUAvalve.
The AQUAvalve and cover should be placed
directly onto the tray.
Never sit the AQUAvalve and cover on
capilliary matting.
2
Remove threaded collar from AQUAvalve.
Push one end of the 6mm pipe through
the collar and attach the pipe to
AQUAvalve nozzle.
Then replace AQUAvalve collar.
4
Ensure the circular spirit level indicates the
tray is level, adjust if required.
Place plant pots into tray.
7
Connecting to a reservoir tap.
A 10cm length of standard garden hose is
required. Push hose onto tap.
Push 16/6mm inline filter onto hose. Attach
6mm pipe to the end of filter.
Clean filter once a month by simply
unscrewing and removing the internal filter,
with the tap turned off.
6
Connecting your easy2GO Kit to a simple
plastic container.
Drill a hole into the side of the container,
25mm from the base. Use a 3-5mm drill bit
to create a pilot hole and a 10mm drill bit for
the final hole.
Insert 6mm Top Hat Grommet into 10mm
hole, push 6mm pipe through the Grommet
and push 6mm filter into 6mm pipe.
Connection Option 1
Connection Option 2
8
Fill reservoir with water and
add liquid feed if required.
Organic feeds should NOT be poured
in the reservoir. Organic fertilisers
should be poured directly in to the
pots/tray from a watering can.
 Loading...