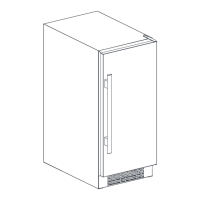
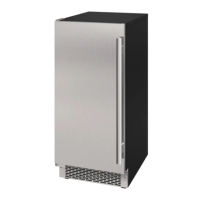
This document is an owner's manual for the Avallon Gourmet Ice Maker, covering models AIMG151GPRI, AIMG151PPRI, AIMG151GSSI, AIMG151PSSI, and AIMG151PSSO.
Function Description:
The Avallon Gourmet Ice Maker is designed to produce gourmet ice cubes for domestic indoor use. Specific models (AIMG151PSSORH and AIMG151PSSOLH) are also suitable for indoor or outdoor use, provided they are protected from rain, sleet, snow, and moisture. The unit automatically produces ice until the bin is full, and continues to produce ice as it is removed or melts, keeping the bin full. It produces one batch of 24 ice pieces every 25-30 minutes under normal temperature conditions (50° to 100°F), taking approximately 10-12 hours to completely fill the ice bin. The ice maker features an "ICE/Off/Wash" switch for operation and cleaning cycles.
Important Technical Specifications:
- Product Type: Automatic Gourmet Ice Maker
- Models Covered: AIMG151GPRI, AIMG151PPRI, AIMG151GSSI, AIMG151PSSI, AIMG151PSSO (and their LH/RH variations for door swing, and SO/RH for outdoor models).
- Voltage / Frequency: AC 115V / 60Hz
- Operating Amperage: 4.0 Amps
- Refrigerant: R134a
- Ambient Temperature Range: 50°F - 100°F
- Dimensions (Height x Width x Depth): 33 3/4" x 14 15/16” x 23 1/4” (Depth with door handle is 25 1/16”). The minimum height is 33 3/4", with leveling feet allowing for adjustment to a taller height.
- Water Supply Pressure: Minimum 20 psi, static pressure no more than 80 psi.
- Electrical Requirements: Standard 115 V, 60Hz, properly grounded 3-prong outlet. Recommended separate circuit with a 15 Amp fuse or circuit breaker. No extension cords or adapters should be used.
- Drainage Options: Available with gravity draining (AIMG151GPRI, AIMG151GSSI) or pump draining (AIMG151PPRI, AIMG151PSSI, AIMG151PSSO). Pump draining models can pump water up to 4 feet vertically and 20 feet horizontally.
Usage Features:
- Installation: Designed for freestanding or built-in installation. Requires at least 2 inches of clearance at the back, 1/4 inch at the top, and 1/4 inch at the sides for proper ventilation and service access. The unit must be leveled using adjustable feet.
- Door Handle: Features a door handle that is installed by securing it with Phillips head screws from the inside of the door. Panel-ready models may have different handle installation instructions.
- Water Supply Connection: Connects to a COLD water piping using copper tubing with a 1/4” compression fitting or 1/4" reinforced PVC tubing. A shut-off valve must be installed. A water filter is strongly advised to remove taste, odors, and particles, and to mitigate issues with hard water.
- Drain Line Connection: Gravity draining models require a downward slope of 1/4" per foot of line to a floor drain, with an air gap. Pump draining models can pump water to a drain within specified vertical and horizontal distances.
- Initial Operation: After installation, the unit should stand upright for at least 24 hours. The main water supply and shut-off valve must be turned on, and the unit plugged in. The power switch is set to "ICE." The first 2-3 batches of ice (1-2 hours) should be discarded.
- Ongoing Operation: The power switch remains in the "ICE" position. Ice is removed using the provided scoop, which should be kept clean and hung from its hook. No items other than ice should be placed in the ice bin to prevent unsanitary conditions, freezing, leaks, or drain blockage.
- Normal Sounds: The manual describes various normal operating sounds, including rattling from refrigerant/water lines, pulsating/high-pitched sounds from the compressor, splashing water, gurgling from refrigerant flow, air forced over the condenser, and ice cubes falling into the bin.
- Storage Preparation: For long-term storage or moving, the unit must be disconnected from power and water, drained, cleaned, and thoroughly dried. The door should be left open for air circulation. Child entrapment warnings are provided, recommending door removal if disposing of an old unit.
Maintenance Features:
- Exterior Cleaning: The door and cabinet can be cleaned with a mild detergent and lukewarm water solution (e.g., 2 tablespoons baking soda to 1 quart water) using a soft sponge. Stainless steel surfaces should be cleaned with a mild detergent and warm water solution, avoiding abrasive or caustic cleaners. Rust stains, especially in coastal areas, should be removed quickly with a commercial stainless steel cleaner or 15% nitric acid solution.
- Interior Cleaning and Sanitizing (Monthly): The interior should be cleaned monthly with a mild detergent and warm water solution (e.g., 1 ounce dishwashing liquid to 2 gallons warm water) using a soft sponge and nylon brush. All surfaces should be rinsed with clean water.
- Condenser Cleaning (Monthly): The condenser should be cleaned monthly to remove dust and hair using a household or portable vacuum cleaner with a brush attachment. This involves removing the front panel to access the condenser.
- Routine Cleaning of Interior Parts:
- Turn the ice maker switch to "OFF" and allow the current ice-making cycle to complete.
- Disconnect power and turn off the water supply.
- Remove all ice from the bin.
- Remove and clean the water curtain and ice slide with a soft sponge and cleaning solution, then rinse.
- Clean water nozzles on the spray bar with a brush or sponge, using vinegar if necessary for mineral buildup.
- Remove and clean the drain plug inside the water reservoir.
- Clean the corners, sides, and bottom of the ice bin.
- Remove and clean the two-part ice bin filter screens and water reservoir filter screen.
- Pour cleaning solution down the ice bin drain and rinse.
- Reassemble all parts, reconnect power and water, and discard the first batch of ice.
- Deep Cleaning and Sanitizing (Every 6 Months or More Frequently):
- Use a Nickle-Safe Ice Maker Cleaner (or vinegar) to remove mineral deposits.
- Use a commercial ice maker disinfectant (or a solution of 1 part 5.25% Sodium Hypochlorite bleach to 25 parts water) for sanitizing.
- Follow specific instructions for mixing and applying cleaning/disinfectant solutions, avoiding contact with exterior surfaces.
- Wear rubber gloves.
- The process involves soaking internal parts, manually cleaning the interior, running automatic "WASH" cycles with cleaning solution, rinsing, then repeating with disinfectant solution, and finally a clean water rinse.
- Discard the first batch of ice produced after deep cleaning and sanitizing.