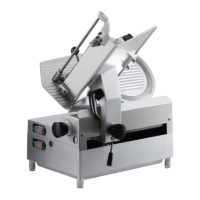
The Avantco meat slicer is a robust, electrically driven appliance designed for efficient and precise slicing of various meats. It features a medium-duty aluminum construction and powerful drive motors, ensuring reliable operation and extended use in commercial settings. The slicer is intended for indoor use only.
Function Description
The primary function of the Avantco meat slicer is to cut meat into uniform slices. It operates with an auto/manual slicing mode, allowing users to choose between automated and manual operation based on their needs. In manual mode, the user controls the carriage movement to slice meat, while in auto mode, the machine automates the slicing process. The slicer is equipped with a sharp blade that rotates at a consistent speed to achieve clean and even cuts. A thickness adjusting knob allows for precise control over slice thickness, ranging from very thin to thicker cuts. The meat pusher and product table are designed to hold the meat securely in place during slicing, ensuring safety and consistent results.
Usage Features
The Avantco meat slicer is designed with several features to enhance usability and safety.
- Unpacking and Setup: Upon receiving the slicer, it's crucial to inspect it for any damage incurred during transit. Any damage should be reported to the carrier. The slicer should be placed on a stable, level surface with adequate working height and clear surrounding areas for safety and proper air circulation. Before initial use, the machine must be thoroughly cleaned and sanitized.
- On/Off Switch: The slicer is equipped with an on/off switch for easy control. Users should ensure the switch is in the "off" position before plugging in the unit.
- Thickness Adjustment: A control knob adjacent to the on/off switch allows users to adjust the slice thickness. To set the desired thickness, the knob is turned to the appropriate setting.
- Meat Placement: For optimal slicing, the meat should be placed on the support platform, ensuring it is firmly held against the meat pusher. The food pusher is then lifted to its original position on top of the meat to begin slicing.
- Manual Mode: In manual mode, the user engages the control lever (H in diagram 1) to position A. The blade motor is switched on, and the handle is used to push the carriage back and forth, beginning the slicing process.
- Auto Feed Mode: For automatic operation, the control lever (H in diagram 1) is moved to position B. This engages the auto feed function. The blade motor is switched on first, followed by the auto feed motor. The unit will then automatically cut the meat.
- Safety Precautions: The manual emphasizes several safety precautions. Users should always wear protective gloves when operating or cleaning the slicer. It is critical to unplug the slicer before undertaking any cleaning or maintenance. The blade is extremely sharp, and users are warned to keep hands away from the blade's edge. The machine should only be operated by trained personnel. Loose-fitting clothes or jewelry should be avoided, as they can get caught in moving parts. The blade must be replaced when it has reduced in size by 5mm.
Maintenance Features
Regular cleaning and sanitizing are essential for maintaining the slicer's performance and complying with health codes. The manual provides detailed instructions for disassembling, cleaning, and reassembling the various parts.
- General Cleaning: The machine should be cleaned and sanitized at least once a day, or more frequently if necessary. If the machine has been unused for a while, it must be cleaned before use.
- Disassembly for Cleaning:
- Meat Pusher: Unscrew the knob to extract the rod from the tray, then remove the meat pusher.
- Product Table: Turn the locking knob counter-clockwise all the way, remove the knob itself, and then pull the entire group upwards.
- Center Plate: Unscrew the center plate locking knob, push on the knob to move the center plate off the knife, and then remove both the center plate and the locking knob.
- Slice Deflector: Remove the slice deflector, which is attached to the main slicer body.
- Sharpener: Loosen the knob below the sharpener block without removing it, then pull the whole sharpener upwards.
- Cleaning Procedures:
- Parts to be Washed: Use hot water and a biodegradable detergent (7-8 PH) at a temperature of no lower than 30°C (86°F) for dishes. A soft, spongy cloth and a semi-rigid nylon brush are recommended for the plate and food press.
- Sanitizing: A chemical sanitizer (chlorine, iodine, or quaternary ammonium) applied in accordance with EPA-registered label use instructions should be used.
- Cleaning the Sharpening Stones: The sharpening stones must be cleaned regularly. Remove the nuts and take the stones off the shafts. Soak the stones in a solution of dish soap and water for one hour. Scrub the stones with a stiff bristle brush, rinse thoroughly, shake off excess water, and pat partially dry with paper toweling or a clean cloth. Allow the stones to air dry for at least 24 hours, then oil the shafts with Food Machine Oil. Reassemble the sharpener.
- Cleaning the Blade: Always wear protective gloves. Press a damp cloth on the surface of the blade and move it slowly from the center to the edge, on both sides of the blade cover and the other side. Sanitize and dry in the same way. Repeat cleaning both front and back of the knife with clear water. Always move hands towards the edge of the knife. Sanitize and allow to dry.
- Cleaning the Ring Guard: Fold a cloth wipe submerged in fresh detergent solution and work it between the ring guard and the knife, starting at the base of the ring guard. Carefully work the cloth around the knife, cleaning the edge of the ring guard and edge of the gauge plate.
- Cleaning the Body of the Machine: Clean the machine body with a damp cloth or a sponge, rinsing frequently with hot water and cleaning solution. Rinse with hot water, sanitize, and let air dry. Clean also the gauge plate and the indexing knob. Do not open the gauge plate or risk injury.
- Cleaning Components in the Base: The components contained in the base do not need any special cleaning; occasionally remove the dust that can accumulate in the end area of the carriage and of the thickness plate regulation.
- Reassembly: After cleaning, reassemble the slicer by reversing the disassembly steps. Ensure all parts are correctly placed and tightened.
- Sharpening Instructions: The manual provides detailed instructions for sharpening the blade using the built-in sharpener. This process involves switching off the power, unplugging the slicer, turning the thickness control knob to the fully closed position, cleaning the knife, loosening the sharpener locking knob, raising and rotating the sharpener until the stones sit on each side of the knife, retightening the knob, plugging in the slicer, and then pressing the sharpening stone push-button for specific durations. After sharpening, the deburring stone push-button is pressed. Finally, the power is switched off, the sharpener is returned to its stored position, and the slicer is cleaned.
- Gear Box Oil Gauge: The manual includes instructions for checking the gear box oil levels. When oil levels drop below the indication line, more oil will need to be added using the oil dispenser provided. The dispenser nozzle must be inserted into the port. An additional port is available on the side of the unit to lubricate the side shaft. These ports need to be filled once a week with only two pushes of the dispenser. A new machine needs to run for 20 minutes before the oil gauge begins showing oil.
- Gasket Inspection: The recommended interval for gasket inspections is six months. Components that are detached for cleaning and sanitizing, such as the gasket between the tray and the extension, and the protection on the switch, should be inspected. If any gasket or seal is found to be damaged or missing, the slicer must be removed from service until repaired by the manufacturer or its authorized service agent.
- Lubrication: The manual recommends using LubriQuik food grade silicone spray lubricant for various machine parts that contact food, such as slicers, conveyor systems, bottling and canning machinery, bakery equipment, and dairy equipment.
The Avantco meat slicer is designed for durability and ease of maintenance, ensuring a long service life with proper care and adherence to the provided instructions.