Do you have a question about the Avanti 64933 and is the answer not in the manual?
Guidelines for staying alert, dressing properly, and maintaining balance while operating the tool.
Explanation of tools with double insulation and their plug types, suitable for grounded or ungrounded outlets.
Guidance on selecting and using appropriate extension cords based on gauge, length, and tool amperage.
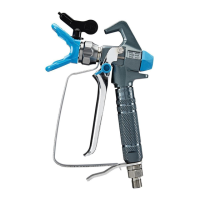
Instructions for correctly aligning and attaching the Spray Gun Handle to the Spray Gun Body.
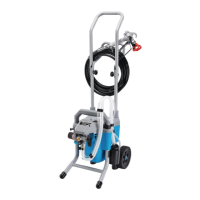
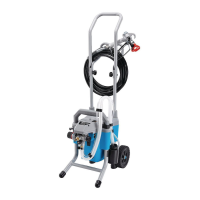
Procedure for attaching the swivel casters to the front and back of the sprayer unit.
Steps for attaching the storage hook to the sprayer handle.
Procedure for connecting the air hose to the sprayer unit.
Instructions on how to adjust the sprayer's handle for user comfort.
Details components specific to the 1.0 mm sprayer model.
Details components specific to the 3.0 mm sprayer model.
Steps for preparing a clean, well-lit workspace and masking surrounding areas.
Steps for setting up and adjusting the spray gun before operation.
Instructions for straining and checking the viscosity of paint materials before filling the cup.
Explains the process of identifying and adjusting spray patterns.
Guidance on performing test sprays to check consistency and make adjustments.
Demonstrates proper gun angle and movement to achieve even spray application and avoid clogs.
Explains the correct way to depress and release the trigger for smooth paint application and build-up prevention.
Instructions for cleaning the spray gun and cup immediately after each use.
Guidelines for safely disposing of cleaning solvents and waste materials according to regulations.
Checklist for inspecting the tool's general condition before each use for safety and proper operation.
Instructions for storing the tool in a dry, secure area away from children.
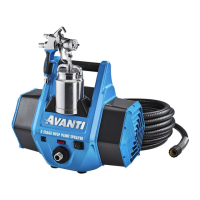
The Avanti Portable HVLP Paint & Stain Sprayer, model 64933, is a household-use-only tool designed for applying water-based or oil-based low viscosity paints, stains, and varnishes. It is a double-insulated device, meaning it does not require grounding and can be used with either two or three-wire extension cords.
The sprayer utilizes High Volume Low Pressure (HVLP) technology to atomize and apply coating materials. It consists of a main unit housing the power/airflow switch, hose storage, and a viscosity cup storage slot, connected via an air hose to a spray gun. The spray gun itself features a cup for holding the material, an air cap, a lock ring, a spray width adjustment knob, a fan pattern adjustment ring, a trigger, and a fluid control knob. The device is designed for ease of use with adjustable settings for spray pattern, fluid control, and airflow, allowing for customized application based on the material and desired finish.
| Brand | Avanti |
|---|---|
| Model | 64933 |
| Category | Paint Sprayer |
| Language | English |