IMPORTANT SAFETY INSTRUCTIONS
Exposure to extremely high noise levels may cause permanent hear-
ing loss. Individuals vary considerable in susceptibility to noise-induced
hearing loss, but nearly everyone will lose some hearing if exposed to
sufficiently intense noise for a period of time. The U.S. Government’s
Occupational Safety and Health Administration (OSHA) have specified the
permissible noise level exposures shown in the following chart.
According to OSHA, any exposure in excess of these permissible limits
could result in some hearing loss. To ensure against potentially danger-
ous exposure to high sound pressure levels, it is recommended that all
persons exposed to equipment capable of producing high sound pressure
levels use hearing protectors while the equipment is in operation. Ear
plugs or protectors in the ear canals or over the ears must be worn when
operating the equipment in order to prevent permanent hearing loss if ex-
posure is in excess of the limits set forth here.
Duration, per
day in hours
Sound Level dBA,
slow response
Typical example
8 90 Duo in small club
6 92
4 95 Subway train
3 97
2 100 Very loud classical music
1.5 102
1 105
That couple screaming
at each other
0.5 110
<0.25 115 Loudest parts at a rock concert
The Avantone CLA-10 Passive Monitors comply with all applicable /
RoHS / WEEE European Union directives.
Do not attempt to service this unit yourself, as it will void your war-
ranty. Please check your unit carefully upon receipt and return to place of
purchase immediately if there are any problems with the product. After
that, the standard AVANTONE 5 YEAR warranty will apply to defects in
materials and workmanship.
U.S.A.
Should your AVANTONE product require service, please contact the
AVANTONE PRO Service Department. +1 845 642 3697-or- e-mail info@
avantonepro.com. You must obtain an RA # (Return Authorization num-
ber) from us before shipping a unit back to us. This RA # must be clearly
written on the outside of the box.
Please safely pack the units…It is best to use the original packing mate-
rials. AVANTONE PRO cannot be responsible for any damages incurred
in shipping to us due to poor packaging. PLEASE PACK CAREFULLY and
FULLY INSURE THE SHIPMENT.
INTERNATIONAL
For service or warranty assistance, please contact the AVANTONE PRO
distributor in your country through the dealer from whom you purchased
this product.
LIMITED 5 YEAR WARRANTY
AVANTONE CLA-10 Passives are warranted by Avantone Pro to be free
from defects in materials and workmanship for the period of 5 YEARS
to the original purchaser. In the event of such defects, the Avantone Pro
product will be repaired without charge or, at our option, replaced with a
new one if delivered to Avantone Pro prepaid, together with a copy of the
sales slip or other proof of purchase date. The warranty excludes prob-
lems due to normal wear, abuse, shipping damage or failure to use the
product in accordance with the specifications.
All speaker systems are vulnerable to damage from sustained amplifier
clipping. This can be described as a distortion of the signal caused by the
amplifier running out of headroom. Heat will then be generated in the
voice coil of the driver beyond the heat handling capabilities of wire and
glue. At some point the voice coil will burn, causing the speaker to sound
very distorted; eventually the driver will stop working.
All parts and labor are covered under this Limited Warranty. However, if it
is determined by AVANTONE PRO that the voice coil was burned due to
sustained amplifier clipping, we reserve the right to charge the customer
for the cost of the repair, since this is considered abuse.
Avantone Pro shall not be liable for damages based upon inconvenience,
loss of use of the product, loss of time, interrupted operation or com-
mercial loss or any other damages, whether incidental, consequential, or
otherwise. This warranty gives you specific legal rights, and you may have
other rights, which will vary from state to state.
This warranty is not transferable.
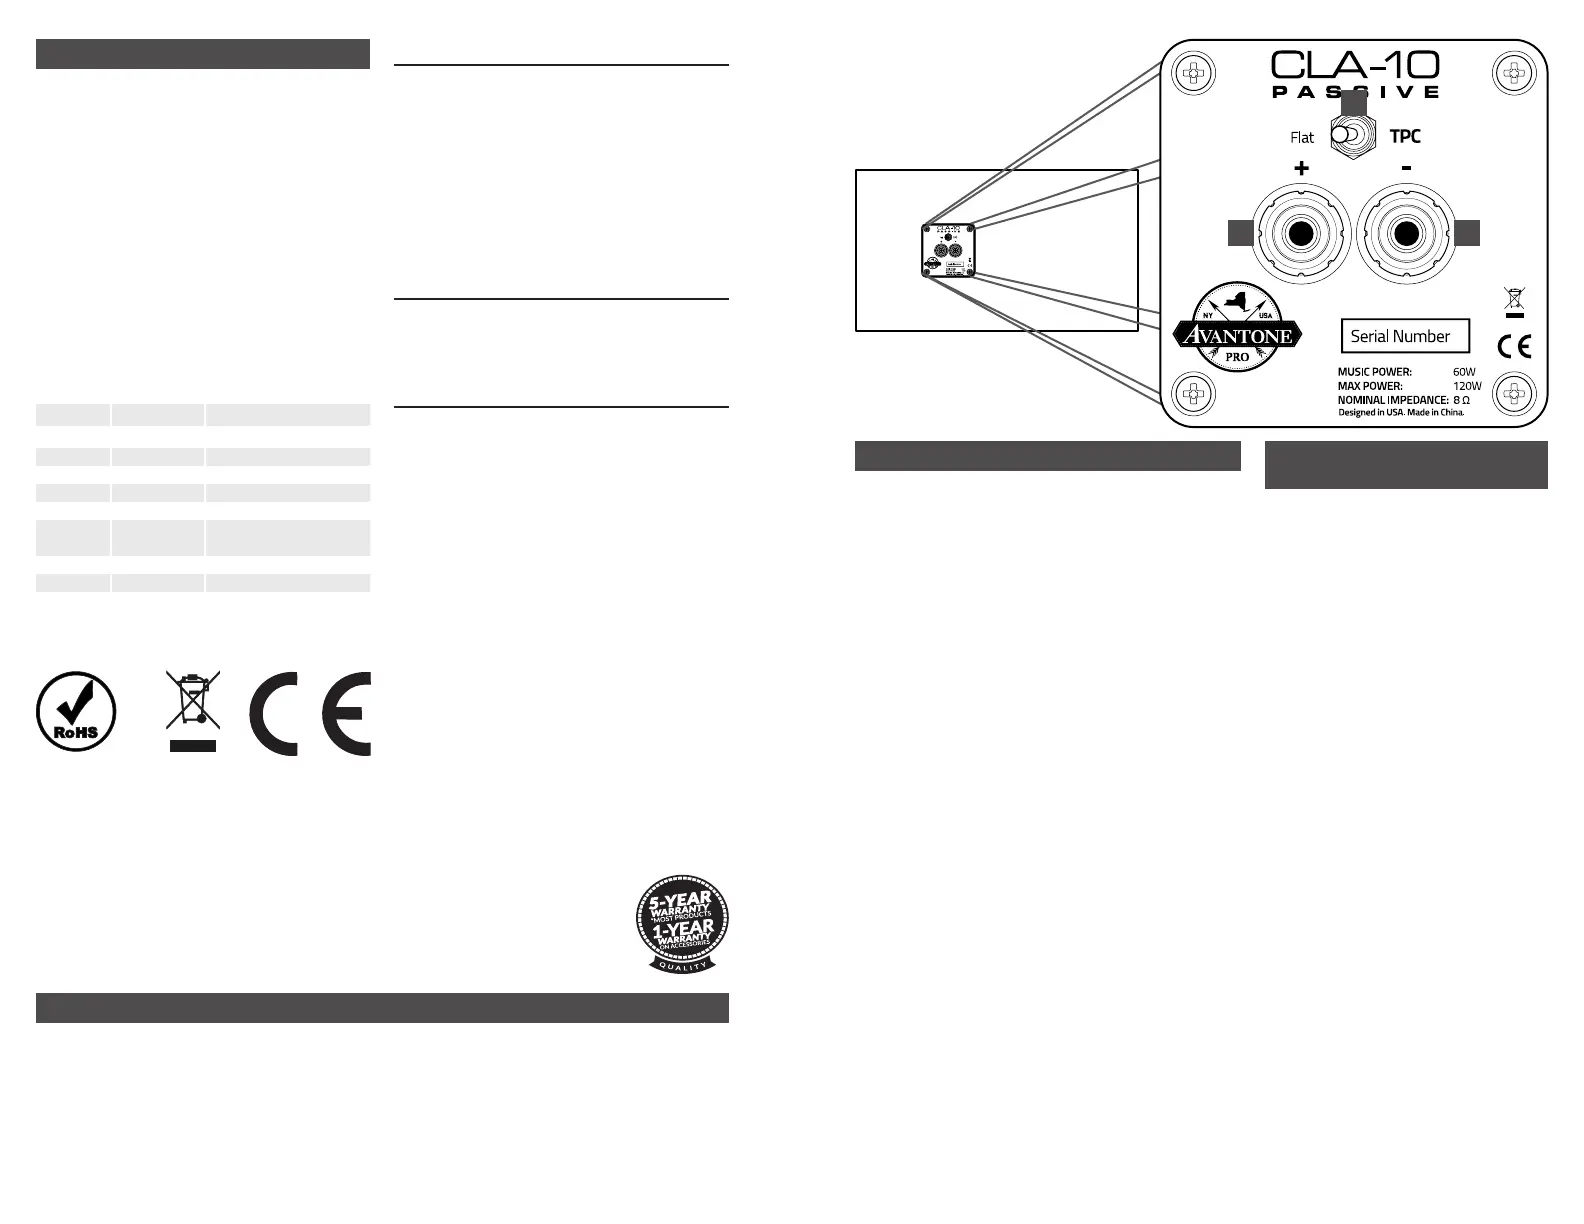
REAR PANEL CONNECTIONS
1. Banana / bare wire connector: Accepts AWG 18 gauge bare wire or banana plugs.
Connect your power amplifier here.
2. TPC (Tissue Paper Control) Switch: Applies a 2 dB cut to the high-frequency driver,
simulating the old studio trick of covering the tweeter with a sheet of tissue paper.
CLA-10 PASSIVE BREAK-
IN SUGGESTIONS
Because any new full-range speaker exhibits a certain amount
of “tightness” when first played, you will most likely benefit
from a break-in of the CLA-10 Passive if you are going to be
doing critical work. Normally, standard usage of the speakers
over a short period of time is all that is required before you rec-
ognize the tonal changes that occur after some hours of use.
However, if you need to get to work immediately; then we do
have a suggested break-in mode that will advance the natural
time process much quicker. Here’s the quick version!
Though the CLA-10 Passives do perform solidly right out of the
box, it is beneficial to run them through a burn-in period before
using them in professional mix situations.
Some high-end speaker manufacturers claim that many
speakers need a 100-200 hour break-in period before they are
“normalized,” which most professional engineers do just to get
used to their new monitors. We feel that simply playing any
music with good low frequency content through them on a
loop for 24-72 hours at a medium volume level can easily
do this. Users have reported that this speeds up the break-in
process, and the speakers open up a bit more than when first
powered up.
Whatever process you utilize, rest assured that you have pur-
chased an amazing tool that will aid in determining the proper
levels and tones of your all-important mixes!
Enjoy and here’s to accurate mixes!
CONNECTING YOUR CLA-10 PASSIVE MONITORS
1. Turn off the power amplifier.
2. Set all faders and level controls to minimum on your console/monitors
feed.
3. Connect AWG 18 gauge wire or better to the binding posts, using bare
wire or banana plugs. The posts accept standard ¾” spacing dual banana
plugs. Red is positive, black is negative.
4. All other equipment should be powered up before turning on the power
amplifier to avoid loud turn-on spikes and surges.
5. Turn on the power amplifier.
1 1
2
 Loading...