EasyManua.ls Logo

Avermedia AVerVision 300AF User Manual

Avermedia AVerVision 300AF
2 pages
To Next Page IconTo Next Page
Page #1 background imageLoading...
Page #1 background image
A
VerVision
300AF
Quick Guide
1. Connect the Power.
VGAOUTVGAINDC12V
LIGHT
BOX
Power adapter
Power cord
Wall outlet
2. Select the video display output.
TV RGB
VIDEO S-VIDEO DVI
TV RGB
VIDEO S-VIDEO DVI
Switch AVerVision Port Device
a. RGB
VGA OUT
LCD/DLP projector
b. TV
S-VIDEO
Television
a. RGB Connection
VGAOUTVGAINDC12V
LIGHT
BOX
LCD/DLP projector
RGB cable
(VGA Cable)
b. TV Connection
TV RGB
VIDEO S-VID EO DVI
TV RGB
VIDEO S-VID EO DVI
S-Video cable
S-Video to SCART cable
S-VIDEO
SCART
INPUT
Television
3. Connect a desktop or portable computer (discretional).
- Make sure to connect the other end of the RGB cable to
the VGA(RGB) output port of the computer.
- Press button to display image from VGA IN port of
AVerVision 300AF.
- For portable computer, make sure to switch your
computer to send signal to external output. Usually the
keyboard command is Fn+F5. If not, please check with
your computer handbook or contact the technical support
of your computer manufacturer.
VGAOUTVGAINDC12V
LIGHT
BOX
RGB Cable
Desktop Computer
Portable Computer
4. Basis Operation
z Press the zoom
and to
zoom in and zoom
out the image.
z Press to
adjust the focus
automatically.
z Press to
capture and save
the image in the
built-in memory.
Question and Answer IconNeed help?

Do you have a question about the Avermedia AVerVision 300AF and is the answer not in the manual?

Avermedia AVerVision 300AF Specifications

General IconGeneral
BrandAvermedia
ModelAVerVision 300AF
CategoryDocument Camera
LanguageEnglish

Summary

Connect the Power

Select Video Display Output

RGB Connection

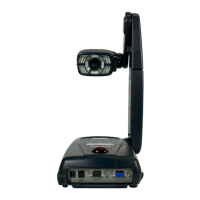
Connects the AVerVision 300AF to a projector using VGA OUT via RGB cable.

TV Connection

Connects the AVerVision 300AF to a television using S-VIDEO OUT via S-Video cable.

Connect Computer

Computer Connection and Display

Connects computer via RGB cable; use Fn+F5 for portable computer signal output.

Basic Operation Controls

Zoom Functionality

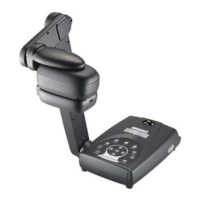
Adjusts image zoom in and out using '+' and '-' buttons.

Auto Focus

Automatically adjusts image focus with a single button press.

Image Capture

Captures and saves the current image to internal memory.

Device Operation and Navigation

Image Effects Control

Applies Black/White, Negative, or Color effects to images.

Freeze Function

Pauses or resumes the live image display in camera mode.

Mode Switching

Switches between Camera, PC, and Playback modes.

Navigation and Selection

Navigates menus and selections using arrow keys and Enter.

Menu Access

Opens the On-Screen Display (OSD) menu for advanced settings.

Related product manuals