AXON BODY 4 AND FLEX POV MODULE QUICK START GUIDE
For more information, including detailed operating instructions and video walkthroughs,
scan the QR Code or go to https://my.axon.com/s/axon-body-4.
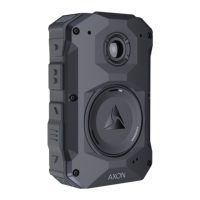
FRONT
Microphones
Microphones
Triad LEDs
Camera Lens
POV Connector
Port
Programmable
Buttons 1, 2
Event Button
Volume Up
Select
Volume Down
Power Button
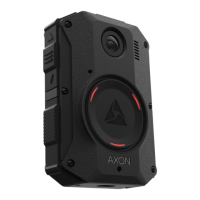
TOP
Speaker (R)
Operation
LED
Display
Speaker (L)
BOTTOM
Power Button
Magnetic
Charger Port
USB-C Port
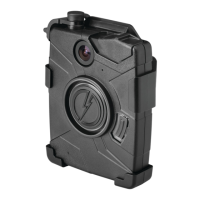
BACK
Drainage
Holes
Microphone
Rapid Lock
Mount
Serial
Number
Vent
REGISTRATION
To register your Axon Body 4 Camera:
1. Enable “Automatic Camera Registration” in the Axon Body 4 Settings page in
Axon Evidence.
2. Register the dock using the Axon Device Manager (ADM) app.
3. Connect the dock to power and internet.
4. Place unregistered Axon Body 4 Camera in the registered dock. Unregistered
cameras will automatically register themselves to the same agency as the dock.
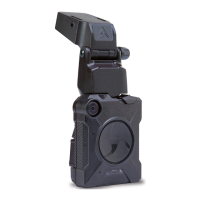
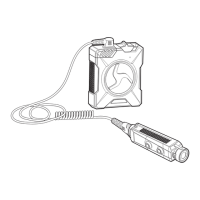
FLEX POV MODULE
The Flex POV module does not require charging or ooad. When a Flex POV module
is connected, Axon Body 4 will buer and record from the POV module perspective.
When the POV module is disconnected, it will switch back to the body-worn camera
perspective automatically.
MAGNETIC DISCONNECT CHARGING CABLE
The magnetic disconnect charging cable allows in-vehicle charging yet will break
away should a camera-wearer need to exit the vehicle rapidly.
1. Connect USB-C to an outlet in the vehicle or a 12V charging adapter.
2. Line up the Axon logo on the cable with the Axon logo on the camera. The cable
will magnetically align itself.
Important: Ensure the USB-C port on the bottom of the camera is dry and free of dirt
and debris before placing the camera in the dock or connecting a USB-C cable. A water
droplet on the camera screen indicates the port is not dry.
For additional help registering cameras to your agency, refer to
the Axon Body 4 Registration Guide, scan the QR code, or go to
https://my.axon.com/s/article/Register-My-Axon-Body-4.
Action Button Press
Power on
Press POWER until short vibration
Power o
Press POWER for 3 seconds
Start recording
Double-press EVENT
End recording
Press EVENT for 3 seconds
Watch Me
Double-press PROGRAMMABLE BUTTON 1
Add marker
Press SELECT while recording
Speaker volume
Press VOLUME or VOLUME
Toggle light setting
Press VOLUME for 3 seconds, then again to
toggle modes
Enter Stealth mode
Press VOLUME for 3 seconds
Exit Stealth Mode
Press VOLUME or VOLUME for 3 seconds
Mute audio
Press SELECT for 3 seconds while recording
Exit audio mute
Press SELECT for 3 seconds or double-press
EVENT
Enter Sleep mode
Press POWER then SELECT to conrm
Exit Sleep mode
Press POWER
Pairing
Press EVENT and SELECT simultaneously
Enter menu
Double-press SELECT
Mount
Magnets
Microphone
Microphone