General Operation
Installation
AM/FM Tuner Operation CD Operation*
Installation
Before You Start
•Consultaqualifiedtechnicianforinstructions.Axxeraalwaysrecommends
professionalinstallation.
•Disconnectnegativebatteryterminal.
•Removetrimringfromunit(ifinstalled).
•Remove2transitscrewslocatedontopoftheunit(ifapplicable).
•Inserttheremovalkeys,andremovethemountingsleevefromtheheadunit.
Note:Mostvehiclesrequireaninstallationkit,wiringharnessand/orantenna
adapter(allsoldseparately)toproperlyinstalltheheadunitinthevehicle.
Installation Process
1. Carefullyremovetheexistingheadunit.
2. Connectwiringharness.Consultaqualifiedtechnicianifyouareunsure.
3. MounttheheadunitusingthemountingsleeveorISObrackets(dependingon
yourvehicle’sdashboard).
4. Connectwiringharnessandantenna.Testtheheadunitforcorrectoperation.
5. Slideintomountingsleevetosecure,ormounttheISObracketstothevehicle.
6. Snaptrimringintoplace.
Wiring Connections
Thechartbelowdefinestheconnectionforeachwireinthewiringharness.
Color Connection
Red 12VIgnition/Accessory
Yellow 12VBattery/Memory
Black Ground
Blue PowerAntenna/AmpTurn-on
Grey RightFront(+)
Grey/Black RightFront(-)
White LeftFront(+)
White/Black LeftFront(-)
Purple RightRear(+)
Purple/Black RightRear(-)
Green LeftRear(+)
Green/Black LeftRear(-)
Quick Start Guide
ThisQuickStartGuideprovidesbasicinstructions
forusingyourAxxeraReceiver.
TodownloadthecompleteOwner’sManualplease
visitwww.axxeraaudio.com/support/manuals.php
andtypeintheproduct’smodelnumber
orcallcustomerserviceat1-866-382-5476.
t
h
i
n
k
b
e
f
o
r
e
y
o
u
p
r
i
n
t
Step 1:
Insertthemountingsleeveintothe
installationkitordashboard.
Step 2:
Bendmultiplemountingtabsaround
themountingsleeveuntilthe
mountingsleeveissecure.
Step 3:
Connectallwiringharnessesand
slidetheheadunitintothemounting
sleeveuntilitclicksintoplace.
Usingtheexistingbracketsorthe
bracketssuppliedwiththeinstallation
kit,mountthebracketstothesidesof
theheadunitwiththescrewssupplied
withtheheadunit.
*Notanavailablefeatureonallheadunits.
TodownloadthecompleteOwner’sManualforyourradio,
pleasevisitwww.axxeraaudio.com/support/manuals.php.
*Notanavailablefeatureonallheadunits.
TodownloadthecompleteOwner’sManualforyourradio,
pleasevisitwww.axxeraaudio.com/support/manuals.php.
*Notanavailablefeatureonallheadunits.
TodownloadthecompleteOwner’sManualforyourradio,
pleasevisitwww.axxeraaudio.com/support/manuals.php.
*Notanavailablefeatureonallheadunits.
TodownloadthecompleteOwner’sManualforyourradio,
pleasevisitwww.axxeraaudio.com/support/manuals.php.
*Notanavailablefeatureonallheadunits.
TodownloadthecompleteOwner’sManualforyourradio,
pleasevisitwww.axxeraaudio.com/support/manuals.php.
*Notanavailablefeatureonallheadunits.
TodownloadthecompleteOwner’sManualforyourradio,
pleasevisitwww.axxeraaudio.com/support/manuals.php.
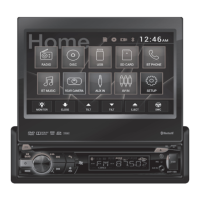
Power On/Off
Faceplate
Removal
Changing
Modes
Volume
Mute
Auxiliary Inputs
Reset
Setting the
Clock
Display
Menu
Pressthe
buttontoturntheuniton.Press
againtoturnunitoff.
Pressthereleasebuttonandpullawayfromthe
leftsidetoremove.Tore-install,insertrightsideof
faceplatefirstthenpushleftsidetosecure.
PressSOURCEtocyclethroughavailable
operatingmodes.
Adjustvolumeusingvolumeknob.
Press
tosilencetheaudio.Press againto
resumelisteningatthepreviouslyselectedvolume.
Inserta3.5mmcableintheunitsfrontAUXport,or
RCAcablesintotherearAUX-INconnectors.
PresstheRESETbuttontoresettheunitbackto
thefactorysettingsifabnormaloperationoccurs.
Theresetbuttonislocatedbehindthefrontpanel.
Withtheuniton,pressandholdDISPuntilthe
clockbeginstoflash,thenrelease.PressTUNE
nn
toadjustthehoursandTUNE
ll
toadjust
theminutes.PressDISPmomentarilytosavethe
selectedtime.
PressDISPtotoggledisplaybetweenvarious
displayedinformation.
PressMENUtoaccesstheaudioandsetupmenu
options.
Seek Tuning
Manual Tuning
Band
*Storing
Presets
*Recalling
Presets
*Storing
Presets
(AXD330 only)
*Recalling
Presets
(AXD330 only)
Insert CD
Eject CD
Track Select
Fast Forward/
Reverse
Pause
Intro
Repeat
Random
CD-R/CD-RW
Compatibility
PressTUNE
nn
orTUNE
ll
formorethan
onesecondtoseektothenextstrongstation.
PressTUNE
nn
orTUNE
ll
momentarilyto
moveradiofrequencyupordownonestepata
time.Pressandholdtoadvancequickly.
PressBANDtoselectbetweenFM1,FM2,FM3,
AM1andAM2bands.Uptosixpresetscanbe
programmedforeachband,enablingupto18
FMstationsand12AMstationstobestoredin
memory.
Selectthedesiredbandandstation.PresstheF
(function)button,turnthevolumeknobuntilthe
desiredpresetnumberishighlighted,thenpress
SELECTtostorethepreset.
PresstheP+orP-buttonstocyclethroughthe
1-6presetsinthecurrentband.
Selectthedesiredbandandstation.Pressand
holdthedesired1-6presetbuttonformorethan
twoseconds.Whenstored,thepresetnumberwill
appearinthedisplay.
Storedstationscanberecalledinstantlyby
pressingthecorresponding1-6presetbutton.
PresstheOPENbuttontoopenthefrontpanel.
Withthelabelfacingup,insertastandardsizeCD
intotheCDslot.TheCDwillautomaticallybegin
playback.
PressEJECT toejecttheCD.Theunitwillchange
topreviousmodeofoperation.
PressTUNE
ll
toskiptothebeginningofthe
nexttrack.PressTUNE
nn
toreturntothe
beginningofthecurrenttrack.PressingTUNE
nn
againskipstothebeginningoftheprevious
track.
PressandholdTUNE
ll
orTUNE
nn
tofast
forwardorreverseatrack.
Press
l
/
II
totemporarilystopCDplayback.
Press
l
/
II
againtoresumeplayback.
PressForINT*toplaythefirst10secondsof
eachtrack.
PressForRPT*tocontinuouslyrepeatthe
selectedtrack.
PressForRDM*toplayallthetracksinrandom
order.
SomeCD-RsandCD-RWsmaybeincompatible
withthisunit,dependingonmediatypeand
recordingmethod.Refertotheonlineowner’s
manualfordetails.
Mounting the Head Unit:
ISO mounting
Mounting the Head Unit:
Typical DIN mounting
Limited One-Year Warranty
Thiswarrantygivesyouspecificlegalrights.Youmayalsohaveotherrightswhich
varyfromstatetostate.DualElectronicsCorp.warrantsthisproducttotheoriginal
purchasertobefreefromdefectsinmaterialandworkmanshipforaperiodofone
yearfromthedateoftheoriginalpurchase.DualElectronicsCorp.agrees,atour
option,duringthewarrantyperiod,torepairanydefectinmaterialorworkmanship
ortofurnishanequalnew,renewedorcomparableproduct(whicheverisdeemed
necessary)inexchangewithoutcharges,subjecttoverificationofthedefector
malfunctionandproofofthedateofpurchase.Subsequentreplacementproductsare
warrantedforthebalanceoftheoriginalwarrantyperiod.
Who is covered? Thiswarrantyisextendedtotheoriginalretailpurchaserfor
productspurchasedandusedintheU.S.A.
What is covered? Thiswarrantycoversalldefectsinmaterialandworkmanship
inthisproduct.Thefollowingarenotcovered:installation/removalcosts,damage
resultingfromaccident,misuse,abuse,neglect,productmodification,improper
installation,incorrectlinevoltage,unauthorizedrepairorfailuretofollowinstructions
suppliedwiththeproduct,ordamageoccurringduringreturnshipmentofthe
product.
What to do?
1.Beforeyoucallforservice,checkthetroubleshootingguideinyourowner’smanual.
Aslightadjustmentofanycustomcontrolsmaysaveyouaservicecall.
2.Ifyourequireserviceduringthewarrantyperiod,youmustcarefullypackthe
product(preferablyintheoriginalpackage)andshipitbyprepaidtransportation
withacopyoftheoriginalreceiptfromtheretailertoanauthorizedservicecenter.
3.Pleasedescribeyourprobleminwritingandincludeyourname,areturnUPS
shippingaddress(P.O.Boxnotacceptable),andadaytimephonenumberwith
yourshipment.
4.Formoreinformationandforthelocationofthenearestauthorizedservicecenter
pleasecontactustoll-freeat1-866-382-5476orbyemailatcs@dualav.com.
Exclusion of Certain Damages: Thiswarrantyisexclusiveandinlieuofany
andallotherwarranties,expressedorimplied,includingwithoutlimitationthe
impliedwarrantiesofmerchantabilityandfitnessforaparticularpurposeandany
obligation,liability,right,claimorremedyincontractortort,whetherornotarising
fromthecompany’snegligence,actualorimputed.Nopersonorrepresentativeis
authorizedtoassumeforthecompanyanyotherliabilityinconnectionwiththesale
ofthisproduct.Innoeventshallthecompanybeliableforindirect,incidentalor
consequentialdamages.
FCC Compliance
ThisdevicecomplieswithPart15oftheFCCRules.Operationissubjecttothe
followingtwoconditions:
(1)thisdevicemaynotcauseharmfulinterference,and
(2)thisdevicemustacceptanyinterferencereceived,includinginterferencethat
maycauseundesiredoperation.
Warning:Changesormodificationstothisunitnotexpresslyapprovedbythe
partyresponsibleforcompliancecouldvoidtheuser’sauthoritytooperatethe
equipment.
Note:Thisequipmenthasbeentestedandfoundtocomplywiththelimitsfor
aClassBdigitaldevice,pursuanttoPart15oftheFCCRules.Theselimits
aredesignedtoprovidereasonableprotectionagainstharmfulinterference
inaresidentialinstallation.Thisequipmentgenerates,usesandcanradiate
radiofrequencyenergyand,ifnotinstalledandusedinaccordancewiththe
instructions,maycauseharmfulinterferencetoradiocommunications.However,
thereisnoguaranteethatinterferencewillnotoccurinaparticularinstallation.If
thisequipmentdoescauseharmfulinterferencetoradioortelevisionreception,
whichcanbedeterminedbyturningtheequipmentoffandon,theuseris
encouragedtotrytocorrecttheinterferencebyoneormoreofthefollowing
measures:
• Reorientorrelocatethereceivingantenna.
• Increasetheseparationbetweentheequipmentandreceiver.
• Connecttheequipmentintoanoutletonacircuitdifferentfromthatto
whichthereceiverisconnected.
• Consultthedealeroranexperiencedradio/TVtechnicianforhelp.
DualElectronicsCorp.
TollFree:1-866-382-5476
www.axxeraaudio.com
©2013DualElectronicsCorp.Allrightsreserved.
NSA0113-V01
Operation of iPod/iPhone Operation of iPod/iPhone
Connect an iPod/
iPhone Device
(sold separately)
Device
Compatibility
Song Select
Fast Forward
and Reverse
Pause
Repeat
Random
Intro
ToplaymusicfromaniPod/iPhonedevice,connectthe
USBcable(includedwithyouriPod/iPhonedevice)tothe
unit’sUSBport.Playbackwillbeginautomatically.
RefertotheonlineOwner’sManualforacompletelistof
compatibleiPod/iPhonedevices.
Press
ll
toskiptothenextsong.Press
nn
toreturn
tothebeginningofthecurrentsong.Pressing
nn
again
skipstothebeginningoftheprevioussong.
Pressandhold
ll
or
nn
tofastforwardorreversea
song.
Press
l
/
II
totemporarilystopplayback.
Press
l
/
II
againtoresumeplayback.
PressForRPT*toentertheRepeatmenu,thenturnthe
volumeknobtoselectoneofthefollowingoptions:
• Off-Repeatsalltracks.
• CurrentSong-Repeatsselectedtrack.
PressForRDM*toentertheRandommenu,thenturn
thevolumeknobtoselectoneofthefollowingoptions:
• Off-CancelstheRDMfunction.
• AllSongs-Playsalltracksinrandomorder.
• CurrentAlbum-Playsalltracksintheselectedalbumin
randomorder.
PressForINT*toentertheIntromenu,thenturnthe
volumeknobtoselectoneofthefollowingoptions:
• Off-CancelstheINTfunction.
• On-Playsfirst10secondsofeachtrack.
Music Search
Manual Control
for iPod
PressSELECT,andthemainsearchmenuwill
appear.
Select a Category: Turnthevolume knob to
selectbetweenartists,albums,songs,playlists,
podcastsandaudiobooks.PressSELECTtoselect
thedesiredsearchcategoryand/orsubcategory.
Step Backwards: PressBACKtoreturntothe
previousmenuortoexitthesearchmenuwhen
themainmenuisshown.
Playing a Song: Navigatetothedesiredsong/
podcast/audiobook,andpressSELECTtobegin
playback.
When“MANUAL”controlisselectedfromthe
SetupMenu,theiPodoriPhonedevicecanbe
controlleddirectlyfromthedevice’sinterface.All
functionsexceptforvolumecanbeusedfromthe
iPodoriPhonedevice.
Note:ThefirmwareoftheiPod/iPhonemustbe
updatedtothelatestversiontobecompatiblewith
manualcontrolmode.
Note:NotalliPod/iPhonedevicesarecompatible
withmanualcontrolmode.
Pandora
®
Operation
*Notanavailablefeatureonallheadunits.
TodownloadthecompleteOwner’sManualforyourradio,
pleasevisitwww.axxeraaudio.com/support/manuals.php.
Car Audio
Mounting Sleeve
Dashboard or Installation Kit
Mounting Sleeve
Dashboard or Installation Kit
Mounting Tabs
New
Radio
Existing
Brackets
Decorative
Bezel
Mounting Sleeve
Dashboard or Installation Kit
Head Unit
MP3 / WMA Operation
Playing MP3/
WMA Files
Track Select
Fast Forward and
Reverse
Pause
Folder Access
Repeat
Random
Intro
ToplayMP3/WMAfiles,insertadataCD*orUSBdevice
containingMP3/WMAfiles.
PressTUNE
ll
toskiptothebeginningofthenextsong.
PressTUNE
nn
toreturntothebeginningofthecurrent
song.PressingTUNE
nn
againskipstothebeginningof
theprevioussong.
PressandholdTUNE
ll
orTUNE
nn
tofastforward
orreverseatrack.
Press
l
/
II
totemporarilystopplayback.
Press
l
/
II
againtoresumeplayback.
Press toselectthenextfolder.Press toselectthe
previousfolder.Folderaccessisonlyavailableondiscsor
deviceswithmorethanonefolder.
PressForRPT*toentertheRepeatmenu,thenturnthe
volumeknobtoselectoneofthefollowingoptions:
• CurrentSong-Continuouslyrepeatsselectedtrack.
• CurrentFolder-Continuouslyrepeatsallfilesinfolder.
PressForRDM* toentertheRandommenu,thenturn
thevolumeknobtoselectoneofthefollowingoptions:
• Off-CancelsRDMfunction.
• AllSongs-Playsalltracksinrandomorder.
• CurrentFolder-Playsalltracksinfolderinrandom
order.
PressForINT*toentertheIntromenu,thenturnthe
volumeknobtoselectoneofthefollowingoptions:
• Off-CancelstheINTfunction.
• AllSongs-Playsfirst10secondsofeachtrack.
• CurrentFolder-Playsfirst10secondsofeachtrackin
theselectedfolder.
Requirements
USB Connection
Changing
Stations
Shuffle
Skipping Tracks
Play/Pause
Thumbs Up
Thumbs Down
Device
Compatibility
Troubleshooting
ControlforPandorarequires:
• AniPhonedevicewithareliabledataconnection,oran
iPodtouchthatisconnectedtowirelessinternet.
• ThePandoraAppinstalledontheiPhone/iPoddevice.
• AnactiveaccountwithPandora.Signupatwww.pandora.
com.
• TheUSBsynccablethatcamewithyouriPod/iPhone
device.
ConnectaniPodtouchoriPhonedevice(required,sold
separtely)totheUSBport,usingtheUSBsynccable
includedwithyouriPhonedevice.
PressSELECTtodisplaythestationsmenu.Turnthe
volume knobtocyclethroughthelistofstations,thenpress
SELECTwhenthedesiredstationishighlighted.
Note:Stationsmustbecreatedonyouraccountpriorto
connectingyouriPod/iPhonedevicetotheheadunit.
PressSELECTtodisplaythestationsmenu.Choose“Quick
Mix”fromthestationsmenutoshufflesongsfromallof
yourstations.
Press
ll
toskipthecurrentsong.
Press
l
/
II
totemporarilystopplayback.
Press
l
/
II
againtoresumeplayback.
Press
tocustomizethestationtoplaymoresongslike
thecurrentlyplayingsong.
Press
tocustomizethestationtoplaysongsthatare
differentfromthecurrentlyplayingsong.
RefertotheonlineOwner’sManualforacompletelistof
compatibleiPod/iPhonedevices.
Note:Pandoramayuselargeamountsofdataandcarrier
datachargesmayapply.Forbestresults,werecommend
thatyouconnectyourdevicetotrustedWiFinetworkswhen
available.
Fuse:
Whenreplacingthefuse,make
surenewfuseisthecorrecttype
andamperage.Usinganincorrect
fusecoulddamagetheradio.
Tip:
Whenasuitablegroundwireis
notpresentinthevehiclewiring
harness,connecttheblackground
wiretothevehiclechassis.