TYTO-01
INSTALLATION INSTRUCTIONS
AxxessInterfaces.com © COPYRIGHT 2018 METRA ELECTRONICS CORPORATION REV. 11/28/18 INSTTYTO-01
Attention! Let the vehicle sit with the key
out of the ignition for a few minutes before
removing the factory radio. When testing the
aftermarket equipment, ensure that all factory
equipment is connected before cycling the
key to ignition.
INTERFACE FEATURES
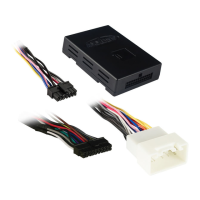
INTERFACE COMPONENTS
TOOLS REQUIRED
• Crimping tool and connectors, or solder gun,
solder, and heat shrink
• Tape • Wire cutter • Zip ties
• Small flat-blade screwdriver
TABLE OF CONTENTS
Connections .........................................................2-3
Installation .............................................................3
Programming .........................................................3
Audio level adjustment .........................................3
Wiring diagram ......................................................4
Toyota Digital Amplifier Interface 2001-2015
• Designed for amplified models
• Retains balance and fade
• Micro-B USB updatable
• TYTO-01 harness
• TYTO-01 interface
• 16-pin harness with stripped leads
APPLICATIONS
See inside front cover
Visit AxxessInterfaces.com for more detailed information about the product and up-to-date
vehicle specific applications