12
HP7-A1
: Distance between 200 mm and 500 mm
HP7-A4
: Distance between 200 mm and 1,000 mm
Hold down the button until the green LED starts
blinking (about 7 seconds).
Sensitivity is restored to the factory default setting.
Orange LED only blinks
rapidly (about 10 Hz).
Indicates Light-operate status.
Green LED only blinks
rapidly (about 10 Hz).
Indicates Dark-operate status.
Checking is complete
Normal operation will be restored automatically.
(in about 2 seconds).
Setup is complete
Normal operation will be restored automatically.
(in about 2 seconds).
LED indicators Status Solution
Tuning in
progress
Orange LED only
blinks slowly.
(at about 1 Hz)
Both LEDs blink
slowly at the
same time.
(at about 1 Hz)
Hold down the button until the
green indicator flashes rapidly
(about 7 seconds) to restore the
factory default setting (Maximum
sensitivity).
Thru-scan and retroreflective models
Press the button once to revert
to normal operation at the
pre-tuning sensitivity. Adjust the
light axis and then repeat the
tuning procedure.
Thru-scan models
Press the button once to revert to
normal operation at the pre-tuning
sensitivity. Reduce the amount of light
by using slits or tilting the optical axis,
and then repeat the tuning procedure.
Thru-scan and retroreflective
models
Press the button once to revert to
normal operation based on the tuning
results. Adjust the light axis and then
repeat the tuning procedure.
Thru-scan, retroreflective, and
diffuse-scan models
Press the button once to revert
to normal operation based on
the tuning results. Check
operation before use.
Press the button once to revert to
normal operation at the pre-tuning
sensitivity.
Thru-scan and retroreflective models
Adjust the light axis and then
repeat the tuning procedure.
Diffuse-scan models
Move the switch closer to the target to
boost the reflected light intensity and
then repeat the tuning procedure.
Press the button once to revert to
normal operation based on the
tuning results. Use a workpiece to
verify that the switch works properly.
Thru-scan models
Reduce the amount of light by
mounting slits or tilting the
optical axis, and then repeat the
tuning procedure.
Diffuse-scan models
Minimize the reflected light by
painting the background black, and
then repeat the tuning procedure.
Tuning
Without a tuning
workpiece
Tuning failed -
insufficient light
Tuning
without workpiece
Setup is done but
light intensity is too
high.
Stability Indicator
may not light up.
Tuning without
workpiece
Setup is done but light
intensity is too low.
The switch may not
operate.
2-point tuning
After 2-point tuning,
the difference in light
intensity between the
two points is too
small. The switch
may not operate.
2-point tuning
Tuning failed -
insufficient light
at both points
2-point tuning
Tuning failed - too
much light at both
points
Orange indicator flashes
rapidly or both indicators
flash rapidly (at about 10 Hz)
Green Orange
Green Orange
Green Orange
Indicator lamp flashes repeatedly
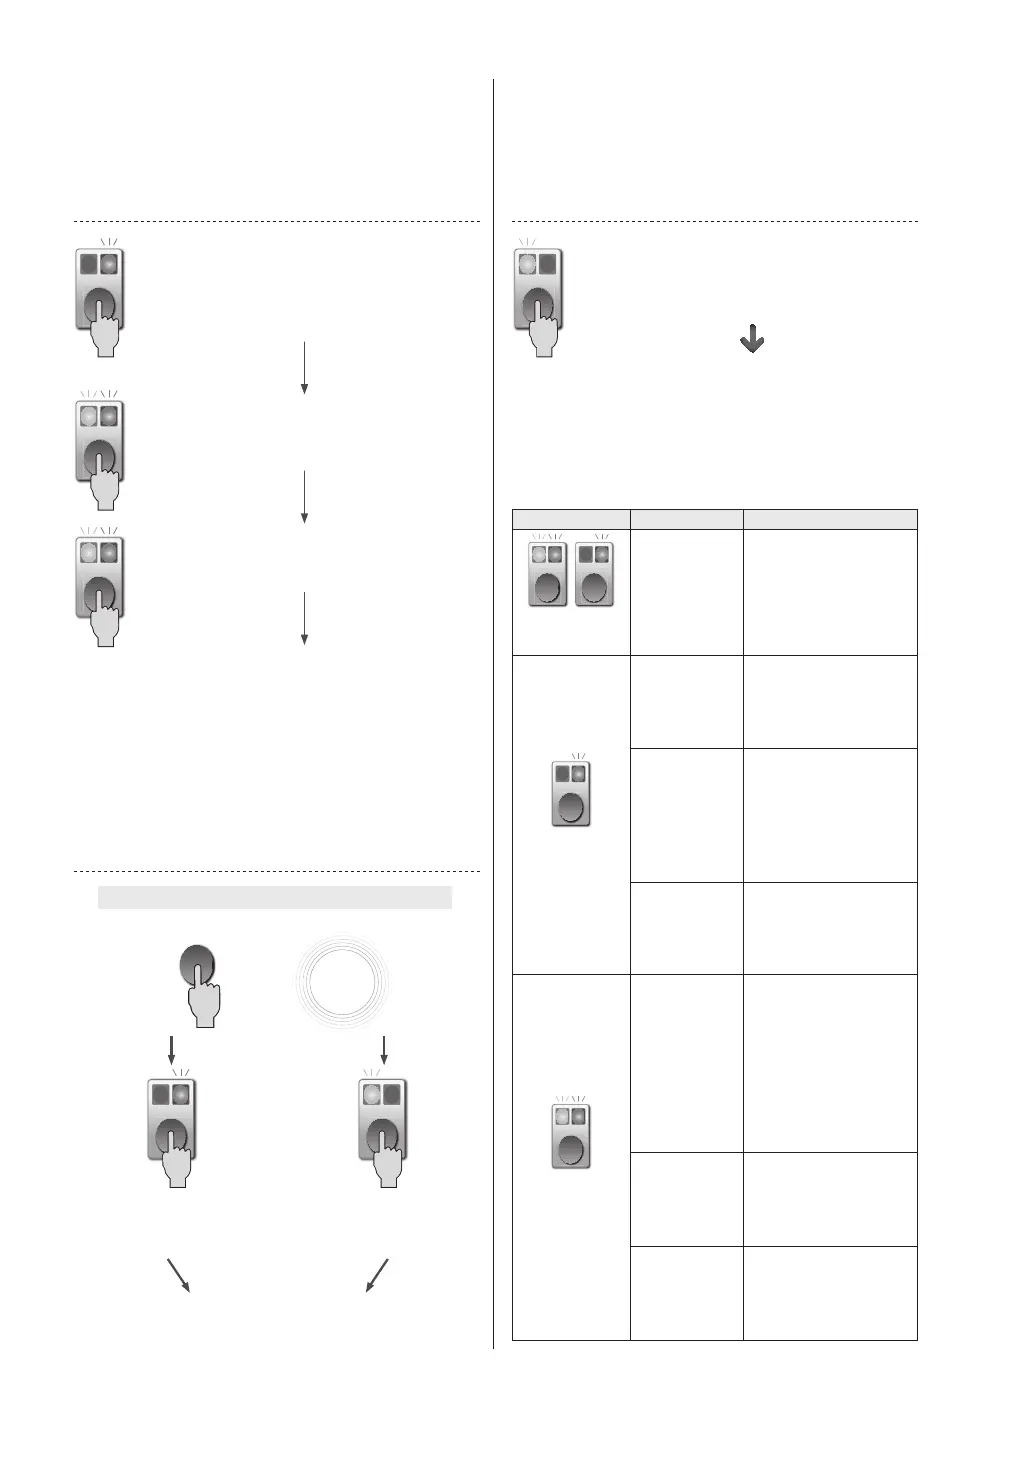
The table below lists the various states indicated by repeated flashing
together with suggested responses. If the problem is not resolved, it
may be necessary to try a different model of switch.
Hold down the button for about 2 seconds until the
orange indicator lamp starts flashing rapidly (at
about 10 Hz), then release.
With the target in position, hold down the button
for about 2 seconds until both indicator lamps
start flashing rapidly (at about 10 Hz), then release.
Press the button briefly.
*4. If the orange light continues to flash slowly (at about 1 Hz), repeat the
procedure as described under Indicator lamp flashes repeatedly.
Now press the button again briefly.
Both indicator lamps will flash slowly
(at about 1 Hz).*
4
Switches to sensitivity adjustment mode.
Setup is complete
Normal operation will be restored automatically.
(in about 2 seconds).
Press the button
3 times
consecutively.
×3
For diffuse-scan detection at any desired specific position, use
position tuning. (The positioning accuracy is 15 % at maximum.)
When confused, or to restore the default
setting (max. sensitivity)
If you wish to restore the factory default sensitivity, or if you lose track
of your progress while making adjustments, do the following to
restore the factory default from any flashing status.
Checking LO/DO
Use the procedure shown below to check the current operating mode.
Green Orange
Green Orange
Green Orange Green Orange
Green Orange
Green Orange Green Orange
Normal operation
 Loading...