Package Contents Device Overview
A
B
C
D
E
F
G
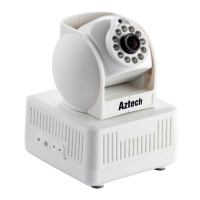
A - Reset
B - Simple Connect Button
C - PLC LED
D - Power LED
E - Light Sensor Side Panel
F - Lens
G - IR LED Light
Connect one end of the ethernet cable to any of your router’s
Ethernet LAN ports.
Connect the other end of the ethernet cable to the LAN port of
your homeplug AV Adapter.
Plug your Homeplug AV Adapter to the power outlet.
Hardware Installation: HomePlugAV Adapter
NOTE: Ensure that you have a HomePlug AV adapter available for your camera.
1
2
3
Step 1: Place your HPCamera anywhere in the house, plug it to a power
outlet and switch on the HPCamera. The HPCamera and HomePlug AV
adapter will connect with each other automatically.
Hardware Installation: The Aztech HPCam Camera
Place your HPCamera anywhere in the house, plug it to a power
outlet and it will automatically switch ON. The HP Camera and
HomePlug AV adapter will connect with each other.
NOTE: During HP Camera’s Initial start-up, you may check whether the HP Camera
IR LEDs are working properly by covering its light sensor above the lens and
confirm if the IR LEDs turn red.
WARNING : If you have an existing HomePlug AV network there is no need to
connect another HomePlug AV to the ethernet port of the router.
The PlugCam App
+
Search and download the PlugCam App on
Apple Store or Google Play to your Mobile
device.
Add the PlugCam Camera
Three methods to add cameras
Scan QR Code located on the
bottom of the HPCamera.
Search the HPCamera over
the same local network.
Manually type in the
HPCamera’s ID and
password.
1.
2.
3.
+
+
Step 1 :
Step 2 :
Step 3 :
Step 4:
Power Cord
Easy Start Guide
Aztech HIPC700
+
The HIPC700 Easy Start Guide is designed to get you up and running with your
HIPC700 device. This Easy start Guide along with the User Manual which provides a
more advanced guide to this product is downloadable on our Aztech Support Website
(www.aztech.com/support).