EasyManua.ls Logo

Baader Planetarium MicroStage II User Manual

Baader Planetarium MicroStage II
4 pages
To Next Page IconTo Next Page
Page #1 background imageLoading...
Page #1 background image
M anual of the
B aader D igiscoping A dapter M icroS tage II
# 2450330
Take your B aader D igiscoping-A dapter M icroS tage II out of its protective cover.
The B aader D igiscoping-A dapter M icroStage II is delivered in hom e position, as in picture I. This
is best for storage as the D igiscoping-A dapter M icroS tage II uses the least space in this
position.
To get your M icroS tage II ready for use, please proceed as follow s:
The clam p screw s (C S ), w hich are part of the process, are num bered in each picture.
First, open clam p screw s 1 and 2 as in Figure I.
© 2013 by
Fig. I
B aader D igiscoping
-
A dapter M icrostage II in its H om e Position
E yepiece bracket
C S 5
C S 1
C S 2
C rossbar
C S 4
C S 3
cam era guide rail
central axis
D O K : G \A nl\B aa\Zub\M icroStage2\E _A nl-M icroStage2-0413-w d.doc
Question and Answer IconNeed help?

Do you have a question about the Baader Planetarium MicroStage II and is the answer not in the manual?

Baader Planetarium MicroStage II Specifications

General IconGeneral
BrandBaader Planetarium
ModelMicroStage II
CategoryCamera Accessories
LanguageEnglish

Summary

Baader Digiscoping Adapter MicroStage II Setup

Home Position

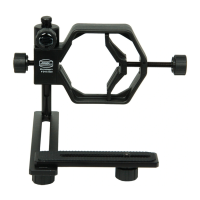
Device shown in its protective cover and home position for minimal space usage.

Rotating Camera Guide Rail

Turning the camera guide rail and crossbar by 180 degrees and securing it.

Setting 90° Angle

Turning the camera guide rail 90 degrees to create an open angle to the eyepiece bracket.

Adjusting Crossbar Position

Positioning and tightening the crossbar using clamp screw 3.

Attaching Camera

Securing the camera to the camera bracket using clamp screw 4.

Mounting to Eyepieces

Fitting the device to various eyepiece sizes using clamp screw 5.

Camera Positioning and Operation

Positioning Camera for Viewing

Aligning optical axes of eyepiece and camera lens for optimal viewing.

Centering and Focusing

Swiveling camera away from the eyepiece to center and focus the target.