Do you have a question about the Baby Jogger city GO 2 RAPIDLOCK and is the answer not in the manual?
| Brand | Baby Jogger |
|---|---|
| Model | city GO 2 RAPIDLOCK |
| Category | Car Seat |
| Language | English |
How to receive important safety recall notifications.
Details on compliance with Federal Motor Vehicle Safety Standards.
Warning against placing rear-facing seats on front seats with airbags.
Emphasizes following instructions to prevent serious injury or death.
Body support must be used for infants under 6 lb (2.7 kg).
Ensure restraint is securely attached and never leave it unsecured.
Instructions for storing LATCH connectors when not in use.
Adhere to 7-year lifespan and child height/weight limits.
Warnings about soft surfaces, loose straps, and child activity.
Ensure the carrying handle is locked before lifting.
Description of LATCH anchors and connectors.
Information on standard spacing and using vehicle belts.
Importance of placing the restraint in correct positions to avoid injury.
The vehicle seat must face forward for proper installation.
Lists vehicle seat belts that are not compatible with this child seat.
Description of a safe lap belt installation method.
Description of a safe lap belt installation using ALR.
Description of a safe lap/shoulder belt installation with locking plate.
Description of a safe lap/shoulder belt installation with sliding plate.
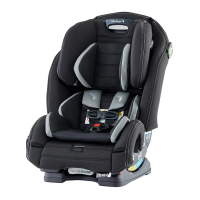
Identification of the handle and canopy components.
Identification of harness, buckle, and related parts.
Identification of base release, head support, and crotch strap clip.
Identification of anti-rebound bar, lock-offs, belt guides, and indicators.
Identification of recline lever, recline foot, and manual storage.
Description of the four carrying and stationary positions for the handle.
Instructions on how to lock the handle in place for carrying.
Step-by-step guide to attach the canopy to the car seat.
Guidance on using body support for infants under 12 lb.
Ensure harness covers do not interfere with chest clip placement.
Steps to securely attach the infant carrier to the base.
Steps to release and remove the infant carrier from the base.
Explanation of the base's four recline positions.
How to use level indicators for proper infant and child weight ranges.
Placing the base on a level vehicle seat and centering it.
Steps to open the LATCH storage door using the release lever.
Pulling out LATCH connectors and laying the strap across the base.
Extending the LATCH strap to its maximum length.
Verifying proper recline using the level indicator for different weights.
Connecting the LATCH hooks to the vehicle's lower LATCH anchors.
Routing LATCH strap under belt guides and removing slack.
Closing the RAPIDLOCK lock-off to secure the LATCH strap.
Checking the base for secure attachment by pushing and pulling.
Placing the infant seat into the base and checking attachment.
Final check of the level indicator with the child in the restraint.
Placing the base on a level vehicle seat and pushing it back.
Pulling the RAPIDLOCK release lever to open the lock-off.
Verifying proper recline using the level indicator for different weights.
Routing the lap portion of the vehicle seat belt through the blue belt path.
Pressing down on the base and pulling the shoulder belt to remove slack.
Routing the shoulder portion of the seat belt through the blue belt path.
Closing the RAPIDLOCK lock-off to secure the seat belt strap.
Checking the base for secure attachment by pushing and pulling.
Placing the infant seat into the base and checking attachment.
Final check of the level indicator with the child in the restraint.
Placing the seat on the vehicle seat and checking the rear-facing level line.
Routing the seat belt through the blue rear-facing belt path.
Routing the shoulder belt behind the seat and through the guide.
Locking the vehicle seat belt and tightening it using forearm pressure.
Checking the car seat for secure attachment by pushing and pulling.
Checking the rear-facing level line with the child in the restraint.
Loosening harness straps and releasing the chest clip.
Placing the child and positioning harness straps over shoulders.
Inserting buckle tongues into the buckle and ensuring they click.
Placing harness straps over the child's shoulders.
Ensuring harness straps are at or below the child's shoulders.
Adjusting head support to set harness height.
Child's head must be at least 1" below the top of the restraint.
Moving the buckle strap to the closest slot without being under the child.
Inserting buckle tongues into the buckle and ensuring they click securely.
Centering the chest clip at the child's chest level with their armpit.
Pulling adjuster straps to make shoulder straps snug and flat.
Ensuring the harness is snug and has no slack.
Pulling the release lever to expose the LATCH storage door.
Swinging open storage door, inserting connectors, and closing the door.
Closing the RAPIDLOCK lock-off until it clicks.
Unfastening snaps and pulling the head support pad away.
Unfastening snaps and pulling plastic flaps to remove the seat pad.
Pulling the seat pad off the shell.
Undoing fastening strips and snaps to remove the canopy.
Instructions for washing seat pads and spot cleaning the shell.
Machine washing canopy and surface washing harness straps.
Instructions for cleaning the buckle, avoiding immersion of the strap.
Details on product warranty against defects and exclusions.
Contact information for customer service and support.
Where to store the instruction manual in the base.