This document provides comprehensive instructions for the assembly, function, and maintenance of the Baby Joy Baby Swing, model BC10089. It emphasizes important safety information and encourages users to retain the booklet for future reference.
Before You Start
The manual begins with a crucial "Before You Start" section, highlighting general warnings and safety precautions. It advises users to remove toys when the child begins crawling to prevent entanglement. All small parts and packaging materials should be kept away from babies and children to avoid choking hazards. The product requires adult supervision for installation and use. Users are instructed to read each step carefully, follow the proper order, and remove all packaging before assembly. It's essential to count all parts and hardware to ensure everything is present. The manual stresses the importance of correct installation, as incorrect assembly can pose a danger. It recommends assembling the product near its intended use area to avoid unnecessary movement once assembled. Finally, it advises ensuring a secure, flat, steady, and stable surface for installation and placement.
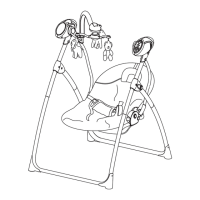
Standard Configuration Parts
The manual provides a detailed visual and textual list of standard configuration parts. These include:
- A. Seat cover
- B. Backrest tube
- C. Seat support tube
- D. Fabric fixed steel wire
- E. Cross tube
- F. Left support tube group
- G. Right support tube group
- H. Front leg
- I. Rear leg
- J. Hanging tubes
- K. Left driving part
- L. Right driving part
Selective Parts
In addition to the standard parts, the manual lists selective parts that enhance the swing's functionality:
- M. Main toy bar
- N. Toy bar arm (3x)
- O. Toys
- P. Head support
- Q. AC/DC power adapter
Assembly
The assembly process is broken down into 13 clear, illustrated steps:
- Insert the seat support tube into the backrest tube: This step involves connecting these two components until a "click" sound confirms they are securely in place.
- Put on the seat cover to the seat frame: The seat cover is draped over the seat frame, preparing it for the next steps.
- Insert the steel wire through fabric sewing housing: The steel wire is threaded through the fabric, and its two ends are inserted into plastic holes until a "click" sound indicates secure placement.
- Fix the seat cover onto the steel wire with the buttons: Buttons are used to attach the seat cover firmly to the steel wire.
- Fix the backrest fabric onto the steel wire with the buttons: Similar to the seat cover, the backrest fabric is secured to the steel wire using buttons.
- Unfasten the screw (Attention: do not take off the screw caps): This step involves loosening a screw without fully removing its cap. The leg is then inserted into the music device, and the screws are fastened. This process is repeated for the other side. A critical note emphasizes that the folding buttons on the legs should always face outward.
- Unfold the 2 driving system parts: The two driving system parts are unfolded until a "click" sound is heard, indicating they are locked into position.
- Install the front legs and rear legs: The front and rear legs are inserted into the upper part tube until a "click" sound confirms their secure attachment.
- Install the hanging tubes: The two hanging tubes are inserted into the plastic part holes until a "click" sound is heard.
- Install the cross tube: The cross tubes are installed onto the two hanging tubes until they "click" into place.
- Install the seat unit: The seat unit is installed by inserting the two hanging tubes into the seat socket.
- Assemble the toy bar: This involves attaching three toy bar arms onto the main toy bar, and then placing three plush toys into the holes of the arms.
- Insert the toy bar frame into the toy bar hole: The toy bar frame is inserted according to a guide line. It can then be rotated 360 degrees and stopped in various positions to suit the user's preference.
Functions
The Baby Joy Baby Swing offers several adjustable functions for comfort and entertainment:
- Adjust the backrest positions: The backrest has three adjustable positions. Users can change the position by pulling a handle located on the backrest.
- Adjust the positions of toy bar: The toy bar can be manually moved to different positions, allowing parents to easily amuse the baby.
- Install the battery of toy bar: To enable the toy bar's automatic rotation and light functions, two 1.5V AAA LR03 size batteries need to be installed. Once installed, turning on the toy bar button will initiate automatic rotation, and pressing the light button will activate the lamp light.
- Folding: The swing can be folded by pressing two buttons located on the sides of the swing frame, making it compact for storage or transport.
Swing Control Plate Instructions
The swing features a control plate with various buttons for managing its functions:
- Speed Button: Offers five speed settings. Pressing the button cycles through the speeds. A speed light indicates the current setting.
- Timer Button: Provides three timer options: 15 minutes, 30 minutes, and 60 minutes. Pressing the button cycles through these timer functions. A timing light indicates the active timer.
- Music Button: Features 12 melodies. Pressing the button advances to the next melody.
- Nature Songs Button: Includes five nature songs. Pressing the button advances to the next nature song.
- Song Volume Decrease/Increase: Buttons to adjust the volume of the music and nature songs.
- Remote Control Signal Receiver: An infrared receiver for remote control operation.
The control plate also indicates the battery compartment for the main swing unit, which requires four 1.5V Size C LR14 batteries (not included). It also shows the AC/DC adaptor connector for alternative power.
WARNING
This section contains critical safety warnings that must be followed to prevent serious injury or death:
- Read Instructions Carefully: Always read and keep the instructions for future reference. Failure to follow warnings and assembly instructions can lead to serious injury or death.
- Adult Supervision: Products must be installed by adults and used under adult supervision.
- Damaged Parts: Do not use the product if any parts are broken, torn, or missing. Only use spare parts approved by the manufacturer.
- Harness Use: Always use the harness. Do not move or lift the product with the baby inside it.
- Never Leave Unattended: Never leave a child unattended. Do not let children play with the product.
- Weight Limit: Stop using the product when the child attempts to climb out or reaches 20 lbs.
- Surface: It is dangerous to place this product on an elevated surface. Always use it on a flat, level floor.
- Folding/Unfolding: Ensure children are kept away when unfolding and folding the product to avoid injury.
- Heat Sources: Be aware of the risk of open fire and other strong heat sources (electric bar fires, gas fires, etc.) in the vicinity of the product.
- Sleep: This product is not intended for prolonged periods of sleep. If your child needs to sleep, place them in a suitable cot or bed.
- Seat Cushion: Do not use the product without the seat cushion.
- Damage: Discontinue using the product if it becomes damaged or broken.
- Transformers: Transformers used with the infant swing must be regularly examined for damage to the cord, plug, enclosure, and other parts. If damaged, they should not be used.
- Recommended Transformer: The infant swing should only be used with the recommended transformer.
FALL HAZARD:
- Restraints: Always use restraints and adjust them to fit snugly.
- Lifting/Carrying: Never lift or carry the baby in the rocker.
- Usage Limit: Stop using the product when the baby starts trying to sit up or has reached 20 lbs, whichever comes first.
- Placement: Always place the rocker on the floor. Never use it on any elevated surface.
SUFFOCATION HAZARD:
- Soft Surfaces: Babies have suffocated when seats tipped over on soft surfaces.
- Avoid Soft Surfaces: Never use on a bed, sofa, cushion, or other soft surface.
- Supervision: Stay near and watch the child during use. This product is not safe for unsupervised use or unattended sleep.
CAUTION (Battery Safety)
This section provides detailed instructions for safe battery use to prevent leaks, burns, and eye irritation:
- Replacement: Always replace the entire set of batteries at one time.
- Mixing Batteries: Never mix old and new batteries, or batteries of different brands or types.
- Storage: Remove batteries when storing the product for a long time.
- Disposal: Dispose of used batteries immediately.
- Children's Reach: Keep batteries out of children's reach.
- Recommended Batteries: Only use recommended batteries or equivalents (volts and size).
- Polarity: Insert batteries with the correct polarity.
- Exhausted Batteries: Remove exhausted batteries from the product.
- Short-Circuiting: Do not short-circuit supply terminals.
- Rechargeable Batteries: Rechargeable batteries must be removed before charging and charged under adult supervision. Non-rechargeable batteries should not be recharged.
- Battery Leakage: Any battery may leak acid if mixed with a different battery type, inserted incorrectly, or if all batteries are not replaced or recharged at the same time. Do not mix alkaline, standard (carbon-zinc), or rechargeable (nickel-cadmium) batteries.
- Explosion Risk: Any battery may leak acid or explode if disposed of in fire or if an attempt is made to charge a battery not intended to be recharged.
- Charger Type: Never use a charger made for one type of battery to charge another type.
- Leaky Batteries: Discard leaky batteries immediately, as they can cause skin burns or other personal injury. Dispose of them properly according to state and local regulations.
- Long-Term Storage: Always remove batteries if the product will not be used for a month or more, as batteries left in the unit may leak and cause damage.
- Recommended Type: Recommended batteries are alkaline disposables, size C (LR14-1.5V). Never mix battery types. Change batteries when the product ceases to operate satisfactorily.
MAINTENANCE
- Regular Checks: This product requires regular maintenance to keep it in good working order. Regularly check all parts to ensure they are operating correctly and for signs of wear or damage.
- Replacement Parts: Only use replacement parts supplied or recommended by the manufacturer.
CLEANING
- Fabric: Refer to the care label on the product for specific cleaning instructions for fabrics.
- Metal/Plastic: Clean metal or plastic components with mild detergent and warm water.
- Avoid Harsh Cleaners: Never use abrasive, ammonia-based, bleach-based, or spirit-type cleaners.
- Drying: Ensure the product is fully dry before use or storage.
The manual concludes with contact information for customer service, encouraging users to reach out for assistance with missing or damaged parts, which will be shipped promptly. It provides email addresses for US, UK, and AU customer service.