EasyManua.ls Logo

Baby Trend Resort User Manual

Baby Trend Resort
26 pages
To Next Page IconTo Next Page
Page #1 background imageLoading...
Page #1 background image
PY72P
Resort Nursery Center
Instruction Manual
Manual de Instrucciones
Manuel d’instruction
PY72xxxP_3L_080316
www.babytrend.com
1-800-328-7363
(8:00am ~ 4:30pm PST)
www.babytrend.com
Baby Trend, Inc.
1607 S. Campus Ave.,
Ontario, CA 91761
www.babytrend.com
Read all instructions BEFORE assembly and USE of product.
KEEP INSTRUCTIONS FOR FUTURE USE.
Lea todas las instrucciones ANTES de armar y USAR el producto.
CONSERVE LAS INSTRUCCIONES PARA USO FUTURO.
Lisez toutes les instructions du manuel AVANT l’assemblage
ou L’UTILISATION de ce produit. CONSERVEZ CES
INSTRUCTIONS POUR RÉFÉRENCE ULTÉRIEURE.
WARRANTY
DO NOT RETURN YOUR PRODUCT TO THE STORE. PLEASE CONTACT BABY TREND
FOR REPLACEMENT PARTS, SERVICE AND REPAIR.
The Baby Trend
®
warranty covers workmanship defects within the rst 180 days of pur-
chase. Any product which has been subjected to misuse, abuse, abnormal use, excessive
wear and tear, improper assembly, negligence, environmental exposure, alteration or ac-
cident, or has had its serial number altered or removed invalidates all claims against the
manufacturer. Any damage to property during installation is the sole responsibility of the end
user. The Customer Service Department can be contacted at 1 (800) 328-7363 Monday
through Friday between 8:00am and 4:30pm (PST). Return Authorizations are required prior
to returning product(s) to Baby Trend
®
. Warranty only valid in North America.
GARANTIA
NO DEVUELVA SU PRODUCTO A LA TIENDA. POR FAVOR CONTACTE A BABY TREND
PARA PIEZAS DE REPUESTO, SERVICIO Y REPARACION.
La garantía de Baby Trend
®
cubre defectos de fábrica dentro de los primeros 180 días de
la compra.Cualquier producto que haya sido sometido a uso indebido, abuso, uso anormal,
desgaste excesivo, montaje incorrecto, negligencia, exposición ambiental, alteración o ac-
cidente, o que ha tenido su número de serie alterado o removido anula todos los reclamos
contra el fabricante. Cualquier daño a la propiedad durante la instalación es de la exclusiva
responsabilidad del usuario nal. El Departamento de Servicio al Cliente puede ser con-
tactado a 1 (800) 328-7363 Lunes a viernes entre 8:00am y 4:30pm (PST).Un numero de
autorizacion es requerido antes de la devolución de los producto(s) a Baby Trend
®
. Garantia
válida sólo en América del Norte.
GARANTIE
NE PAS RETOURNER VOTRE PRODUIT AU MAGASIN. VEUILLEZ CONTACTER BABY
TREND POUR DES PIÈCES DE RECHANGE, ENTRETIEN ET RÉPARATION.
La garantie Baby Trend
®
couvre les vices de fabrication dans les 180 jours suivant l'achat du
produit. Tout produit qui a été soumis à un usage abusif, une utilisation anormale, une usure
excessive, un montage incorrect, de la négligence, de l'exposition environnementale, de la
modication ou un accident, ou a eu son numéro de série modié ou supprimé annule toutes
les réclamations contre le fabricant. Tout dommage à la propriété lors de l'installation est de
la seule responsabilité de l'utilisateur nal. Le service client peut être contacté au 1 (800)
328-7363 du lundi au vendredi 8 h – 16 h 30 (PST). Une autorisation sera nécessaire avant
de retourner le produit à Baby Trend
®
. Garantie valable uniquement en Amérique du Nord.
*Toys and mobile may vary
*Los juguetes y el móvil pueden variar
*Les jouets et le mobile peuvent varier
Question and Answer IconNeed help?

Do you have a question about the Baby Trend Resort and is the answer not in the manual?

Baby Trend Resort Specifications

General IconGeneral
BrandBaby Trend
ModelResort
CategoryBaby & Toddler Furniture
LanguageEnglish

Summary

Warranty

Parts List

Safety Warnings

Product Inspection

Inspect for damage, loose parts, or sharp edges before assembly and each use.

Adult Assembly Required

Emphasizes that the product requires assembly by an adult.

General Safety Warnings

Never Leave Infant Unattended

Emphasizes constant supervision for child safety.

String Hazard

Warns about strangulation risk from strings and cords.

Discontinue Use Limits

Specifies age, height, or weight limits for product use.

Suffocation Hazards

Details risks of suffocation from gaps, bedding, and improper padding.

Care and Maintenance

Assembling the Playard

Unzip Bag and Remove Frame

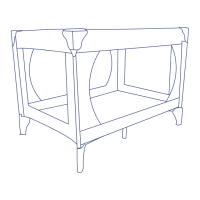
Initial step to unpack the playard and remove components.

Locking Top Rails

Instructions on how to properly lock the side rails into place.

Securing the Center Handle

Details on lowering the center handle after locking rails.

Placing the Mattress

Instructions for correctly positioning the playard mattress.

Folding the Playard

Releasing Mattress Fasteners

Steps to detach the mattress before folding.

Lowering the Center Handle

Process for manipulating the center handle for folding.

Unlocking Rails for Folding

Detailed steps for releasing the safety rails to fold.

Folding and Securing

How to fold the playard and secure it in the carry bag.

Assembling the Bassinet

Connecting Mattress Support Tubes

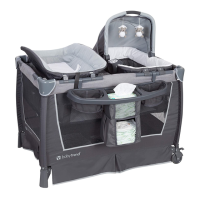
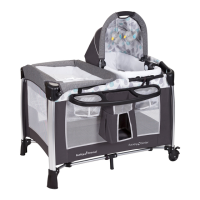
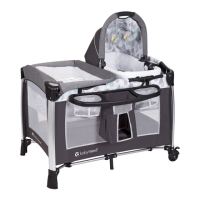
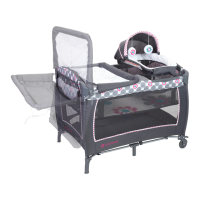
Steps for attaching the bassinet's support structure.

Securing Bassinet to Playard

How to attach the bassinet securely to the main playard.

Installing Bassinet Mattress

Instructions for placing the mattress inside the bassinet.

Removing the Bassinet

Assembling the Changing Table

Attaching Curved Bars

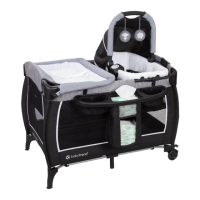
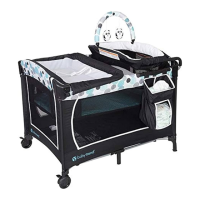
Steps to connect the support bars for the changing table.

Securing Clips and Pins

Details on how to properly attach and secure the changing table components.

Securing Changing Table to Playard

How to attach the changing table to the playard using fasteners.

Using the Changing Table Restraint System

Assembling the Parent Organizer

Positioning Organizer Hooks

How to correctly position and secure the organizer's hooks.

Attaching Organizer to Playard

Steps for attaching the organizer to the playard rails.

Assembling the Canopy and Napper

Attaching the Canopy

Steps to secure the canopy to the playard frame.

Adjusting Canopy Angle

Instructions for changing the canopy's angle.

Assembling the Napper Frame

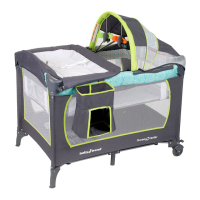
Detailed steps for constructing the napper's frame.

Securing Napper Clips

How to attach the napper's top clips and ensure they are locked.

Attaching Napper to Playard

Final steps to secure the assembled napper onto the playard.

Completed Napper Structure

Positioning Baby's Head

Guidance on the correct placement of the baby's head in the napper.

Related product manuals