Do you have a question about the Babyletto Lolly 3 9023 and is the answer not in the manual?
Critical safety information and warnings before assembling and using the product.
Information on assembly assistance, required tools, and product support resources.
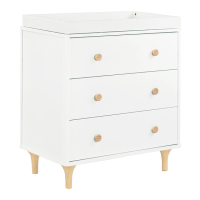
List of all main furniture components for the dresser assembly.
List of all components specifically for assembling the drawers.
Detailed identification of all screws, bolts, dowels, and other hardware pieces.
Instructions for attaching the dresser feet to the base panel using specified hardware.
Attaching the left and right side panels to the base using hardware.
Inserting dowels and cam bolts into the appropriate panels for structural connections.
Securing the side panels to the base using cam locks and bolts.
Attaching the back panel to the dresser frame for stability.
Inserting cam bolts into the top panel for connecting to side panels.
Connecting the top panel to the assembled side panels.
Assembling the sides, back, and bottom of the drawers.
Attaching the drawer front panel and the knob to the drawer assembly.
Mounting the drawer slide mechanisms onto the dresser's interior side panels.
Sliding the assembled drawers onto the installed drawer slides.
Ensuring drawer slides are properly attached to the drawer side panels.
Final steps to complete the main dresser structure.
Identification of all parts required for assembling the changing tray.
Identification of all hardware pieces needed for the changing tray assembly.
Joining the front and back panels of the tray using dowels and cam bolts.
Connecting the side panels to the front and back tray pieces.
Sliding the bottom panel into the tray frame.
Finalizing the tray structure by securing its components.
Attaching any necessary support hardware to the tray.
Securing the assembled tray onto the top of the dresser.
Identification of hardware components for the furniture anti-tip safety kit.
Instructions for attaching the anti-tip kit to walls with wood studs.
Instructions for attaching the anti-tip kit to walls without wood studs using anchors.
Attaching the safety strap to the back of the dresser.
Marking the precise location on the wall for the anti-tip kit attachment.
Drilling a hole and inserting a wall anchor if necessary.
Screwing the strap or bracket securely into the wall anchor or stud.
Confirming all anti-tip kit components are securely fastened.
Guidance on storing the manual and the maximum recommended weight for the changing table.
Critical warnings about fall hazards, child supervision, and safe practices.
Information on correct tray usage, surface requirements, and product limitations.
Details of the manufacturer's one-year limited warranty for the product.
Advice on proper storage conditions and cleaning methods for the furniture.
Step-by-step guide on how to safely secure a baby on the changing pad.
Information on how to register the product and order replacement or missing parts.
| Brand | Babyletto |
|---|---|
| Model | Lolly 3 9023 |
| Category | LCD Drawer |
| Language | English |