Do you have a question about the bancor LECTOR K2S and is the answer not in the manual?
This document provides instructions for use of the Bancor LECTOR K2S device.
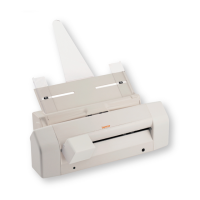
The LECTOR K2S is a multi-functional device designed for scanning, reading, and printing. It serves as a scanner/reader, capable of processing cheques and documents, and includes functionalities for reading smart cards and magnetic stripe cards. The device can be optionally equipped with a badge reader, smart card reader/writer, automatic document feeder (ADF), 4-line printer, magnetic head, and thermal printer, expanding its capabilities for various applications.
For cheque and document reading, the device accepts cheques introduced into a dedicated slot, with the front side facing the operator. For MICR cheques, the front side should face downwards, and the magnetic stripe should be towards the outer right side, with the short side inserted first. If an ADF is present, the paper guides should be aligned to the center.
For credit card usage, the device supports both smart cards and magnetic stripe cards. Smart cards are inserted with the chip facing upwards and towards the front, pushed all the way to the bottom of the device. Magnetic stripe cards are positioned with the magnetic stripe downwards and facing the operator, then slid from the right side of the reader step until they exit on the left side.
The optional 4-line printer allows for high-resolution logo and information printing on documents. The thermal printer is composed of a central body that provides access to the paper roll and the printing mechanism. A FEED button is available for manual paper advancement.
The device must be installed by qualified personnel following Bancor's instructions. Incorrect installation may cause damage to persons, animals, or property, for which the manufacturer is not responsible. The device's electrical safety is guaranteed only when correctly connected to the provided power supply. It should only be connected to the power supply provided with the device.
The LECTOR K2S is designed for specific purposes. Any other use is considered improper and dangerous, and Bancor disclaims responsibility for damages resulting from inappropriate use.
To read cheques, insert them into the designated slot, ensuring the front side faces the operator (Fig. 7). For MICR cheques, the front side should be facing downwards, and the magnetic stripe towards the outer right side. The cheque should be inserted short side first in a central position (Fig. 9). If an ADF is present, align the paper guides to the center.
Before loading paper into the ADF, thoroughly fan and tap the sheets to prevent them from sticking together (Fig. 10). If not fanned sufficiently, multiple sheets may be fed at once, causing paper jams. Ensure the paper guides are correctly positioned for the size of the loaded paper to avoid misfeeds or jams. It is recommended to load the first sheet alone, then add the rest.
To replace an empty cartridge:
The thermal printer has a central body with a door for accessing the paper roll and printing mechanism. The FEED button manually advances the paper. The external STATUS LED indicates the printer's status:
To replace the paper roll:
For original spare parts, cite the serial number located on the identification nameplate.
The packaging materials should not be left within reach of children, as they pose potential hazards.
The device is equipped with a specially developed cleaning KIT (Fig. 2) to remove dirt from the sensor glass. Additional cleaning kits can be purchased from Bancor or their website.
Fig. 1 illustrates how dirt deposits can cause vertical black lines on a white paper image. To clean, insert the cleaning cloth (like a regular sheet of paper) and run the cleaning procedure found in the "Scanner Cleaning" menu (instruments / scanner cleaning). Repeat as necessary.
For optimal maintenance, this cleaning procedure should be performed once a week.
Do not clean the device with corrosive products or steel wool. Bancor is not responsible for any damage caused by using cleaning solutions not provided by Bancor (cloths, liquids, etc.).
The cleaning KIT is intended for preventative maintenance, not corrective action. Its benefits are realized through regular use as indicated in this manual.
At the end of its life cycle, the physical demolition and disposal of the device's components (metallic, chemical-plastic, solid, and non-solid materials) must comply with the electronic waste collection systems and the WEEE directive (Directive 2002/96/CE).