Do you have a question about the B&Q PRH850C and is the answer not in the manual?
Read all safety warnings and instructions to prevent electric shock, fire, and serious injury.
Maintain a clean, well-lit area, avoid explosive atmospheres, and keep children and bystanders away.
Ensure proper plug/outlet matching, avoid grounded surfaces, protect from moisture, and handle cords safely.
Stay alert, use common sense, wear protective equipment, and prevent unintentional starting.
Lists numbered components of the rotary hammer for identification.
Explains common symbols and abbreviations used in the manual for safety and understanding.
Information on waste disposal and manufacturing date code.
Explanation of model number, brand, and power ratings as shown on the product label.
Steps for unpacking the product, checking contents, and preparing for assembly.
Instructions for mounting and adjusting the auxiliary handle for safe operation.
Procedure for cleaning, inserting, and removing SDS-Plus drill bits and chisels.
How to install and set the depth stop for controlled drilling depth.
Describes the power tool's purpose: hammer drilling and light-duty chiselling.
Pre-operation checks including protective equipment.
Introduces the rotation stop switch and its function.
How to set the rotation stop switch for different modes like hammer drilling or chiselling.
How to use the hammer stop switch in combination with rotation stop for various applications.
Explains how to turn the power tool on and off, and how speed depends on pressing depth.
Ensure correct drill bit, apply proper force, check handles and bits regularly.
Instructions for drilling wood, plastic, metal using a keyed chuck and SDS-Plus adapter.
Guidance for hammer drilling masonry, including inching mode and tile drilling.
Advice on selecting chisels, using shorter chisels, and planning chiselling routes.
Explanation of the clutch unit and how the torque limiter functions.
Steps for switching off, cooling down, disconnecting, and removing the drill bit.
How to clean the product using a dry cloth, brush, or compressed air.
Procedures for checking parts for wear and damage, and contacting service if needed.
When to check gear box lubrication, typically by an authorised service centre.
Instructions for replacing the power cord by manufacturer or authorized agent.
Detailed steps for wiring and fitting a UK plug correctly.
Advice on how to safely carry the product by its main handle and avoid cord use.
Instructions for storing the product in a dark, dry, frost-free, well-ventilated place away from children.
Table listing common issues like product not starting, low power, and solutions.
Guidance on proper disposal of waste electrical products for recycling.
Details the 1-year guarantee, what it covers, and common exclusions like misuse or wear.
Official declaration that the product complies with EU directives and harmonized standards.
This document provides original instructions for the PRH850C rotary hammer, a power tool designed for various drilling and chiselling tasks. It emphasizes safety, proper usage, and maintenance to ensure efficient operation and user safety.
The PRH850C is primarily intended for hammer drilling and light-duty chiselling in concrete, brick, and stone when equipped with SDS-Plus bits. It can also be used for coarse drilling operations in wood, wood-like materials, plastic, and metal with an optional keyed drill chuck. The tool's design incorporates features to enhance control and safety during operation.
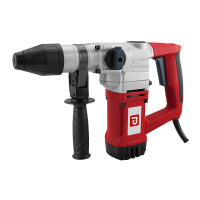
The rotary hammer features an SDS-PLUS drill chuck (1) for quick and secure bit changes, a chuck sleeve (2), and a rotation stop switch (3) with an unlocking button (3a) and position indicator (3b) to select different operating modes. It also includes a grease box cover (4), a main handle (5), an On/Off switch (6), a hammer stop switch (7), an auxiliary handle (8), and a depth stop (9).
Before operation, the product must be fully assembled. Users should unpack all parts, lay them on a flat, stable surface, and remove all packing materials. It is crucial to ensure all delivery contents are complete and undamaged. If any parts are missing or damaged, the product should not be used, and the dealer should be contacted. Appropriate personal protective equipment must be worn during assembly.
The auxiliary handle (8) is essential for all work with the machine and must always be mounted. To adjust it, turn it anti-clockwise to loosen, position it as needed, and then turn it clockwise to clamp it firmly on the spindle collar. No modifications should be made to the auxiliary handle.
For inserting drill bits or chisels (Fig. B), the shank end of the SDS-Plus bit should be cleaned and lightly greased. The chuck sleeve (2) is pulled backward and held in position while the SDS-Plus drill bit/chisel is inserted completely, combining inserting and rotational motion to find the proper position. Releasing the chuck sleeve (2) secures the bit. To remove, pull the chuck sleeve (2) backward and pull the bit out. It's important to note that the chuck and drill bits can become very hot after use, so assembly/disassembly should only occur after cooling down.
The depth stop (9) (Fig. C) is inserted through the hole in the auxiliary handle (8) after loosening the handle. It should be turned to a radial position so that the tips of the drill bit and depth stop have the smallest radial distance. The depth stop is then aligned with the drill bit tip in the axial direction and pulled back to achieve the desired drilling depth "X". The depth stop is only for indication and cannot withstand a large pressing force; feeding speed should be slowed down as the target depth is approached to prevent damage.
Before starting, ensure the correct drill bit is inserted, and all controls are in the correct position. The product should be held perpendicular to the drilling point to prevent slipping or jamming. The drill tip should be placed directly on the drilling point before switching the product on.
The rotation stop switch (3) and hammer stop switch (7) control the operating modes. Mode settings should only be changed when the product is switched off and has come to a complete stop. The mode selector must be adjusted to the correct position for the intended operation, avoiding any intermediate positions.
The hammer stop switch (7) is turned to the proper position for the desired application. The combination of rotation and hammer stop switch positions determines the application:
For drilling into wood, wood-like materials, plastic, or metal, a suitable keyed drill chuck with an SDS-PLUS adapter (not provided) can be used. The machine should be set to "drilling without hammering" mode, and the keyed drill chuck with SDS-PLUS adapter inserted into the SDS-PLUS chuck. A suitable drill bit is then attached to the keyed drill chuck. Punching the drilling point before operation helps prevent slipping. A metal drill bit and cooling lubricant should be used for drilling into plastic and metal.
For hammer drilling, masonry should generally be drilled at maximum speed. However, during the initial seconds, the drill bit may deviate due to hammer action. To prevent this, an "inching mode" (lightly pressing the On/Off switch) should be used until the drill bit is well seated. Special care is needed when drilling tiles, as hammer drilling can damage them. A special tile drill bit with drill mode (without hammer function) should be used to drill through the tile first, then switch to hammer drilling for the brick/concrete behind.
For chiselling, a suitable SDS-Plus chisel should be chosen, with shorter chisels used for greater striking power. The chiselling route should be marked, and work should start near the edge, proceeding inwards.
The product includes a torque limiter, which activates automatically when a certain torque is reached, stopping the attachment to prevent wear or damage. If this occurs, release the on/off switch and remove the attachment from the drill chuck.
After use, the product should be switched off, allowed to come to a complete stop, disconnected from the power supply, and allowed to cool down before removing the drill bit.
Regular care and maintenance are crucial for the product's longevity and safe operation. Always switch off the product, disconnect it from the power supply, and allow it to cool down before performing any inspection, maintenance, or cleaning. Only perform maintenance according to these instructions; all other work should be done by a qualified specialist.
The product should be cleaned with a dry cloth, using a brush for hard-to-reach areas. The chuck, switches, and air vents should be cleaned after every use. Stubborn dirt can be removed with high-pressure air (max. 3 bar). Worn or damaged parts should be replaced or repaired by an authorised service centre. Chemical, alkaline, abrasive, or aggressive detergents should not be used for cleaning as they can harm the surfaces.
Before and after each use, the product and accessories should be checked for wear and damage, and replaced if necessary. The lubrication of the gearbox behind the grease box cover (4) should be checked by an authorised service centre or a qualified specialist if the hammering force noticeably reduces.
General power tool safety warnings emphasize keeping the work area clean and well-lit, avoiding explosive atmospheres, and keeping children and bystanders away. Electrical safety includes matching power tool plugs to outlets, avoiding body contact with earthed surfaces, and not exposing power tools to rain or wet conditions. The cord should not be abused, and an RCD-protected supply should be used in damp locations.
Personal safety involves staying alert, using common sense, and not operating the tool while tired or under the influence. Personal protective equipment, including eye protection, ear protectors, dust masks, non-skid safety shoes, and hard hats, should always be worn. Unintentional starting should be prevented by ensuring the switch is off before connecting to power or handling the tool. Adjusting keys or wrenches must be removed before turning the tool on. Proper footing and balance should be maintained, and loose clothing or jewellery should be avoided. Dust extraction and collection facilities should be used if provided.
For rotary hammers specifically, auxiliary handles must be used, and the tool should be held by insulated gripping surfaces when cutting accessories may contact hidden wiring. The SDS drill has a safety clutch mechanism that activates if the drill bit jams, but users must resist initial forces by securely holding the drill with both hands. The front and rear handles must be firmly held. The drill should always be used on a firm and secure platform, not on ladders or steps. The drill should never be started with the core or drill jammed, and users should not stretch or drill above shoulder height or below knee height. Drilling holes above the maximum size declared in the manual is not recommended.
The power tool should not be wet or applied in wet environments. The voltage of the power source must match the nameplate. The product, power cord, plug, and accessories should be checked for damage before each use. Accessories and attachments must be properly fixed. Suitable detectors should be used to locate hidden utility lines. The workpiece should be secured, and handles kept dry. The drill bit, chuck, and workpiece can become very hot and should not be touched until cooled. Air vents must remain unobstructed and clean.
The power tool should be switched off immediately if the drill bit jams or if disturbed by others entering the work area. Users should take regular breaks and always keep the power cord behind the tool.
Additional safety warnings address construction dust, particularly silica, wood, and gypsum dusts, which can cause lung cancer, silicosis, and chronic obstructive pulmonary disease (COPD). Users are advised to reduce cutting, use less powerful tools, and employ different work methods to minimize dust exposure. Approved safety equipment, such as dust masks designed to filter microscopic particles, and dust extraction facilities should always be used.
The European Physical Agents (Vibration) Directive aims to reduce hand-arm vibration syndrome (HAVS). Users are advised to limit operating time, use low-vibration modes, and wear personal protective equipment. Factors influencing vibration emission include the materials being worked on, the tool's condition, the use of correct and sharp accessories, and the tightness of gripping handles. To minimize vibration exposure, users should always use sharp chisels, drills, and blades, maintain the tool, keep it well lubricated, and avoid using tools in temperatures below 10°C. Work schedules should be planned to spread high-vibration tool use over several days. Health surveillance is recommended for employees to identify vibration-related diseases early.
Even with adherence to safety requirements, potential risks remain, including health defects from vibration emission, injuries from broken attachments or sudden impacts with hidden objects, and property damage from flying objects or poor power tool accessories. The product produces an electromagnetic field that may interfere with active or passive medical implants; persons with such implants should consult their doctor and the manufacturer before operating the product.
When transporting the product, it should always be carried by its main handle, never by the cord. The product should be switched off, disconnected from the power supply, and the drill bit removed. It should be protected from heavy impact or strong vibrations during transport and secured to prevent slipping or falling.
For storage, the product should be switched off, disconnected from the power supply, and cleaned. It should be stored with its accessories in a dark, dry, frost-free, well-ventilated place, inaccessible to children, ideally between 10°C and 30°C. The original package or a suitable cloth/enclosure should be used to protect it against dust.
| Power Source | Corded Electric |
|---|---|
| Chuck Type | Keyless |
| Maximum Drilling Diameter in Steel | 13 mm |
| Power | 850 W |
| No Load Speed | 0-3000 RPM |
| Chuck Size | 13 mm |
| Voltage | 230 V |
| Impact Rate | 0-48000 BPM |
| Cable Length | 2 m |