EasyManua.ls Logo

Barker 25895 - User Manual

Barker 25895
2 pages
Print Icon
To Next Page IconTo Next Page
Loading...
TOTE-ALONG OWNER'S INSTRUCTIONS
25 GALLON - P/N 25895
**Contents: Instructions, warranty
card, tow handle, pin for handle, black
square cap for handle, 1 grey filler
hose, 1 bobber gauge, 2 bayonet
hose adaptors, 2 hose clamps, 1
garden hose cap, 1 gasket for garden
hose cap, 2 - 3" caps, 2 straps for
caps, and 1 sewer hose.
Step 1 - Take everything out of
the box (tank and hardware bag
and handle).
Step 2 - Take everything out of
the plastic bag.
Step 3 - Attach tow handle (be
sure the handle is turned the
correct way--with the loop facing out or away from tank, so the handle will lean against tank when it is attached). Attach square black
plastic cap to tow handle.
Step 4 - Put sewer hose onto adaptors and tighten with clamps. (This is the hardest thing hardest part of putting your tank together.)
To make your life easier and less muttering under your breath, take a hair dryer, heat the hose slightly. The hose will expand to make
the connection simpler. You can do it without a hairdryer, but you may break a nail and it takes some time and patience.
Once you
get one adaptor end on, put the two silver hose clamps onto hose and then attach the other adaptor. That way you won't have to
unscrew the hose clamp to insert it around the hose. Now, tighten the hose clamp at the base of the adaptor and hose. (You can use
a coin to tighten, if you don't have a screwdriver handy.)
Step 5 - Attach one end of the rubber strap to 3" cap(s) and attach the other end of rubber strap to tank (one on side at valve and one
on top). Close caps on tank for transporting. When you take the caps off to attach 3" adaptor/sewer hose assembly for emptying,
you will still have your transport caps at hands reach.
OVER PLEASE
Tow handle
with pin
attached.
Attach tow handle
with pin.
Attach black cap.
Completed
sewer hose
assembly
3" cap with
strap attached--
top of tank
3" cap with
strap attached--
side valve
25 Gallon Tote
out of box.
Contents of hardware bag ** and tow handle.
Tow handle attached
to tank
Question and Answer IconNeed help?

Do you have a question about the Barker 25895 and is the answer not in the manual?

Summary

TOTE-ALONG OWNERS INSTRUCTIONS

Unpacking and Initial Setup

Instructions for removing the tank, hardware bag, and handle from the box and plastic bag.

Attaching the Tow Handle

Guide on correctly attaching the tow handle and securing the black plastic cap.

Connecting the Sewer Hose

Detailed instructions for attaching the sewer hose to adaptors, including tips for easier connection.

Securing Transport Caps

How to attach rubber straps to 3" caps and secure them to the tank for transport.

Using the Tote-Along

Attaching Garden Hose Cap

Instructions for attaching the garden hose cap for filling the tank.

Tank Filling and Emptying

Guidance on using the bobber gauge, attaching the sewer hose, and emptying the tank at a dump site.

Important Usage Notes

Critical safety and maintenance information regarding towing speed and tire inflation.

Overview

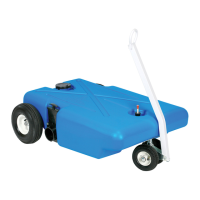
This document provides owner's instructions for the Barker Tote-Along 25 Gallon portable waste tank, P/N 25895. It details the assembly, usage, and maintenance of the device.

Function Description:

The Barker Tote-Along 25 Gallon is a portable waste tank designed for recreational vehicles (RVs) to collect and transport grey and black water waste to a dump station. It allows RV users to empty their holding tanks without having to move the entire RV. The tank is equipped with wheels and a tow handle for easy transport, and it includes various fittings for connecting to an RV's waste valve and for emptying at a dump station.

Important Technical Specifications:

  • Capacity: 25 Gallons (also available in 32 and 42-gallon versions, though this manual specifically covers the 25-gallon model).
  • Part Number: P/N 25895.
  • Wheels: Features pneumatic tires, with 6-inch front wheels and 10-inch rear wheels, for easier maneuverability.
  • Connections: Includes 3-inch adaptor assemblies for connecting to RV waste valves, a 3/4-inch filler hose assembly for rinsing, and a 5-foot sewer hose.
  • Valves: Equipped with a 3-inch waste valve for controlled emptying.
  • Gauge: Includes a bobber gauge to indicate tank fullness.
  • Materials: The tank is made of durable plastic, and various fittings are made of rubber, metal, and plastic.

Usage Features:

  • Assembly:
    • Initial Setup: Unpack the tank, hardware bag, and tow handle.
    • Tow Handle Attachment: Attach the tow handle to the tank, ensuring the loop faces away from the tank so it leans against the tank when attached. Secure with a pin and attach the black square cap to the handle.
    • Sewer Hose Assembly: This is described as the "hardest part." It involves attaching the sewer hose to two 3-inch adaptors. The manual suggests using a hair dryer to slightly heat the hose to make it more pliable and easier to connect. Once the hose is on the adaptors, secure it with two silver hose clamps, tightening them at the base of the adaptor and hose (a coin can be used if a screwdriver is not handy).
    • Cap Straps: Attach one end of the rubber strap to each 3-inch cap and the other end to the tank (one on the side valve and one on top). This keeps the transport caps handy when the main adaptors are removed for use.
  • Operation at Campsite:
    • Connecting to RV: Ensure the side valve on the Tote-Along is closed and the 3-inch cap is securely attached. Attach the reassembled sewer hose to the top of the Tote-Along tank and the other end to the RV's waste valve.
    • Filling the Tank: Open the RV's waste valve (handle pulled UP) to allow waste to flow into the Tote-Along. The bobber gauge will indicate when the tank is full.
    • Transporting: Once full, remove the sewer hose from the RV and the Tote-Along. Attach the 3-inch cap to the top of the Tote-Along. Hook the tow handle to a hitch ball on a car, golf cart, or bike for transport to the dump station.
    • Emptying at Dump Station: At the dump station, attach one end of the sewer hose to the side of the Tote-Along and the other end to the dump station. Remove the garden hose cap or bobber gauge for ventilation. Open the valve on the side of the tank (handle pulled UP) to empty the contents.
    • Rinsing: After emptying, attach a grey water hose (or the filler hose assembly) to the garden hose filler on the Tote-Along and connect it to a water supply at the dump station to rinse the tank.
    • Post-Use: After rinsing, replace both 3-inch caps on the tank and store accessories.
  • Bobber Gauge: Provides a visual indication of the tank's fill level ("Empty tank" vs. "Full tank—time to empty").

Maintenance Features:

  • Tire Inflation: The pneumatic tires may require periodic air inflation. The manual recommends using a bicycle air pump and warns against over-inflating with an air compressor, which could damage the tire tubes.
  • Cleaning: The tank can be rinsed with water after emptying to maintain cleanliness.
  • Part Replacement: The manual includes a detailed parts list with item numbers, part numbers, required quantities, and descriptions, facilitating the identification and replacement of components if needed. Key parts include adaptor assemblies, spindle assembly, tow bar, axle support, hose clamps, caps, sewer hose, wheels, waste valve, and gaskets.
  • Warranty: The instructions mention a warranty card is included, implying that proper usage and maintenance are important for warranty coverage.

Important Notes:

  • Towing Speed: Do not tow the tank faster than 5 mph (or walking speed). Exceeding this speed can damage the tank or wheels and will void the warranty.
  • Hose Connection Tip: Heating the sewer hose slightly with a hair dryer can make it easier to connect to the adaptors, preventing potential nail breakage and making the process smoother.
  • Clamp Tightening: Hose clamps can be tightened with a coin if a screwdriver is not available.

Barker 25895 Specifications

General IconGeneral
BrandBarker
Model25895
CategoryAutomobile Accessories
LanguageEnglish

Related product manuals